Fluffy Bunny Tail Project Tutorial


Welcome to the March Stitch Along Project
This guide will walk you through all of the steps and techniques used to stitch this pattern. The information in this guide is merely a suggestion so please feel free to make changes to colors, stitches or techniques to make it your own. There is no right or wrong way to stitch this pattern, so relax and have fun!
You will need:
- Fabric
- Sharp Scissors
- Embroidery Needles
- 6" Embroidery Hoop
- Embroidery Floss or Thread
- Fluffy Bunny Tail Pattern, Fabric or Kit
Iron and Ironing-board or Equivalent
Floss Colors
- Carrots - Orange
- Carrot Tops - Green
- Dirt - Brown
- Rabbit - Blue or Tan
Or colors of your choice
Stitches Used in this Project

To complete the Back Stitch
Start on the back side of the fabric and bring your needle up through the fabric at 1 then down through at 2. Bring your needle up through at 3 and back down at 4 in the same hole as 1. Each stitch is made by moving forward on the back side then back to the previous stitch on top.

To complete the Fill Stitch
Use the long and short stitch to fill large shapes. You can use one color or multiple for different shading. Starting at the top or bottom of a shape, create a row of parallel stitches varying the length. Next work a second row of long stitches into the short stitches of the first row, passing the needle through the stitch above. Continue working rows until the shape is filled.
When filling circles be careful not to go to far out on the sides or the circle will start to look more oval. If you are having trouble keeping your stitches straight, use a ruler to draw parallel lines in.
When filling circles be careful not to go to far out on the sides or the circle will start to look more oval. If you are having trouble keeping your stitches straight, use a ruler to draw parallel lines in.

To complete the Stem Stitch
Start on the back side of the fabric, bring your needle up through the fabric at 1 then down through at 2. Then holding your first stitch to the side slightly bring your needle up at 3 being careful not to pierce the first stitch. Then go down at 4 to make your next stitch. Your stitches will overlap slightly. Stay consistent by always bringing your needle up on the same side of the stitch.

To complete the Split Stitch
Start on the back side of the fabric and bring your needle up through the fabric at 1 then down through at 2. Bring your needle up through at 3 stitching through the previous stitch piercing the strands of floss. Create another stitch by bringing your needle down at 4 and up at 5 repeating the process.

Turkey Work is used to make bushy carrot tops
Instructions below

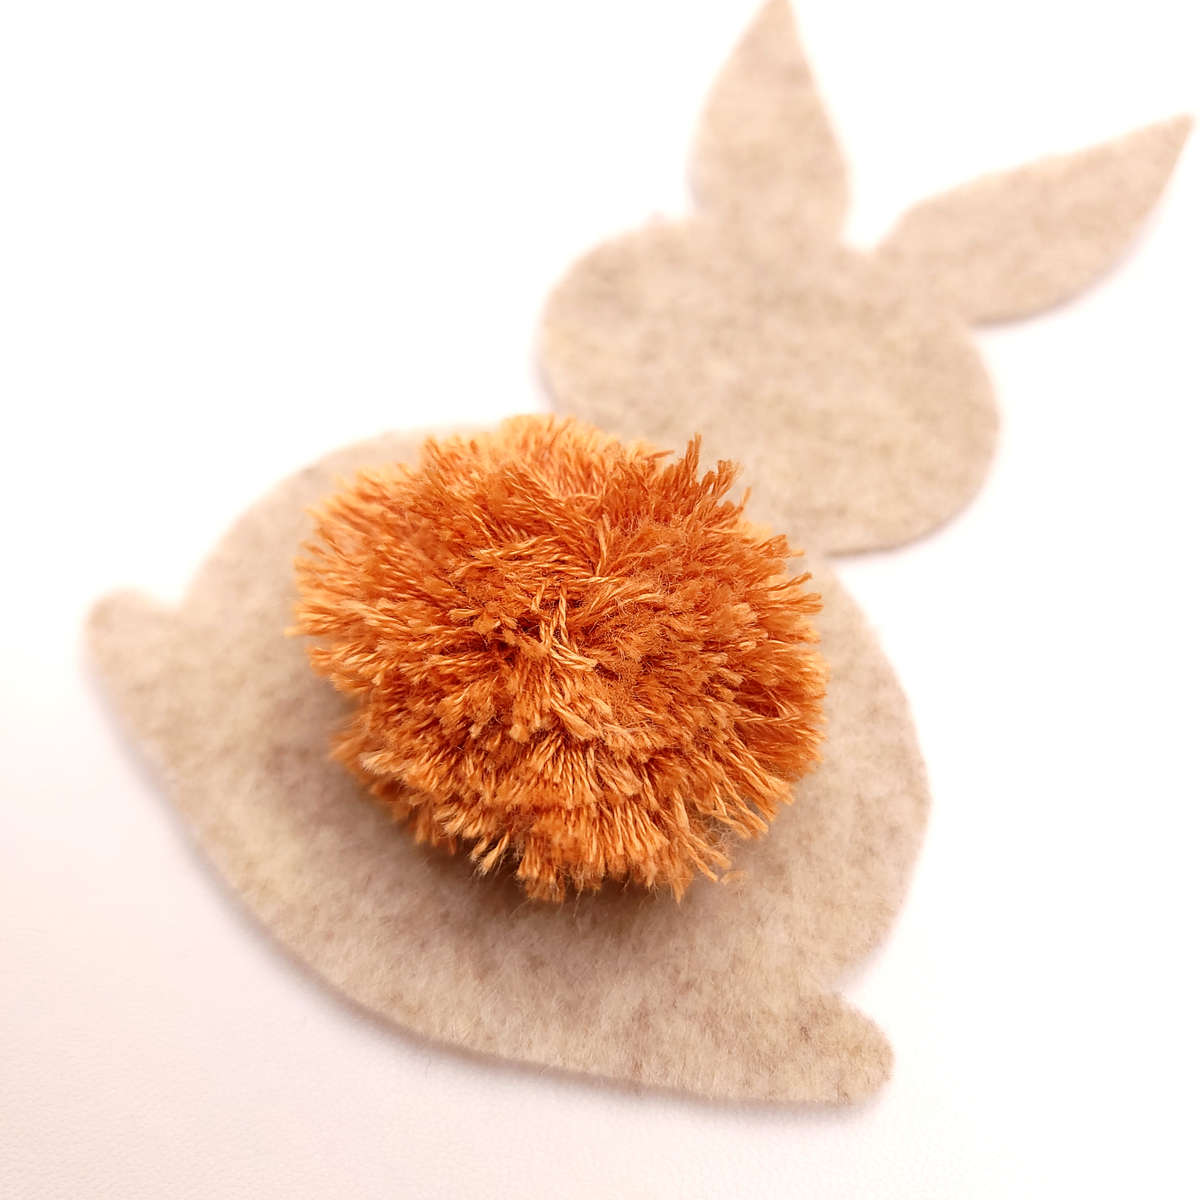
A pompom made out of floss makes the perfect fluffy tail
Step-by-step instructions for creating a pompom are available at the bottom of page. Click here to go to the instructions.
----- Let's get Started! -----
Before you start stitching be sure your fabric is pressed and free of wrinkles or creases. Hoop your fabric and let's get stitching.
Two different kits are available for this stitch along. If your kit includes a stick-and-stitch pattern, start here. If not, you can move on to Step One. (If the pattern is printed on the fabric, you don't have a stick-and-stitch pattern.)
Stick-and-stitch patterns are printed on a Sulky water-soluble stabilizer. This stabilizer has a light adhesive back that sticks to the fabric. After stitching the design, remove the stabilizer from the fabric by soaking it in water.
To use a stick-and-stitch pattern, start by trimming away any excess stabilizer. Then, remove the backing from the stick-and-stitch pattern. With the sticky side down, center the pattern in the hoop and press it against the front of the fabric.

Trim away the excess stabilizer
Trimming off excess stabilizer helps with pattern placement. It also speeds up the rinsing process.

Stick the pattern to the fabric
Peel the paper backing off of the stabilizer. Place the stabilizer sticky side down on the front of the fabric. The pattern can be lifted and repositioned if necessary.
Tips for Stitching on Sulky Water Soluble Stabilizer
More detailed instructions are provided below but here are a few tips for working with water soluble stabilizer.
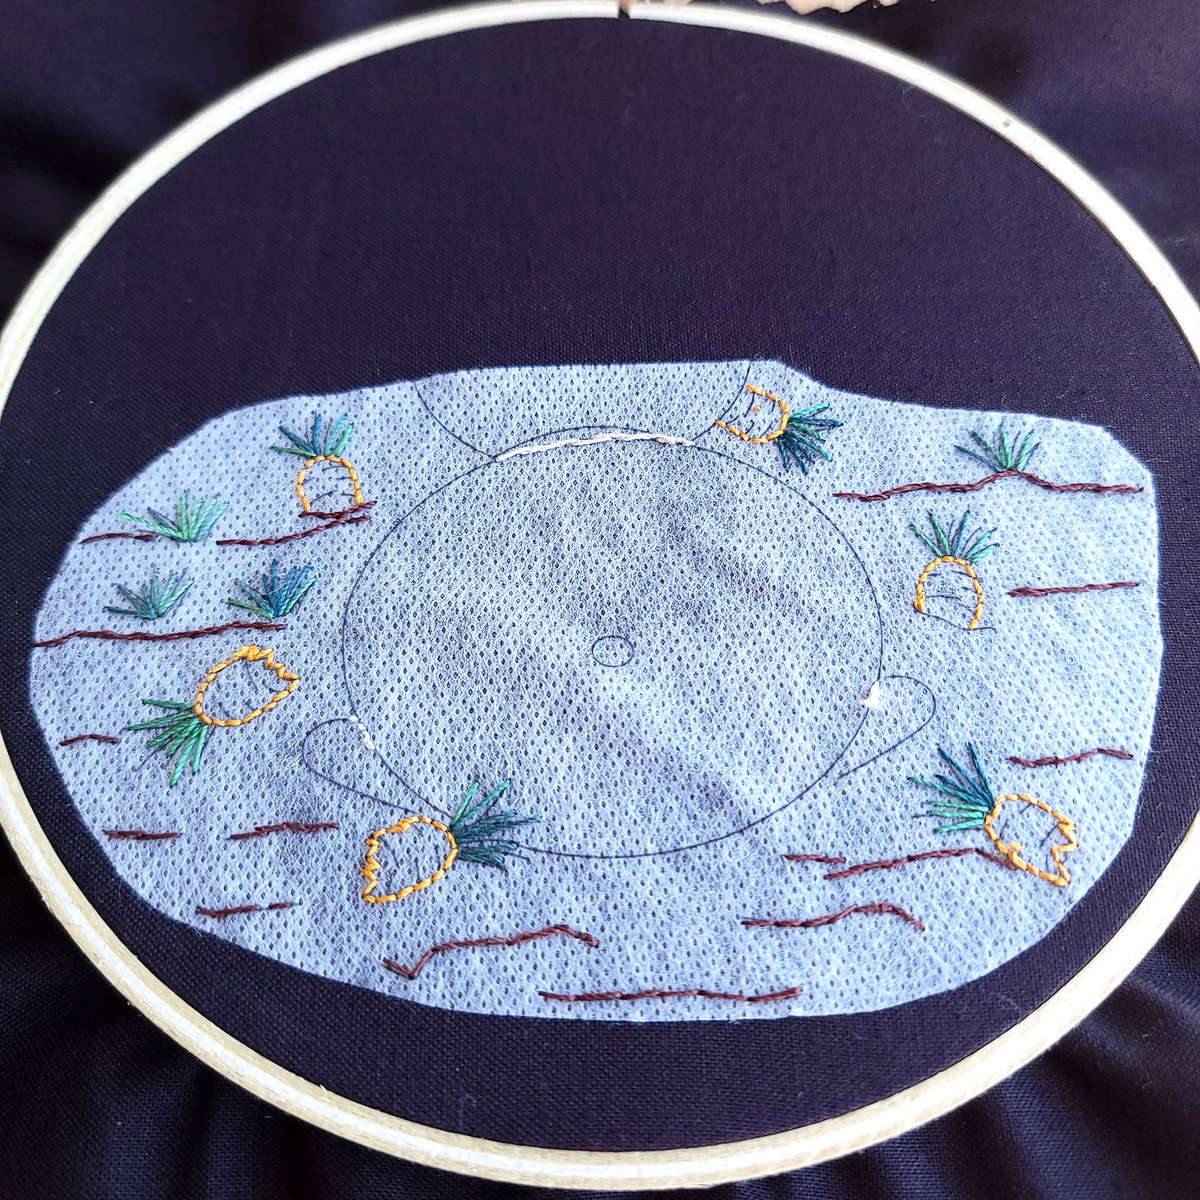
- The adhesive on stick-and-stitch stabilizer is very light. To keep the pattern from shifting add a few small stitches in the center and/or near the edges. Try to pick areas were these small stitches are part of the design, or can be removed, or hidden later. On This pattern I used the rabbit since that area will be covered by applique later.
- Outline your pattern with stitches, then rinse the stabilizer away before adding any applique or fill stitches. This is not crucial, you can stitch the entire design over top of the stabilizer. However, the stabilizer does create a space between the stitches and the fabric. Once the stabilizer is removed there is a tiny gap between your stitches and the fabric. I find removing the stabilizer before you add fill stitches will keep your stitches tighter and smoother. It also speeds up the rinsing process.
- The pattern fully disappears when washed away so be sure you have stitched an outline or marked every part of the pattern you want in your final piece before you rinse the fabric.
- Cut away any unstitched stabilizer before you rinse with water. Again, this is not required, but cutting away the stabilizer speeds up the rinsing process. I decided I didn't need to outline the rabbit for the applique placement, so I removed an unstitched area of stabilizer before rinsing. If you are not using an applique piece for the rabbit be sure to outline the rabbit in stitches before removing the stabilizer.
- You may need to rinse your fabric more than once. If any stiffness remains after the fabric is dry, repeat the rinsing process.
- If your needle becomes sticky from the adhesive, unthread your needle and clean the needle with dish soap and warm water or rubbing alcohol.
Full instructions for Sulky Printable Stabilizer can be found at wildflowerfox.com/pages/sulky-sticky-fabri-solvy-stabilizer
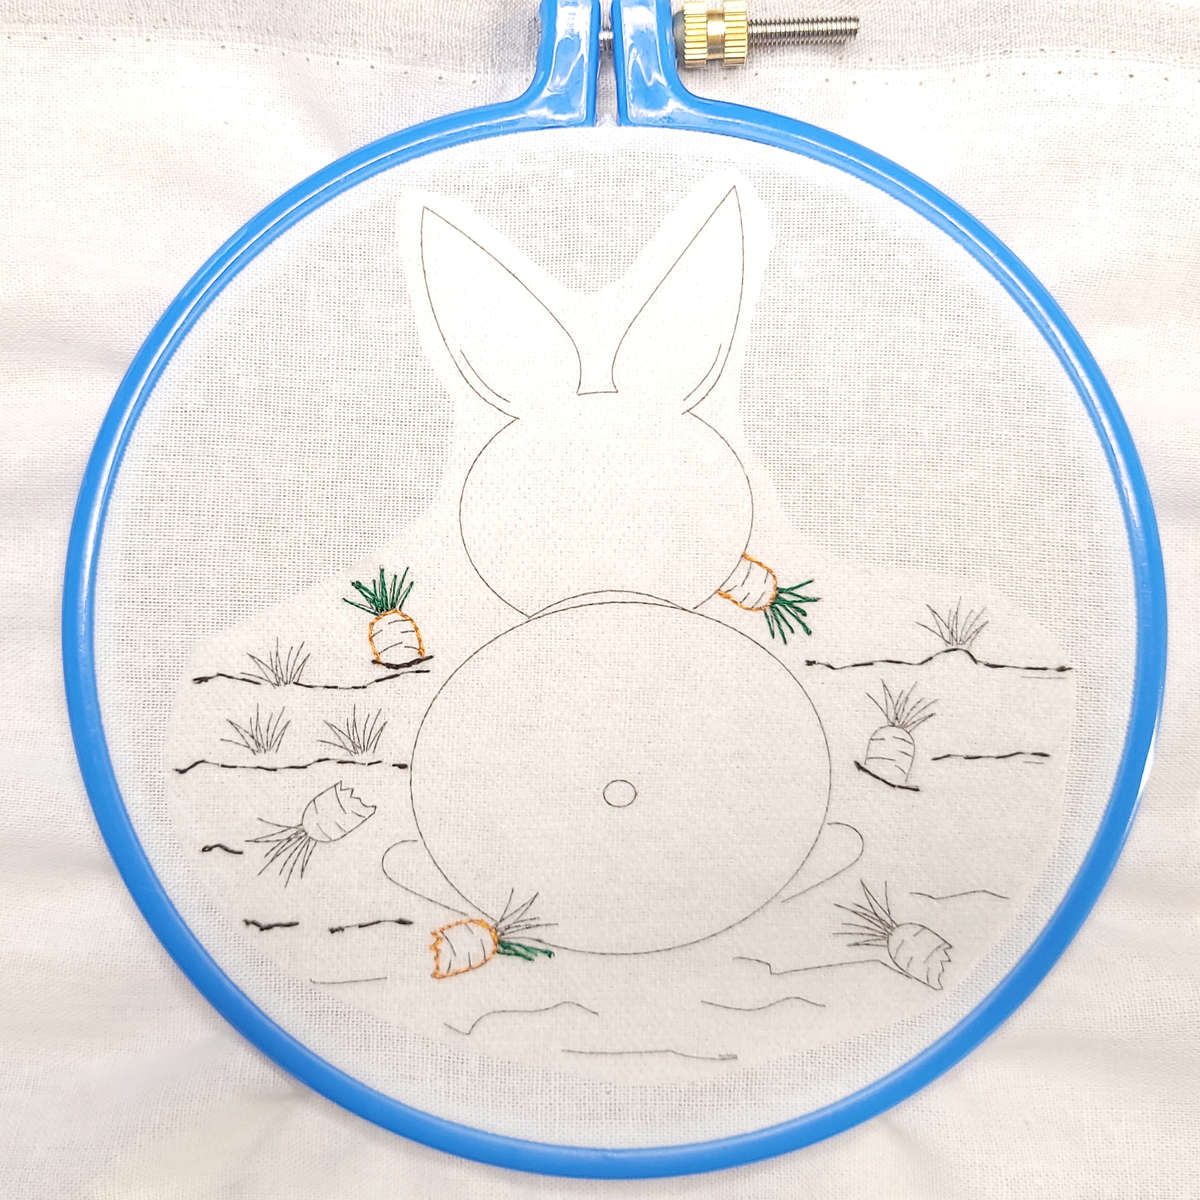
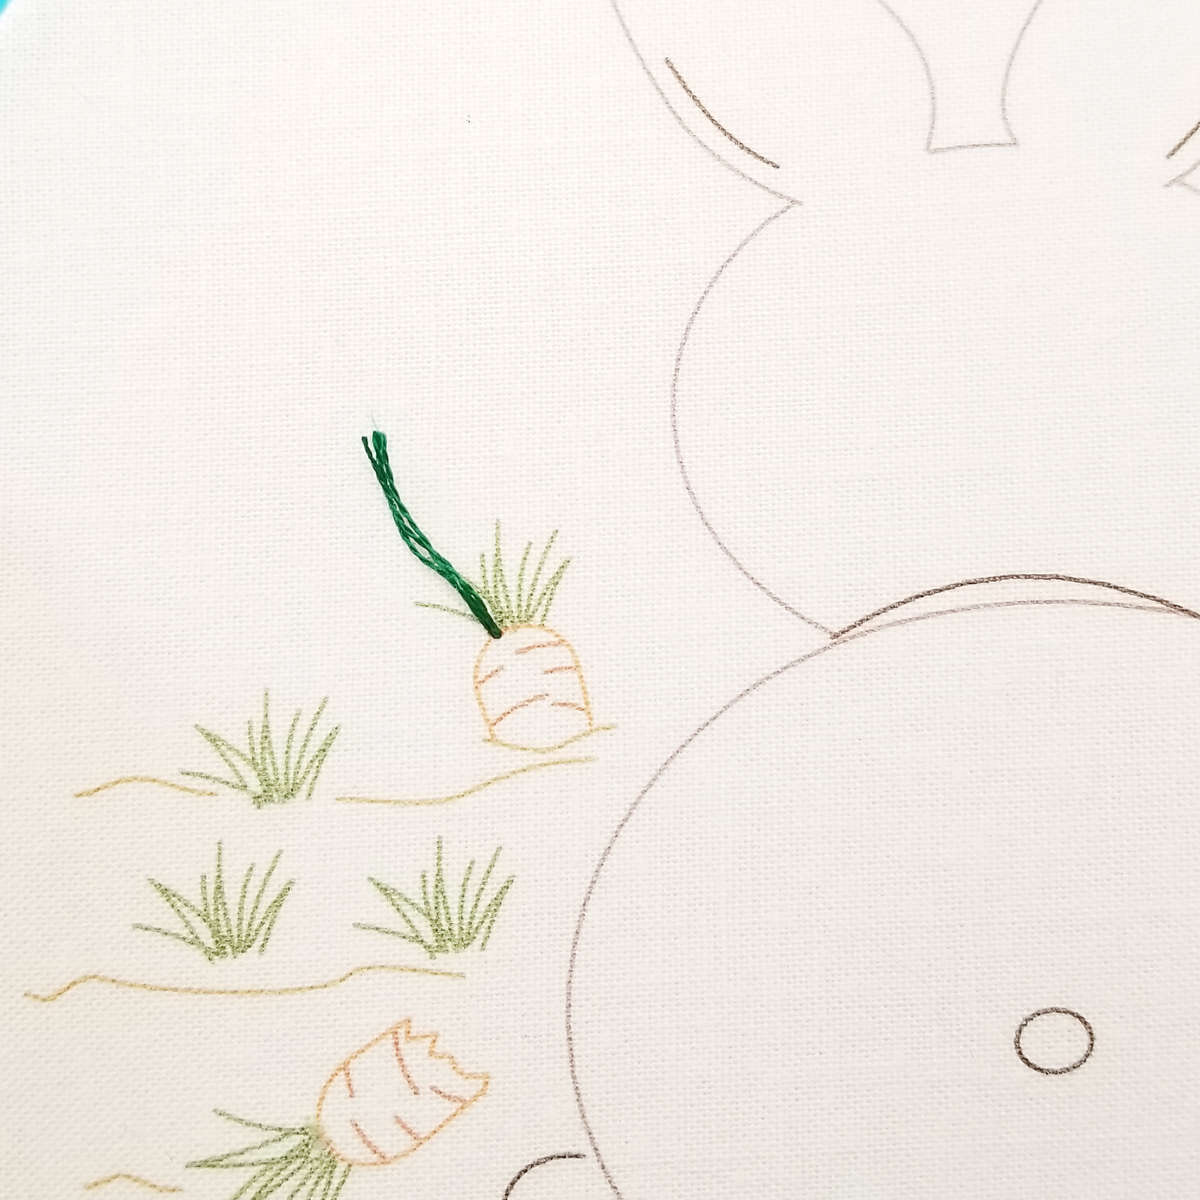
Outlining the Print and Stitch Pattern
Start by outlining the carrots with a back stitch in one strand of orange. Then, using long single stitches, stitch the carrot tops in one strand of green floss.
Next, using one strand of brown floss stitch a simple line for the dirt with your preferred outline stitch. These lines are just to mark the fabric. I used a running stitch, but the back stitch, split stitch or stem stitch will all work. You will be adding more stitches later to give the dirt a bit of texture. You can also add or omit dirt lines.
If you are using an applique for the rabbit, I don't recommend outlining the rabbit. The rabbit applique is easy to place without an outline.
If you are NOT using an applique for the rabbit be sure to outline the rabbit before you rinse away the stabilizer.
When all of the necessary parts of the design have been marked by stitches, unhoop your fabric and begin rinsing the stabilizer away.
Start by carefully cutting away the excess stabilizer. Remove any that remains by submerging and agitating the project in warm water for 2 to 3 minutes or use your kitchen spray hose or faucet by holding the project at an angle under the running water; rinse from top to bottom to be sure all the ink is flowing away from your project. Rinse thoroughly. Air dry on a towel. If any stiffness remains after it is dry, simply repeat the process.
• While the fabric is drying, cut out the rabbit applique.
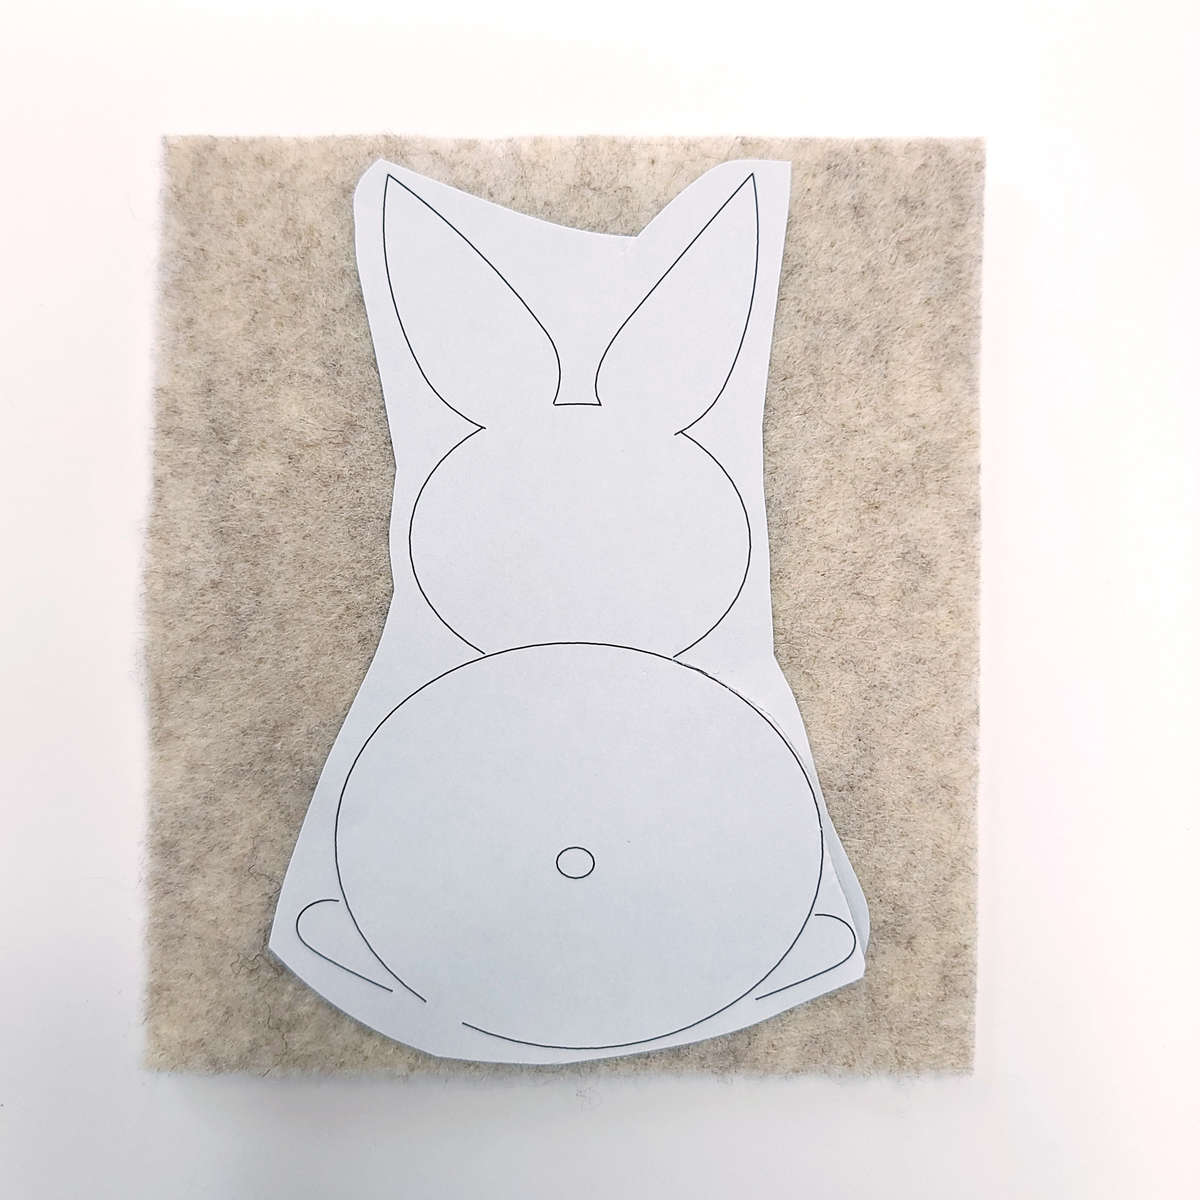
Bunny Applique Sticker
To use the outline of the rabbit sticker, remove the backing, and center it on the tan piece of felt. Stick it to the felt.

Cut Out Bunny Applique
With scissors, cut out the rabbit shape.
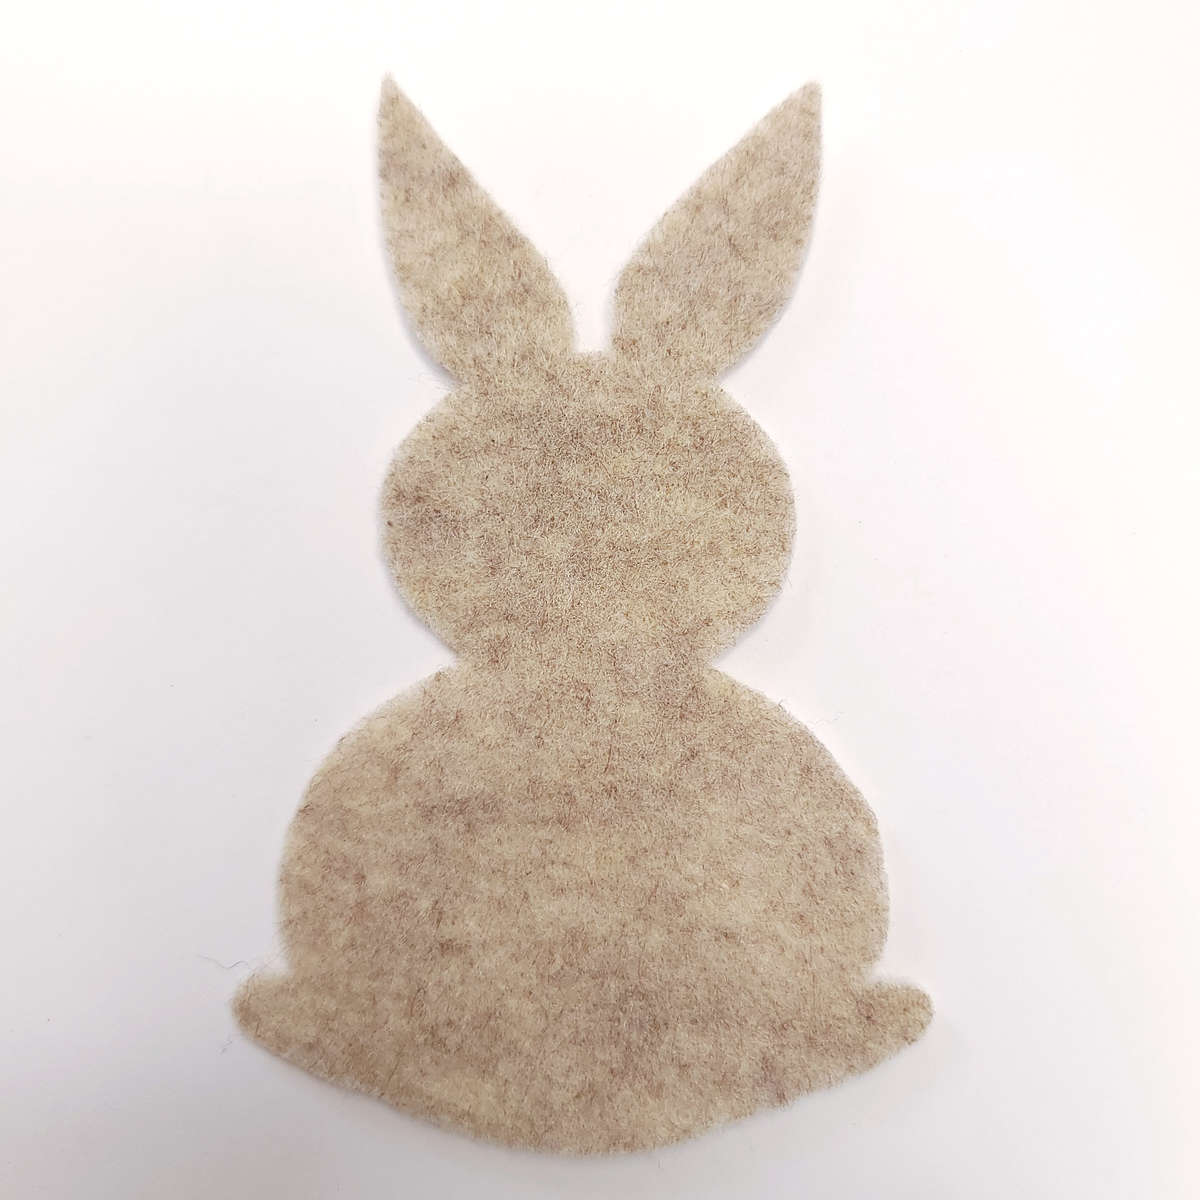
Felt Bunny Applique
Once the rabbit shape is entirely cut out, remove the sticker. The sticker is no longer needed.
Step One - The Bunny
Step One - The Bunny (no applique)
Use these instructions if you are not using an applique
6 strand / Split Stitch
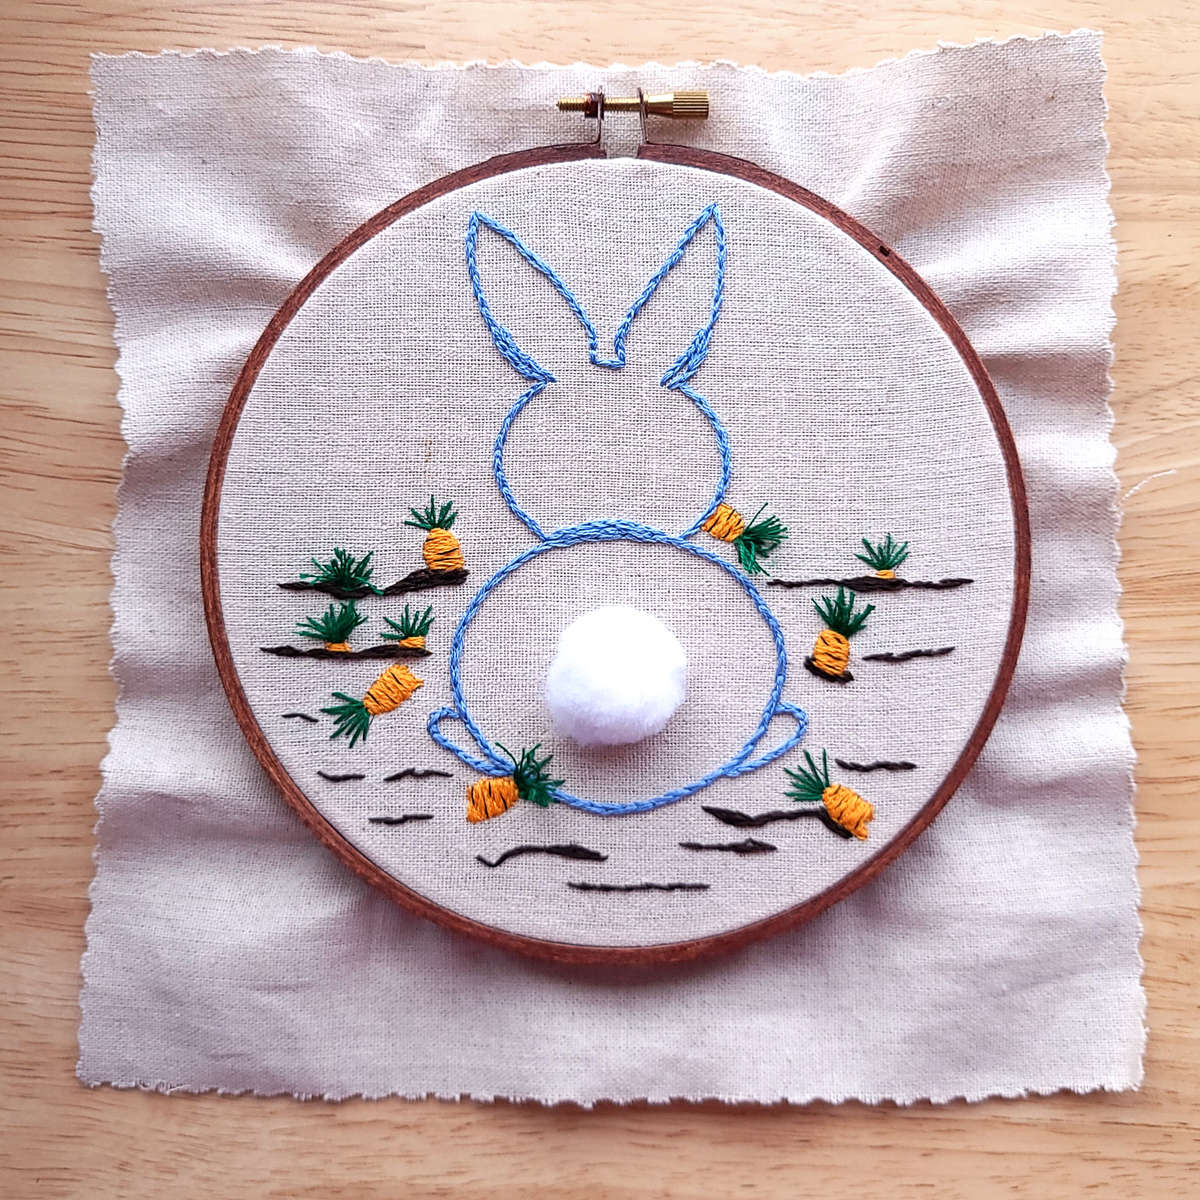
Start by outlining the Bunny. Use two or more strands of floss in the outline stitch of your choice. The example image was created using 6-strands in a split stitch.
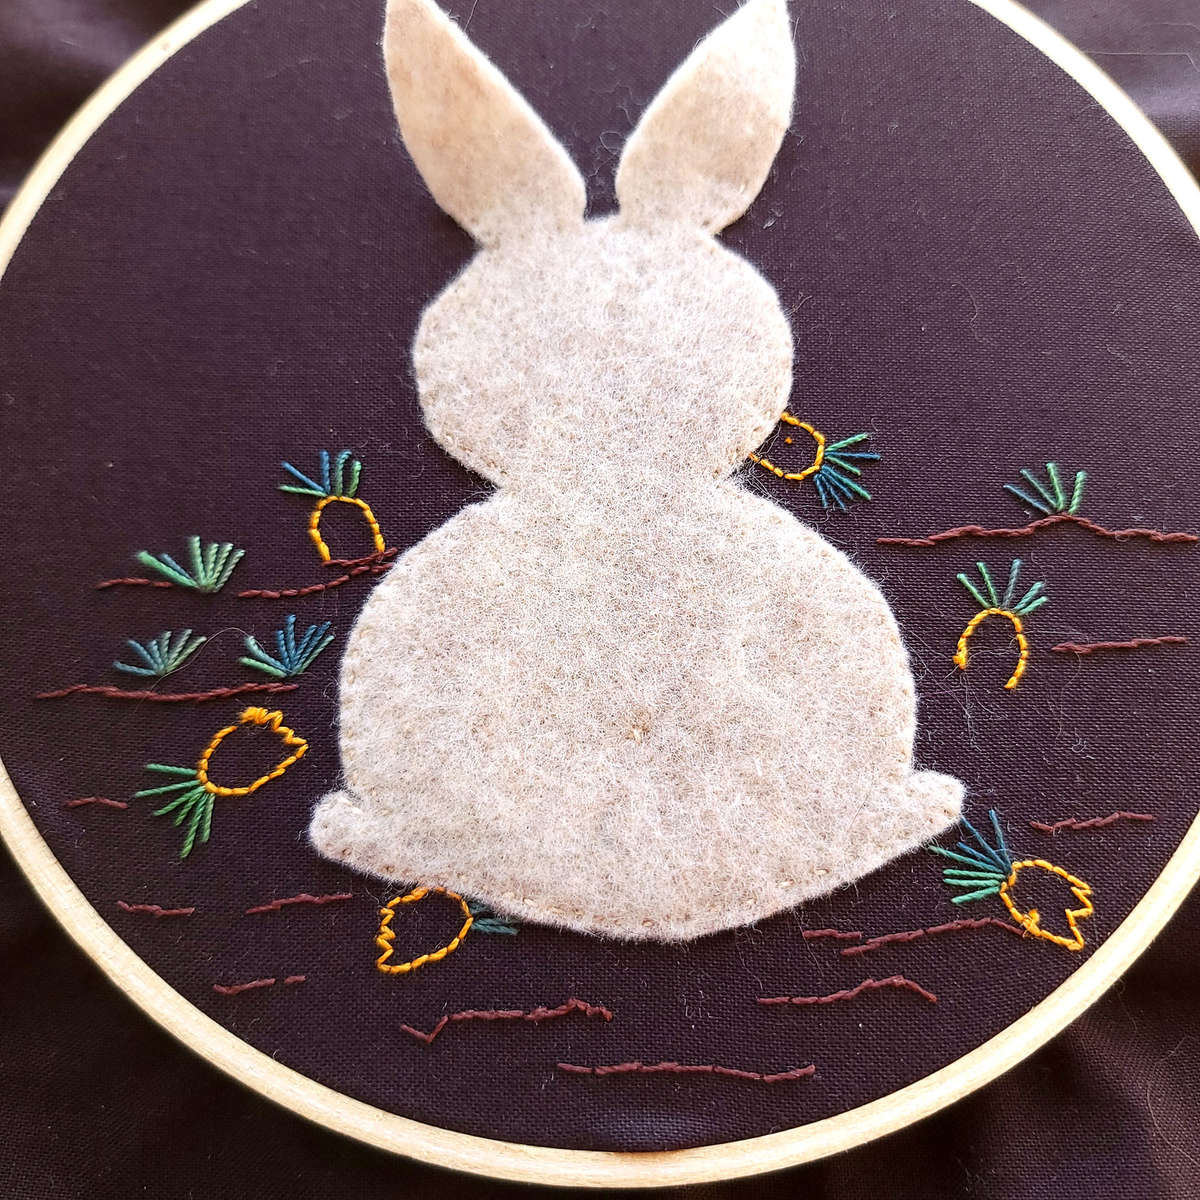
Step One - The Bunny Applique
Use these instructions if you are adding an applique
1 Strand / Running Stitch
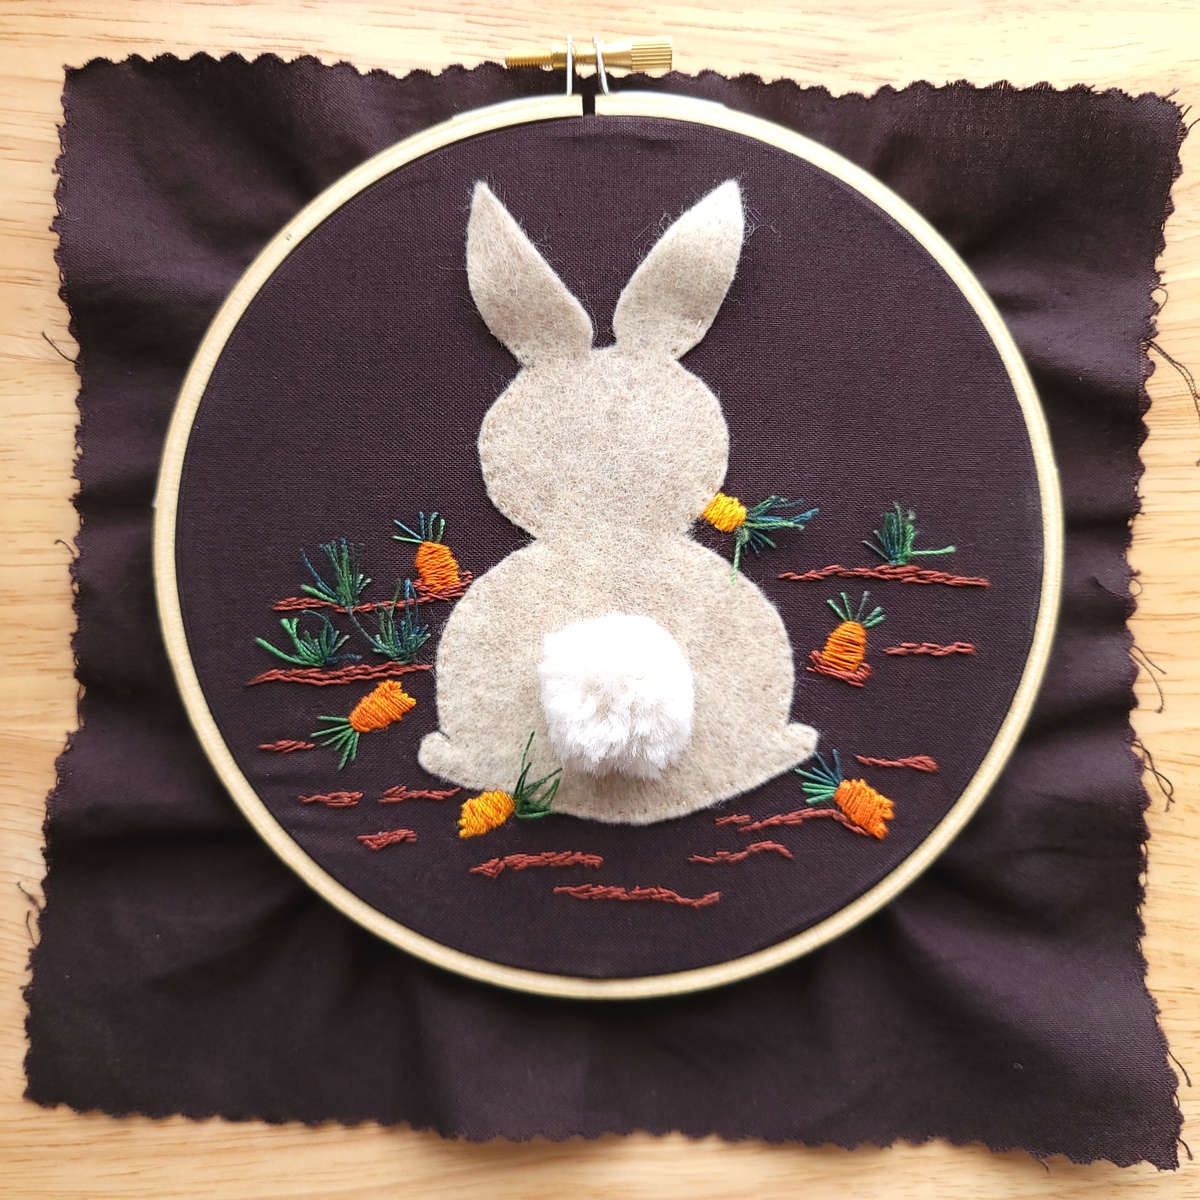
Once your fabric is fully dry, rehoop it. Then put the felt rabbit in place. When you are happy with the rabbit's position, put two small stitches in the rabbit's butt behind where the tail will go. This will keep the felt in place as you stitch around the edges. If you prefer the stitches around the rabbit to be less noticeable, use a running stitch with small short stitches. For stitches that stand out more, use a back stitch with longer stitch lengths. Staying close to the edge, use the tan thread and stitch all the way around the rabbit. You can add some dimension by leaving the rabbit's ears loose (not stitched down).

Step Two - Dirt
3 to 6 - Strands / Misc Stitches
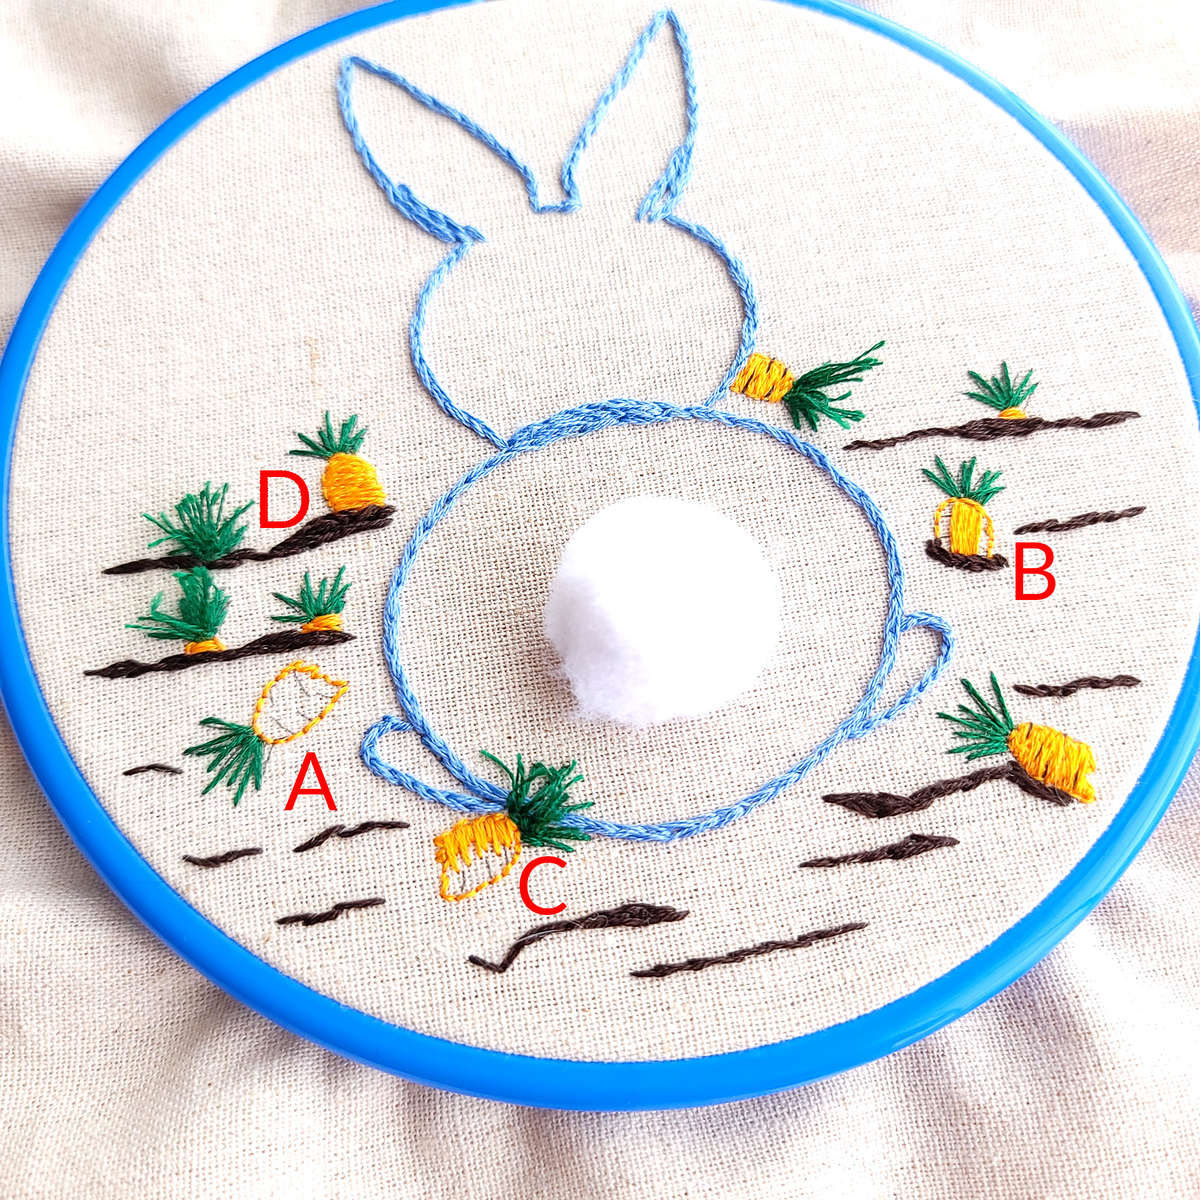
A - The lines provided are suggestions of mounds of dirt. Embellish these lines by making some areas thicker. Use different types of stitches to create texture in the soil. Try mixing up the split stitch, back stitch, stem stitch, or running stitch to add random texture to the dirt. The example was stitched with 3 strands for all of the dirt.
B - The pattern shows carrot tops here but no outline for carrots. It's your choice if you want to add visible carrots or build the dirt up to meet the carrot tops.
Step 3 - Carrots
1 Strand Outline / Back Stitch. 1 or 2 Strands Fill Stitch
You have two options for the carrots. You can leave them as an outline or you can fill them in.
A - If you haven't already done so, start by outlining the carrots in a back stitch with 1 strand of orange floss. If you want to leave the carrots as outlines only, stitch the horizontal groove lines in orange also.
B - If you are filling in your carrots and want to make the carrots look a little rounded add a few vertical stitches to the center before you do the fill stitches. Adding the vertical stitches will add a bit of lift to the center giving the carrots a rounded look.
C - Next, fill the carrots in with 1 or 2-strands using long/short stitches. For a smoother texture on the carrots, use 1 strand. For a rougher texture, use 2 strands of floss (2 strands were used in the example photo). Like the grooves in a carrot, the long/short stitch should be parallel to the top of the carrot.
D - Finish Filling in all of the carrots with long short stitches. For added detail add a few dirt filled grooves to the carrots using 1 strand of brown floss. Stagger 3 to 5 small single stitches on each carrot.
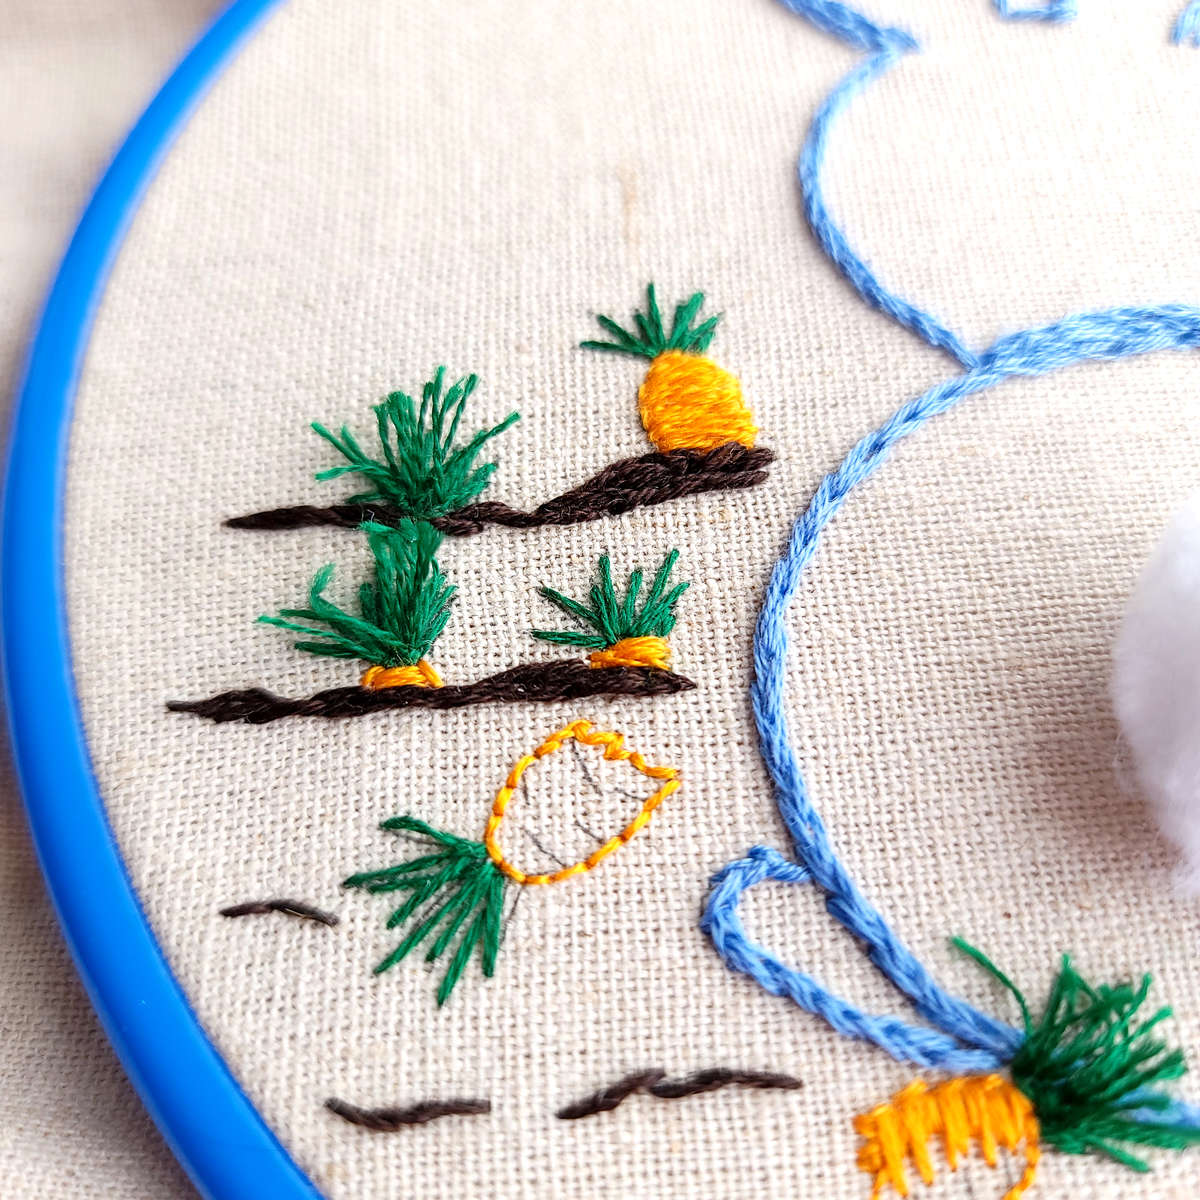
Step Four - Carrot Tops
1 to 2 Strands / Single Stitch. 3 Strand / Turkey Work
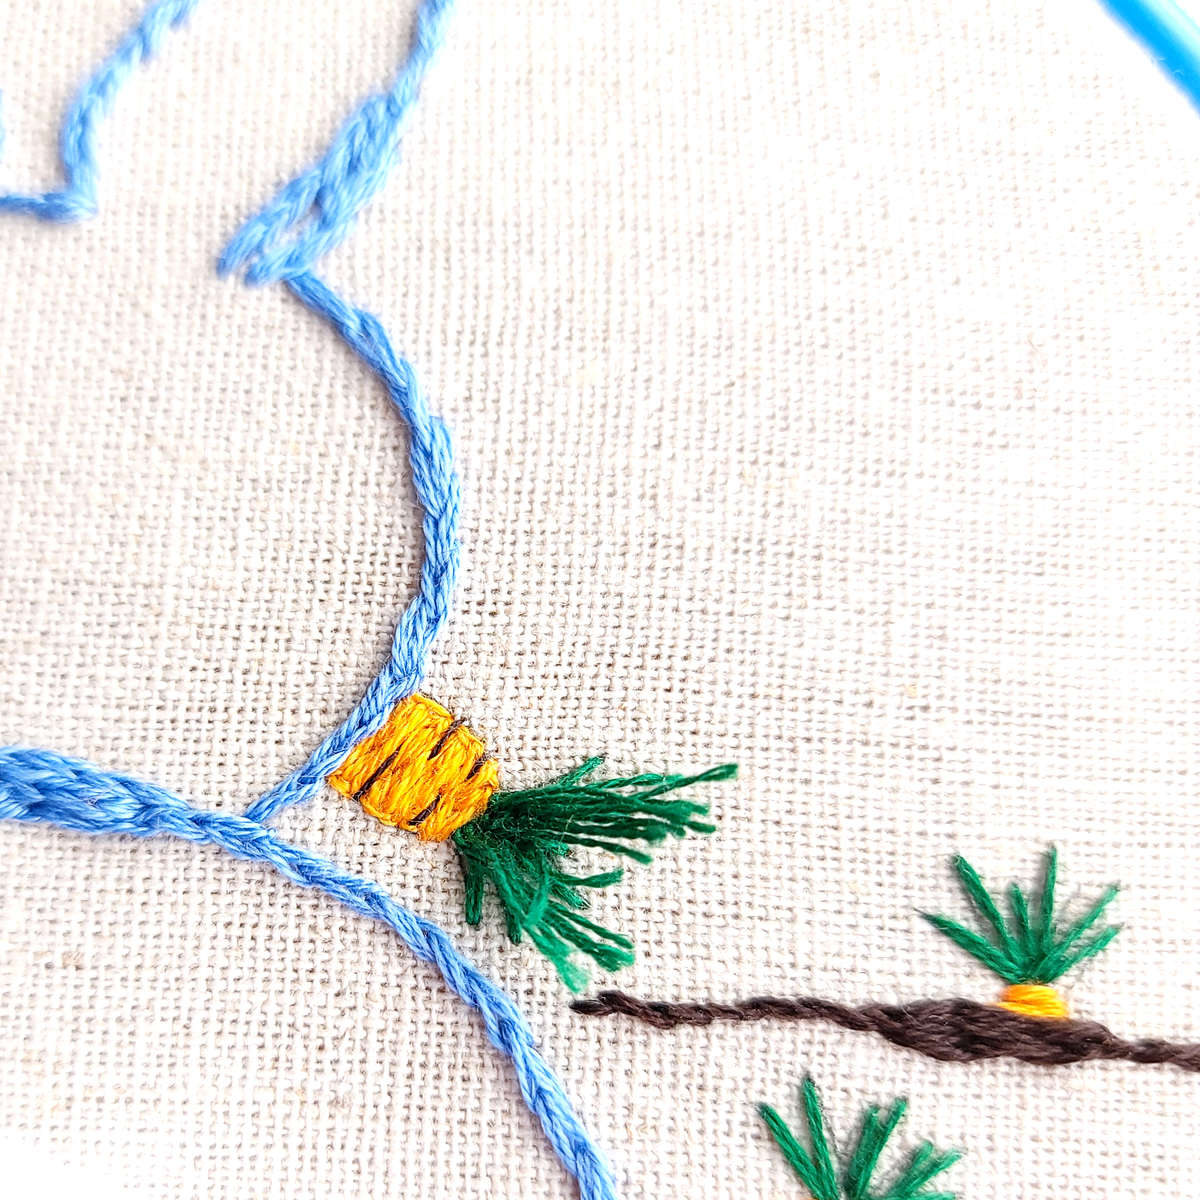
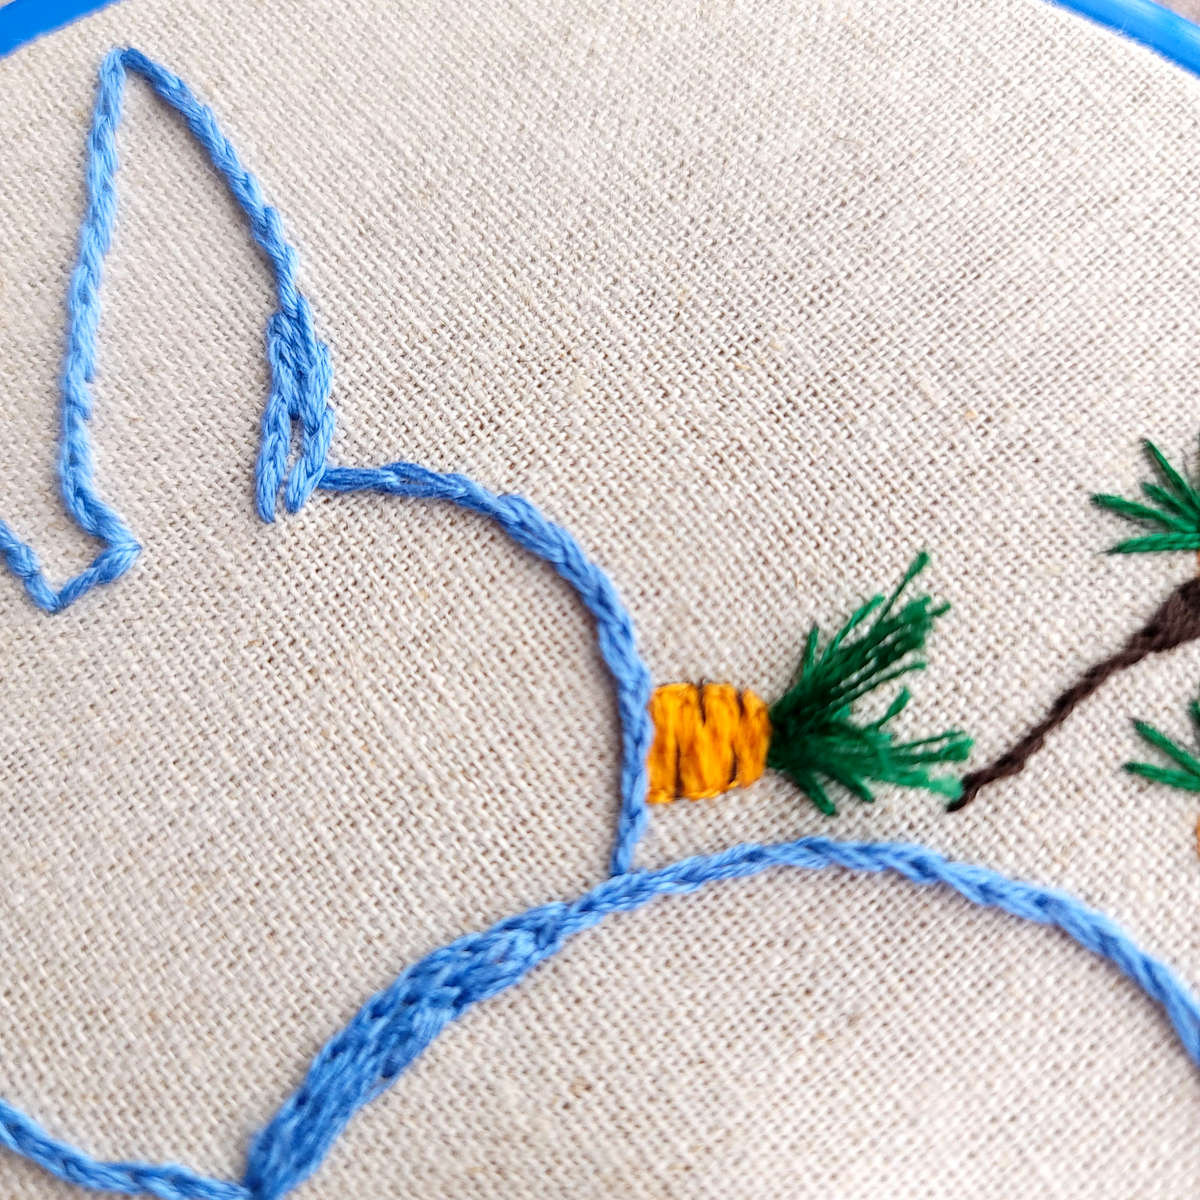
If you haven't done so already, start by covering the pattern lines for the carrot tops with long single stitches in green floss.
After you stitch the two dimensional carrot tops, you can either leave them that way, or you can add turkey work over top for more bushy carrot tops.
Instructions for the turkey work stitch are below. Because the carrot tops are so small you can only put 2 or 3 turkey stitches on each. If you want a thicker carrot top you can stack your turkey stitches. To stack your stitches, place two stitches at the top of the carrot and then two more directly behind the first two but slightly staggered.
--- Turkey Work ---
Step 1
Use 3 Strands of Floss
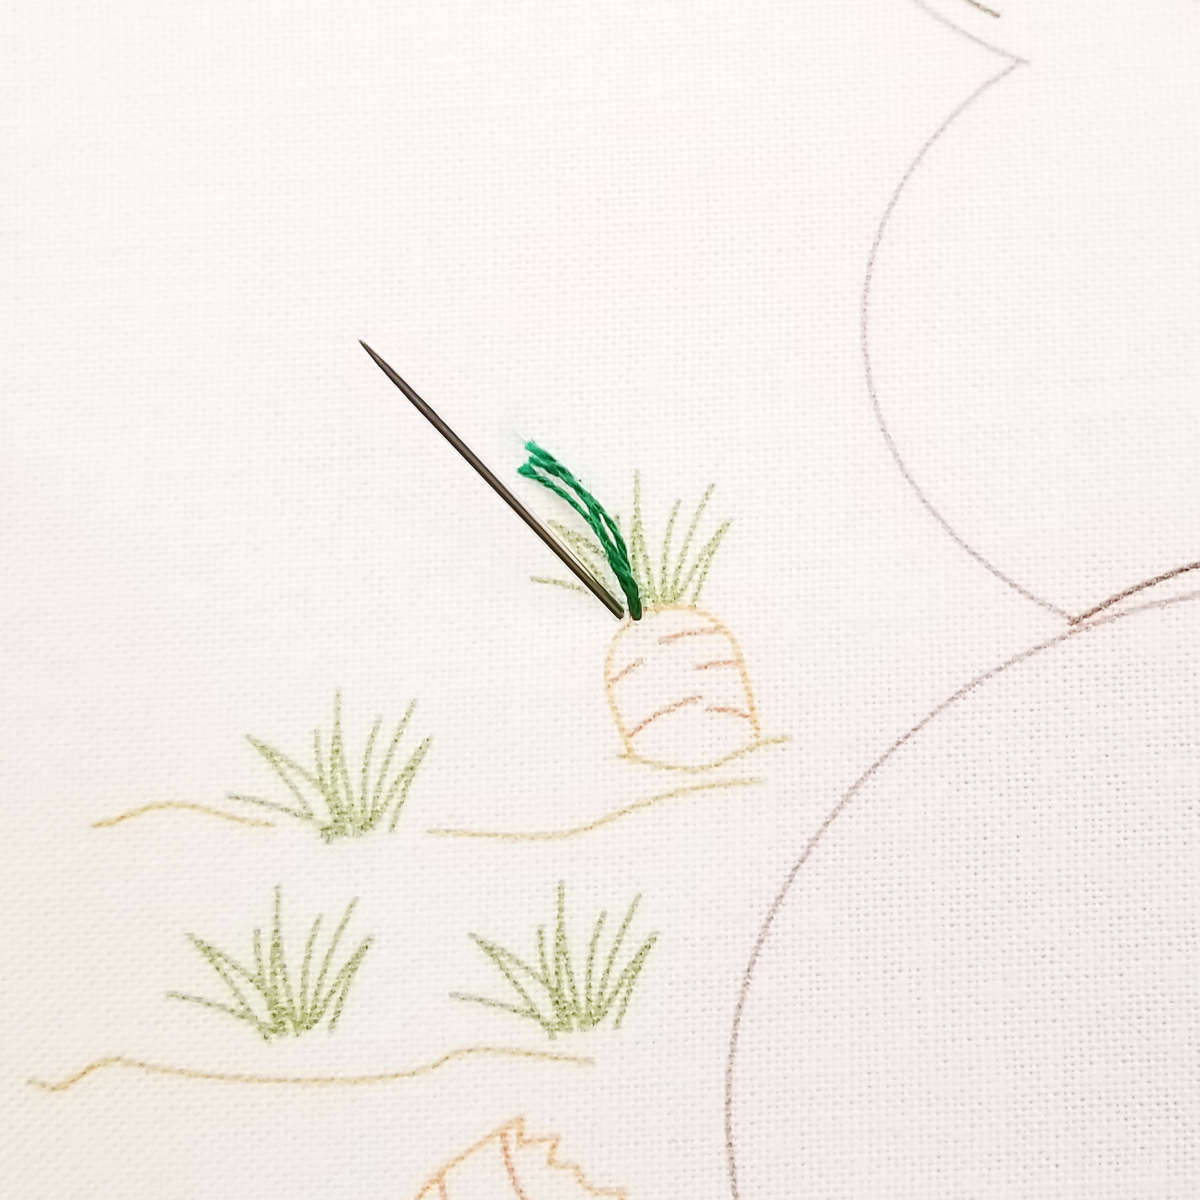
Without a knot at the end of the thread, bring your needle down into the fabric from the front. Pull your thread so just a small tail of thread is left on the front of the fabric.
Step 2
Bring your needle up from the back of the fabric just to the left of the tail of thread. Don't pull too hard, you want to leave the tail on the front of the fabric. Hold the tail down with your finger if you need to.
Step 3
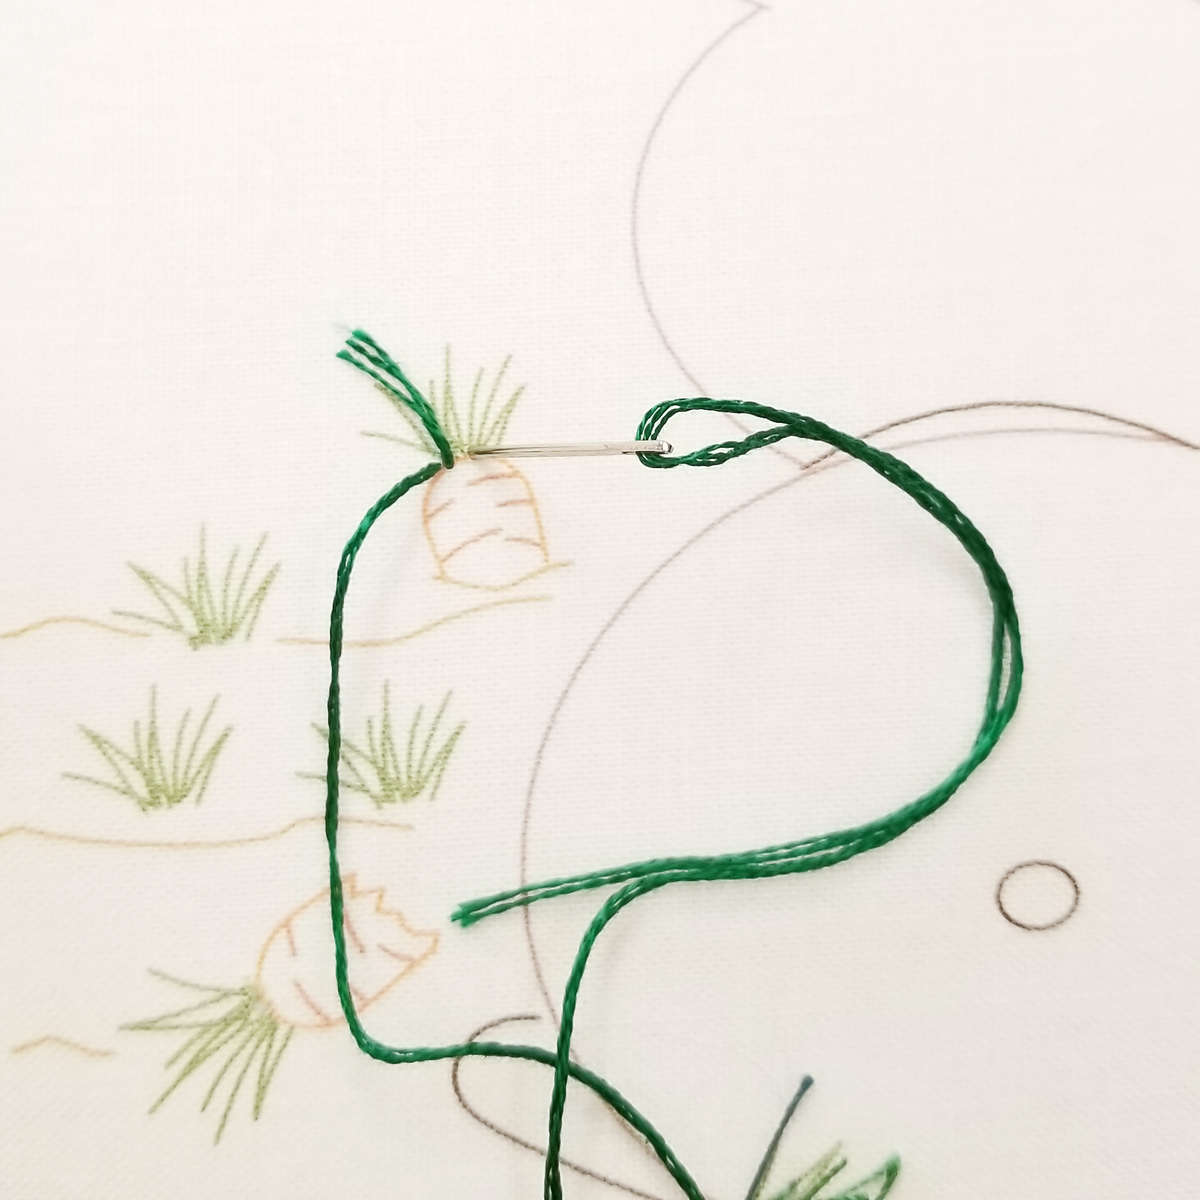
Cross in front of the thread tail, then bring the needle down into the fabric to the right of the thread tail.
Step 4
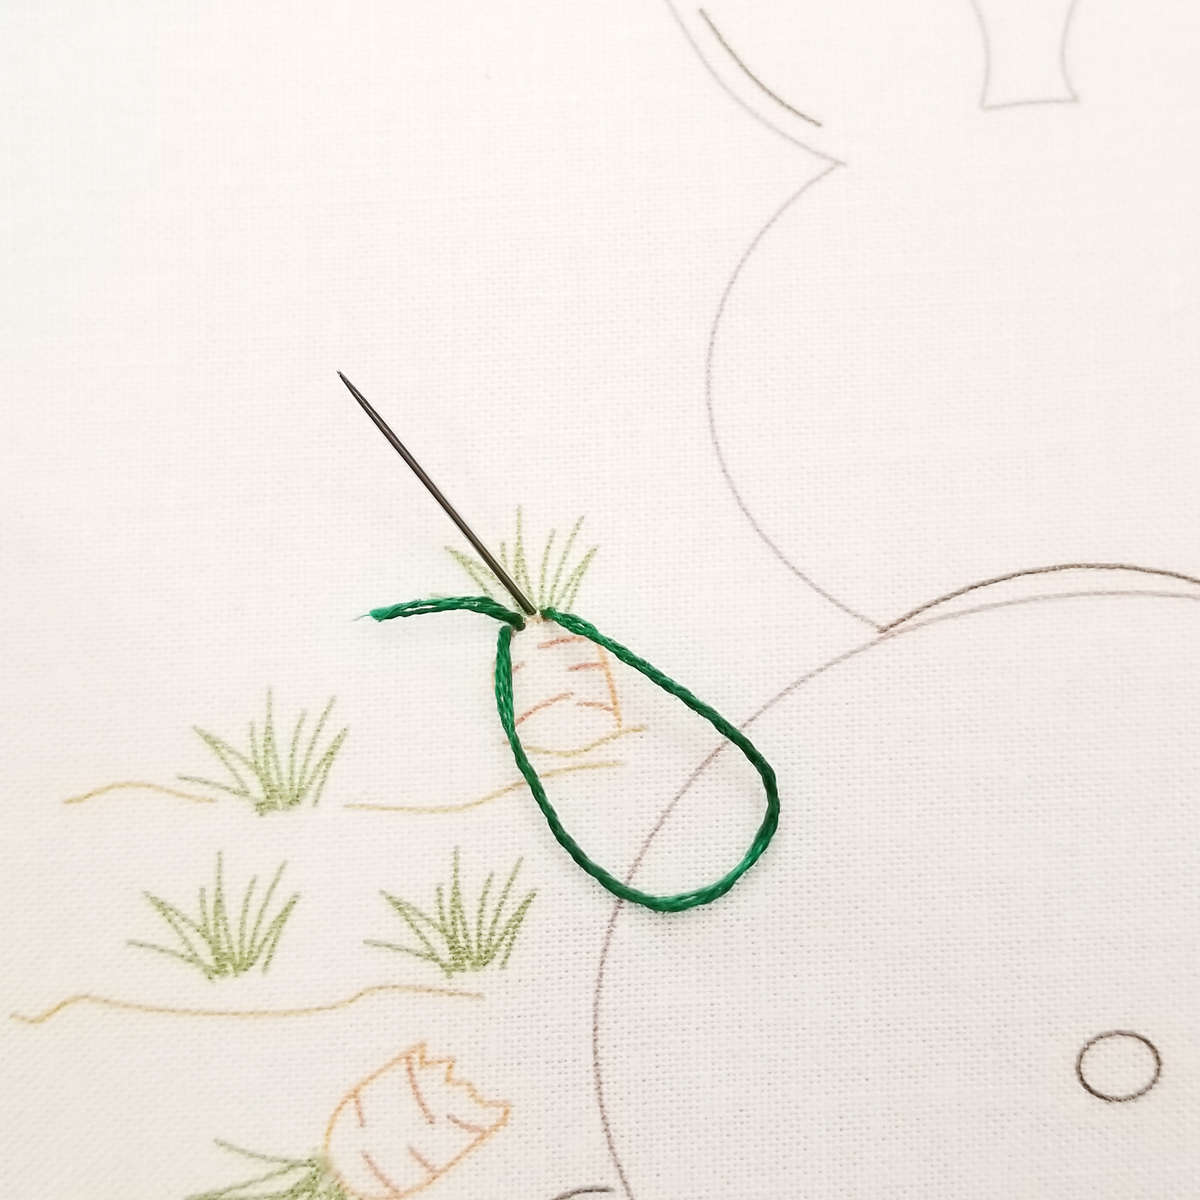
Leaving a temporary small loop of thread on the front of the fabric, bring your needle up through the fabric from the back, between the thread tail and your last stitch
Step 5
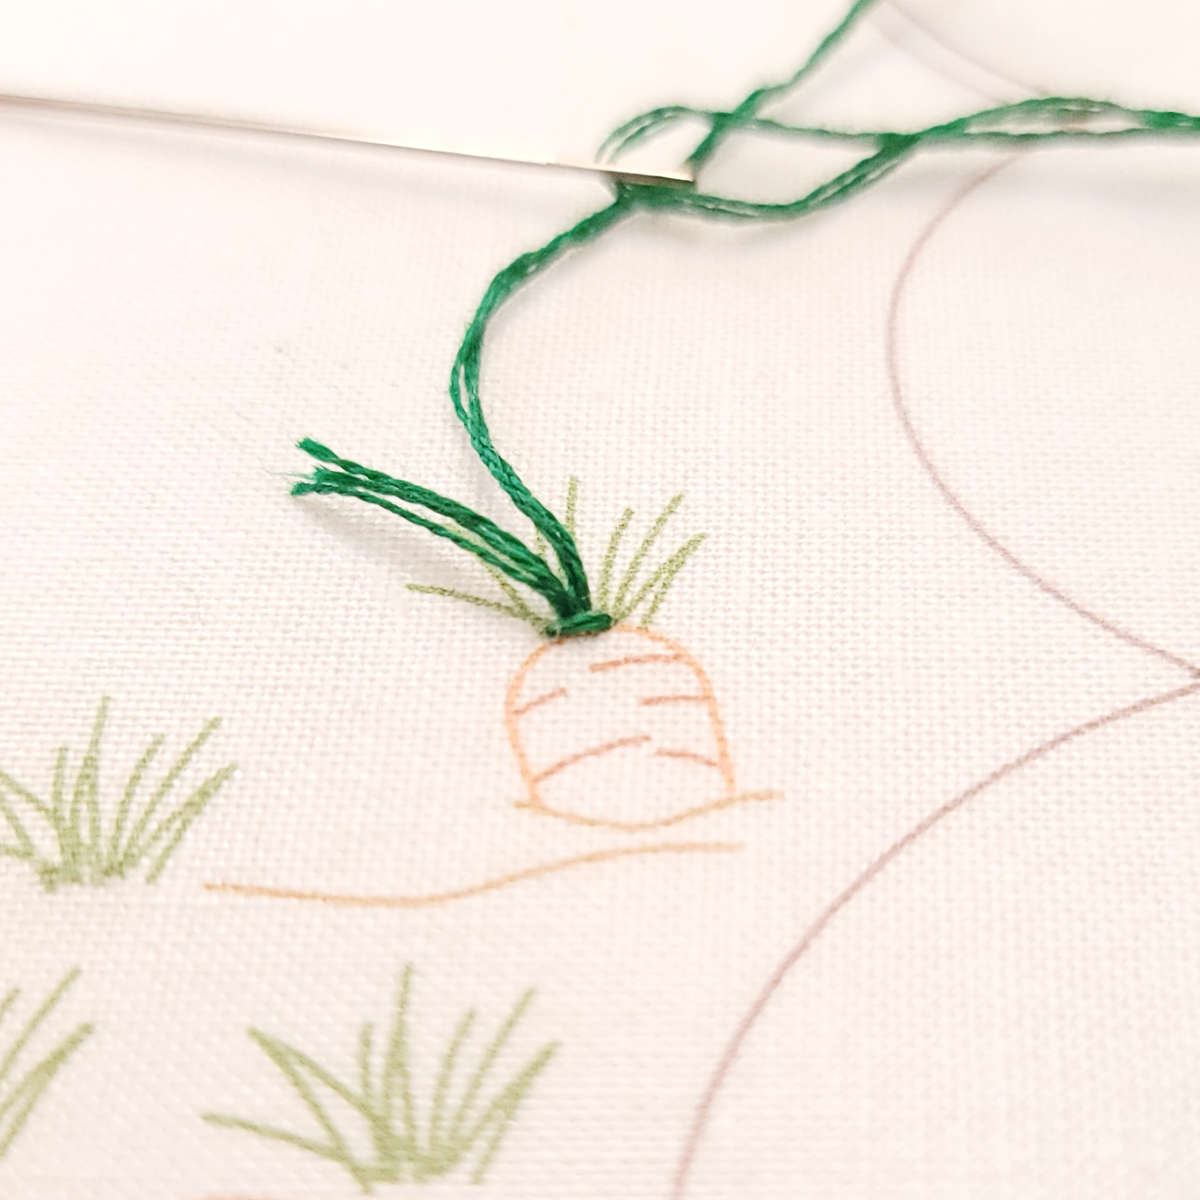
Pull the thread up through the fabric pulling the temporary loop closed. This creates a holding stitch that traps the thread tail and the working thread within the loop.
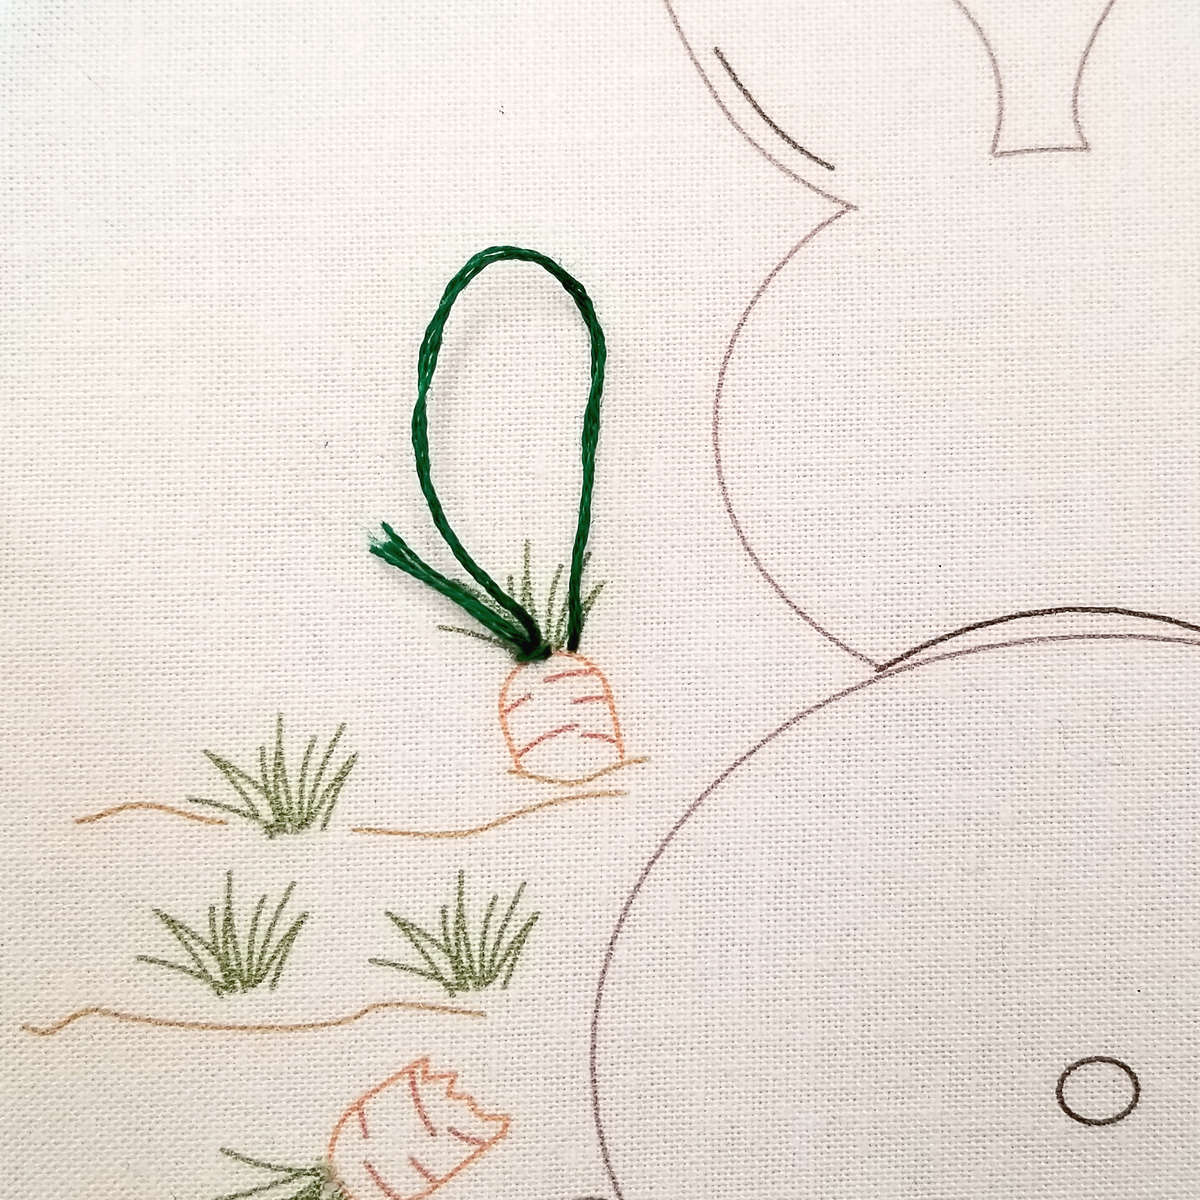
Second Turkey Stitch
Continue to the right. Start the second turkey stitch by leaving a permanent loop on the front of the fabric.

Like the first turkey stitch, come up on the left side of the last single stitch. Repeat steps 3-5.
Because the carrot tops are so small, 2 or 3 turkey stitches should be enough.
Because the carrot tops are so small, 2 or 3 turkey stitches should be enough.
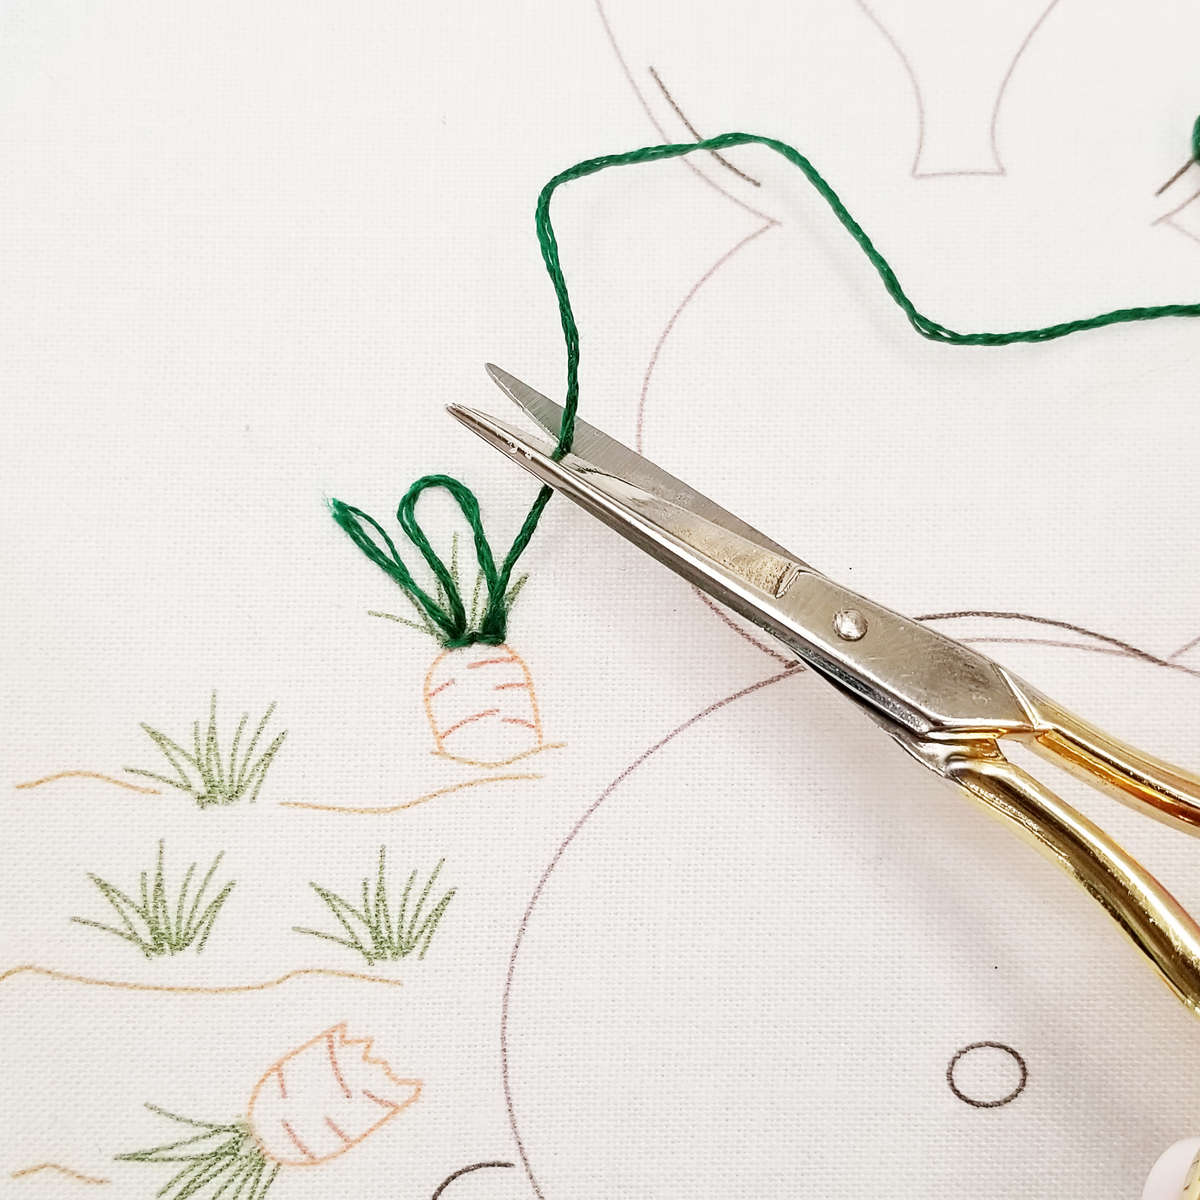
After placing 2 or 3 stitches, cut your working thread at the front of the fabric.

Cut your loop(s)
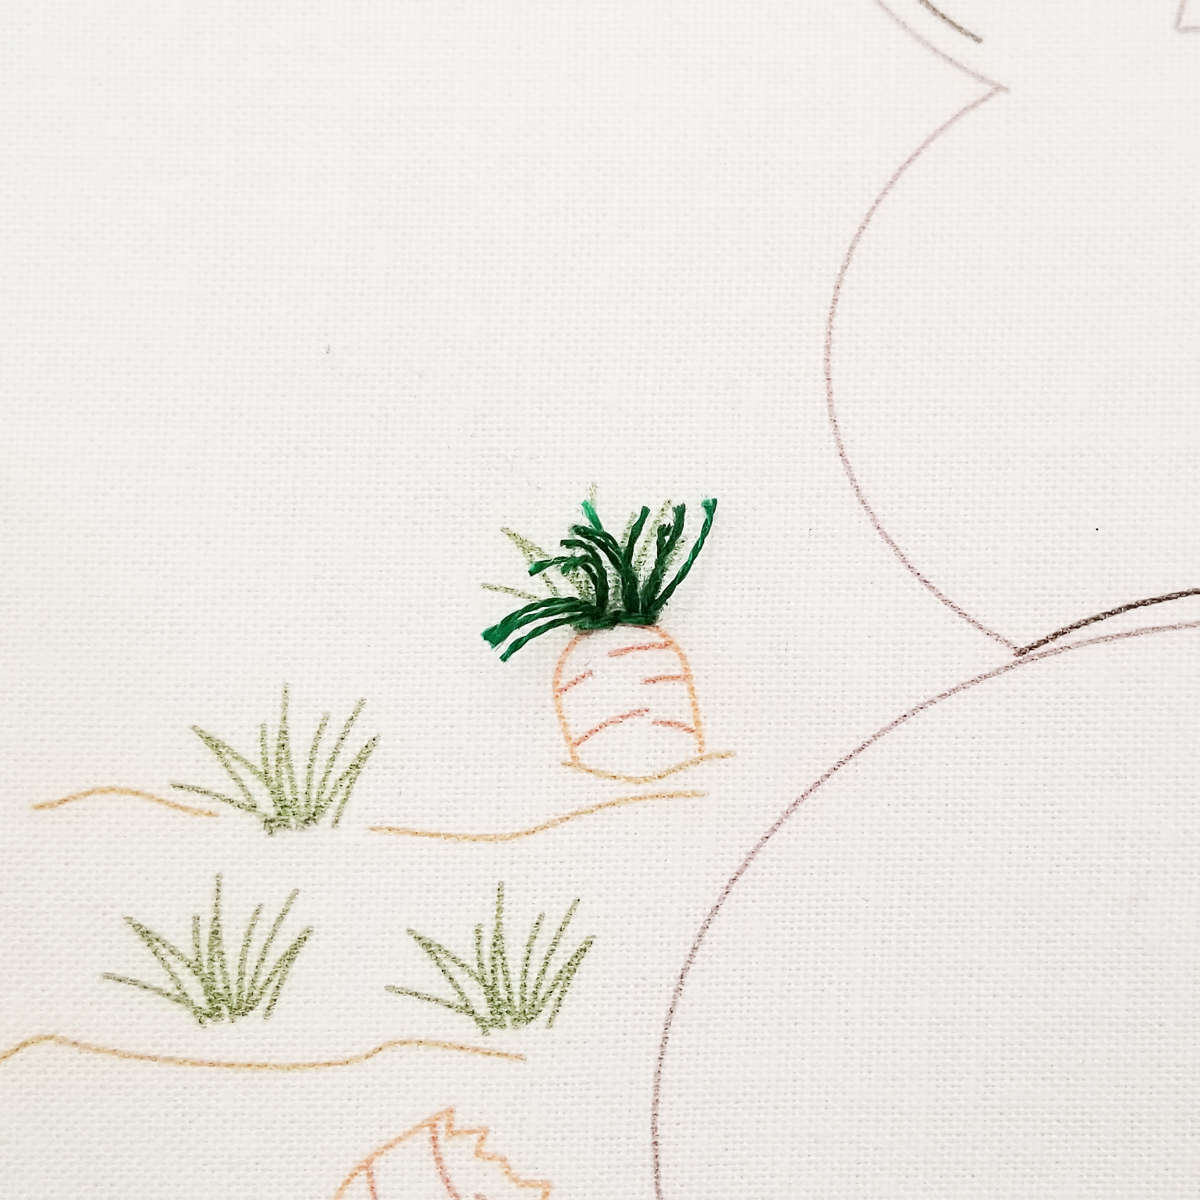
Trim the thread if needed. Gently fluff the thread with your fingers.
Finally the Fluffy Tail
Instructions for making a Pompom out of embroidery floss are below. The kit includes both a premade pompom and white floss for making your own. If you purchased a kit you can use either the premade pompom or make one of your own.
If you don't want to make a pompom, premade ones are available at most craft stores. You can also use a fluffy cotton ball.
Attach the pompom to the fabric with a small cross stitch in the center of the pompom. Your stitches should be very small and disappear into the fluff. Start by bringing your needle up from the back of the fabric and pierce the pompom just off-center. Make a small diagonal stitch bringing your needle back down through the center of the pompom and the fabric. Do a second stitch across the first stitch at the opposite angle to create a cross stitch. Tie your thread off on the back of the fabric.
--- Creating a Pompom ---
Making a pompom for the tail requires a full skein of floss. I suggest white foss for the tail but I used a darker color here so it would be easier to see.
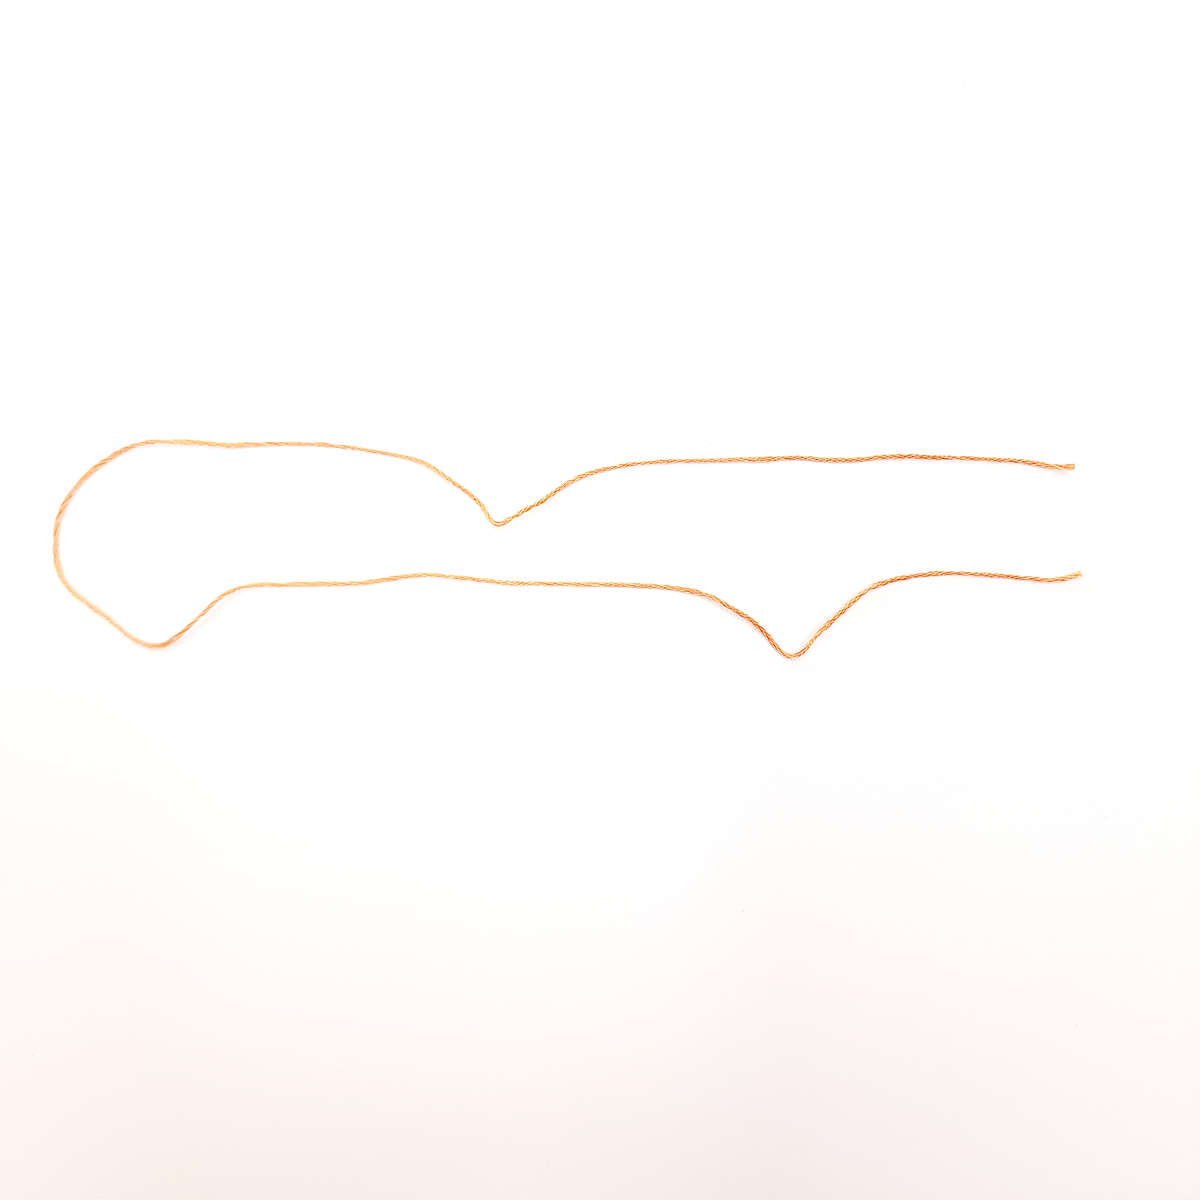
Start by cutting an 8 to 10 inch length of floss for the tie. Set that aside for now.
Start by cutting an 8 to 10 inch length of floss for the tie. Set that aside for now.
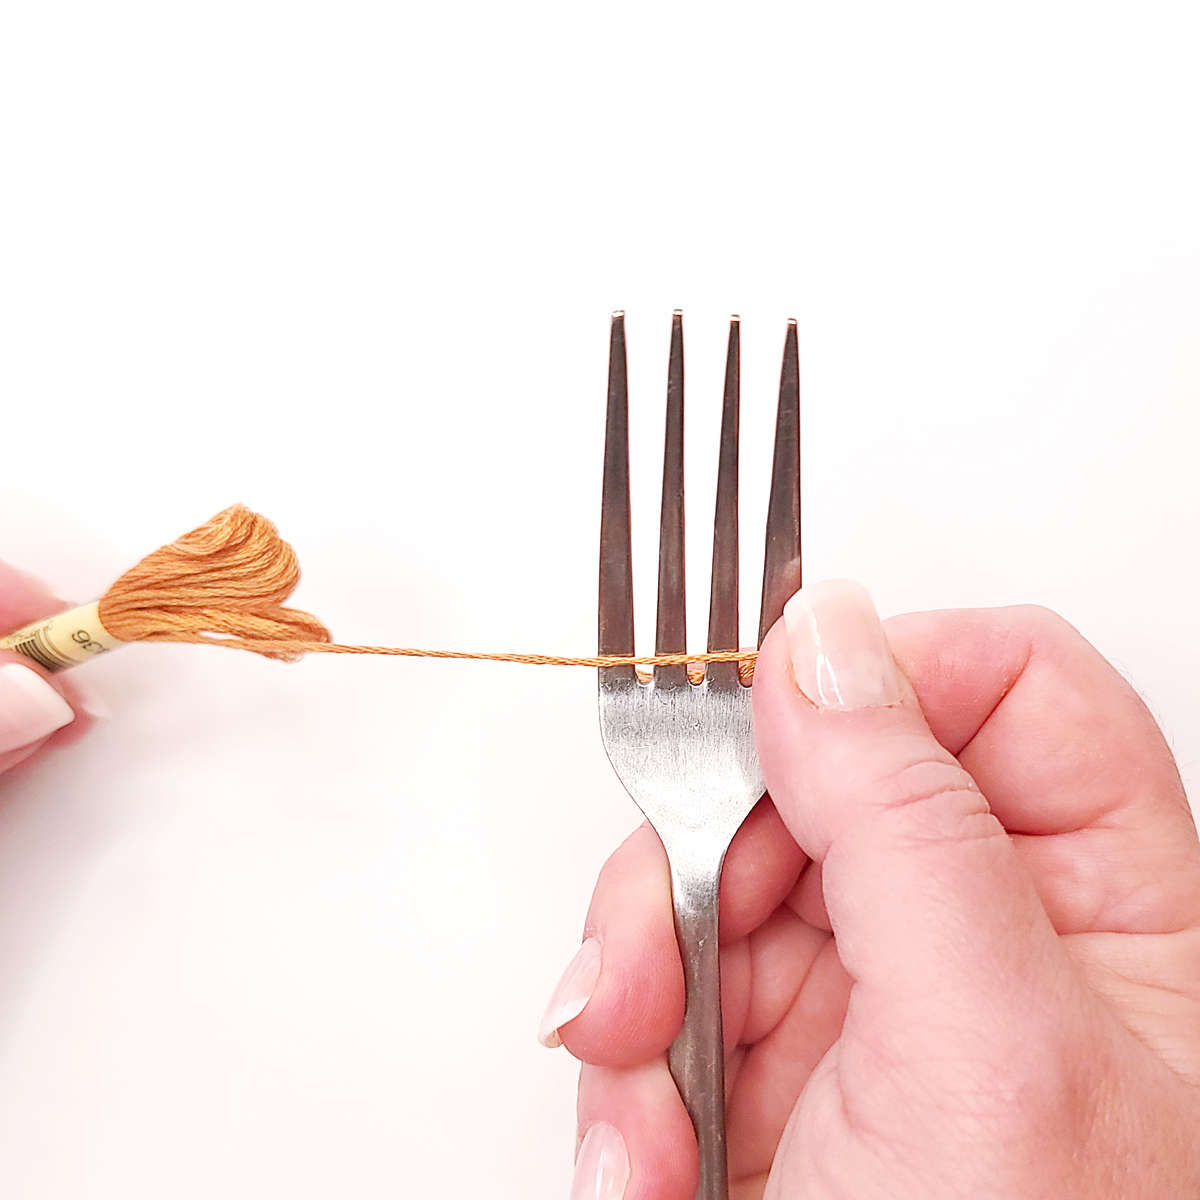
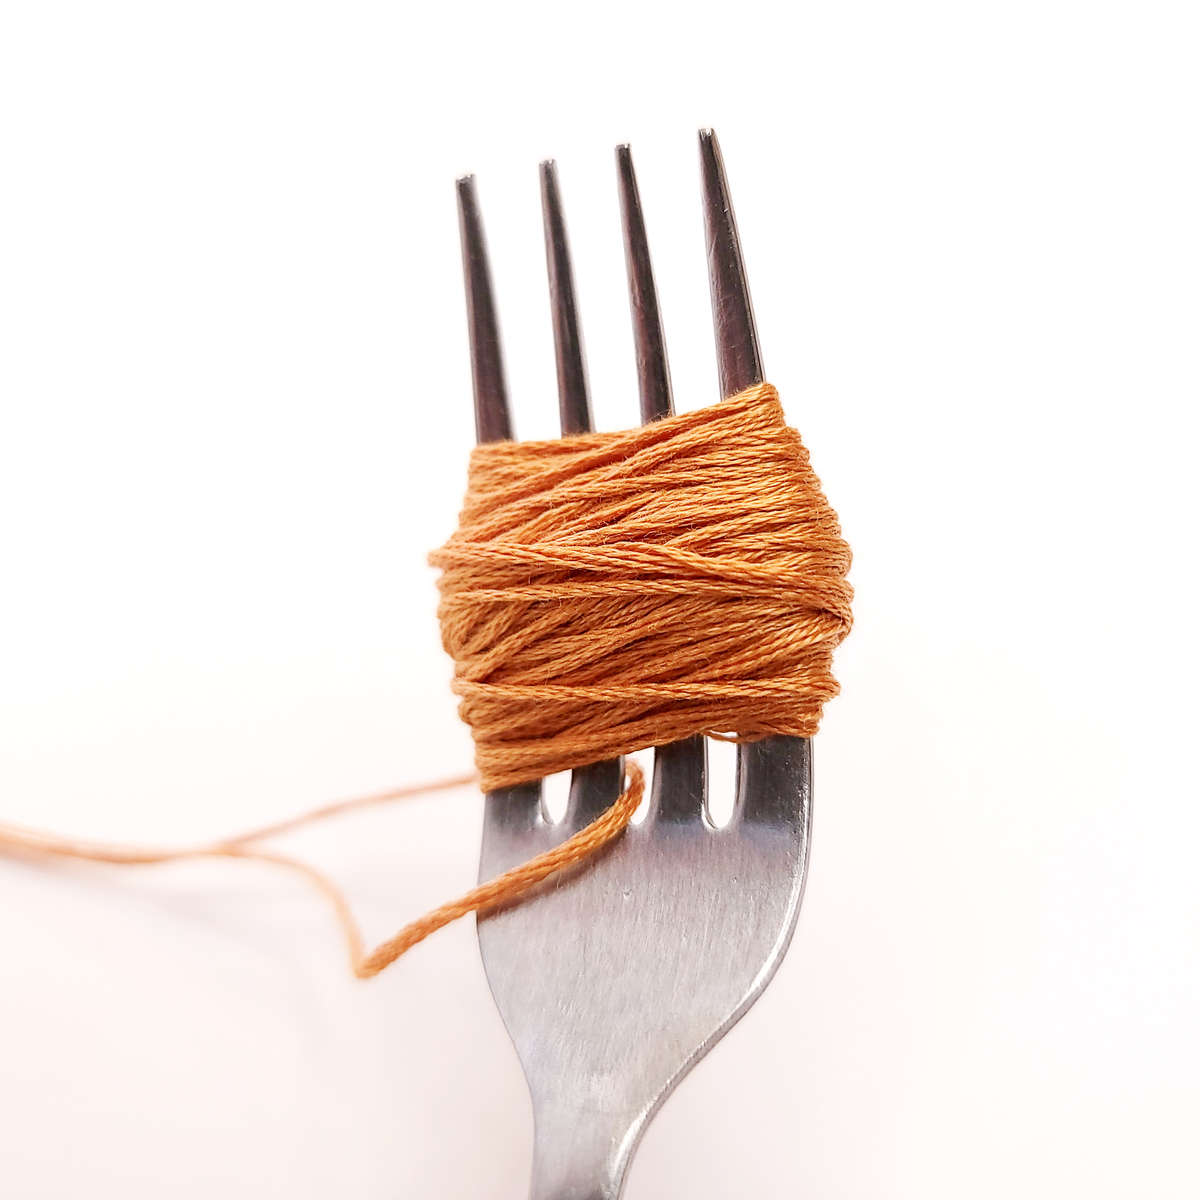
For this tutorial I am using a fork to wrap my thread around. There are a number of ways to make a pompom but using a fork creates the perfect size pompom for the tail.
Pulling from the numbered end of the skein, hold the floss against the fork tines.
Pulling from the numbered end of the skein, hold the floss against the fork tines.
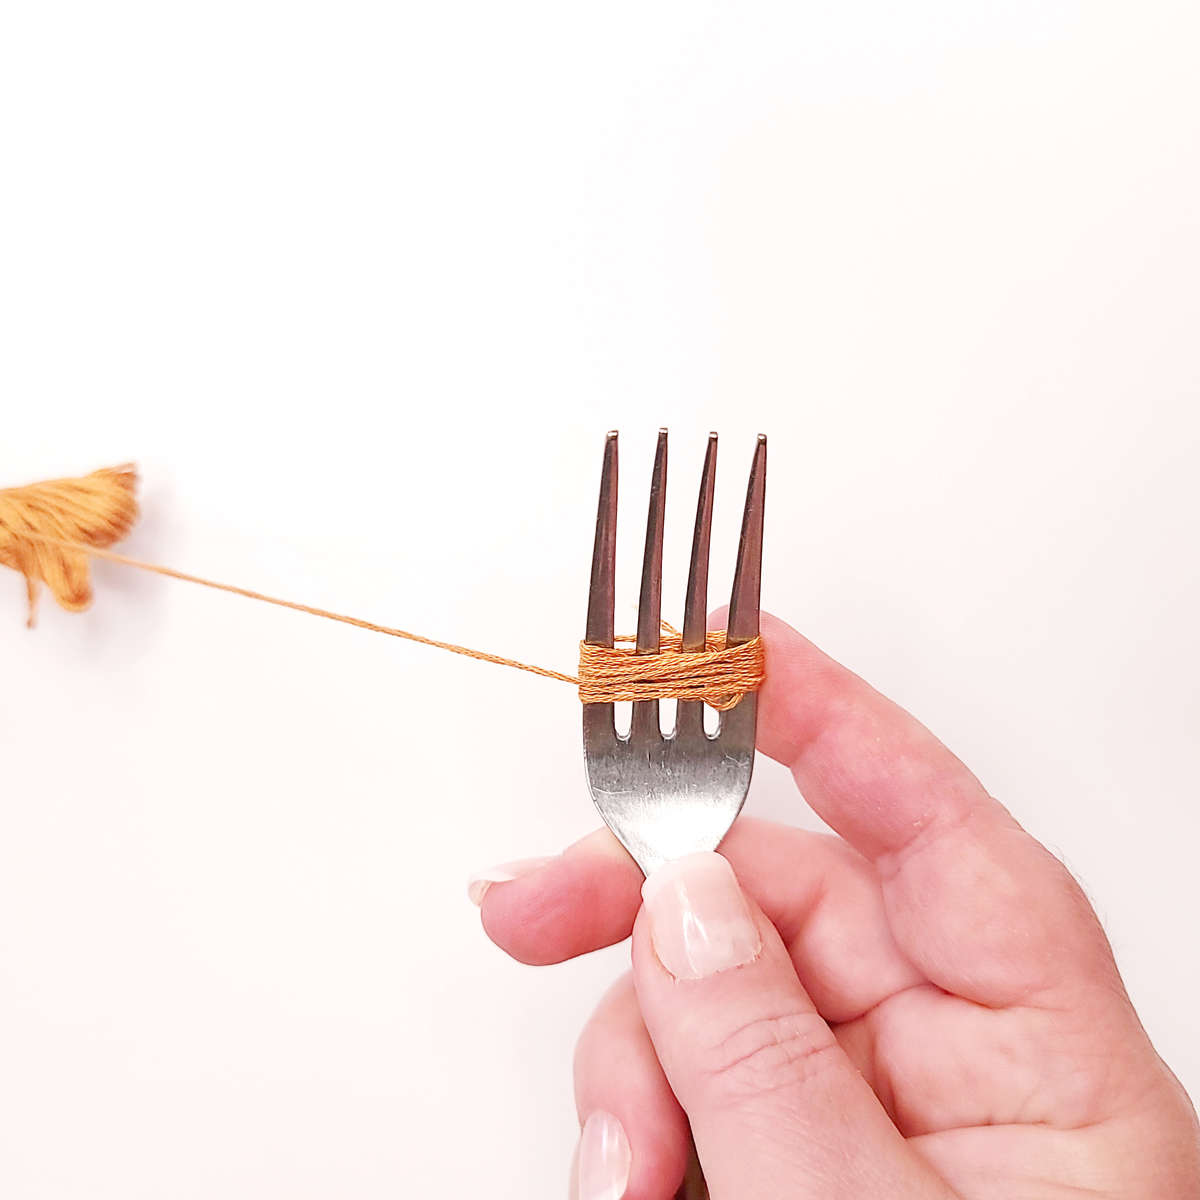
Begin wrapping the floss around the fork. It doesn't matter what direction you wrap. Go all the way around the fork and do not weave the floss between the tines.
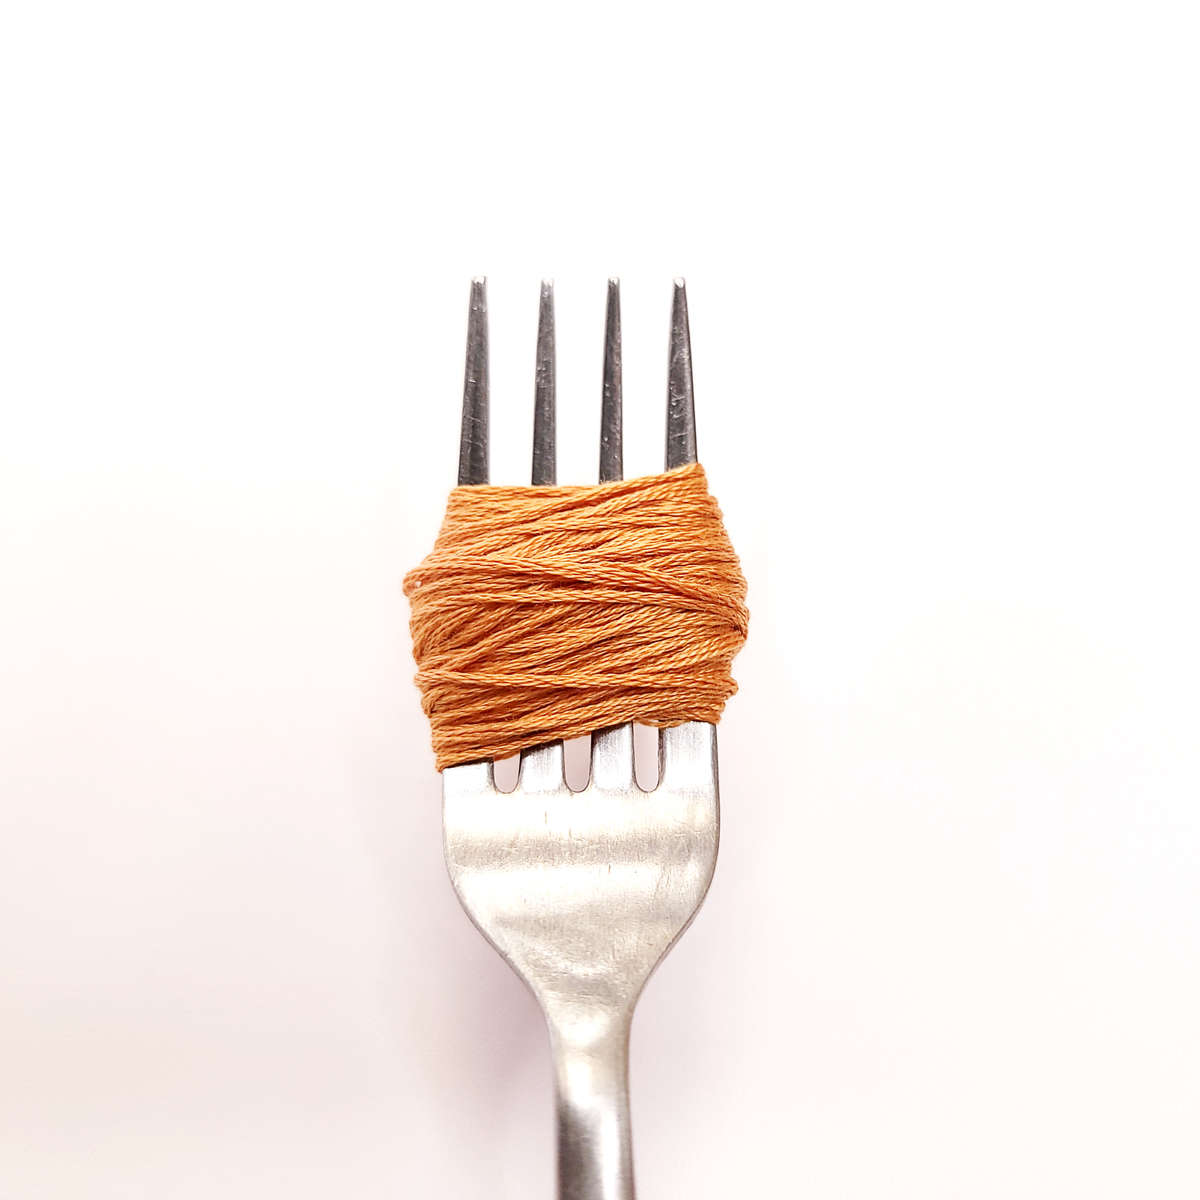
Keep wrapping the floss around the fork until you have used up the skein
Next, thread the length of floss you cut for a tie through the center tines of the fork.
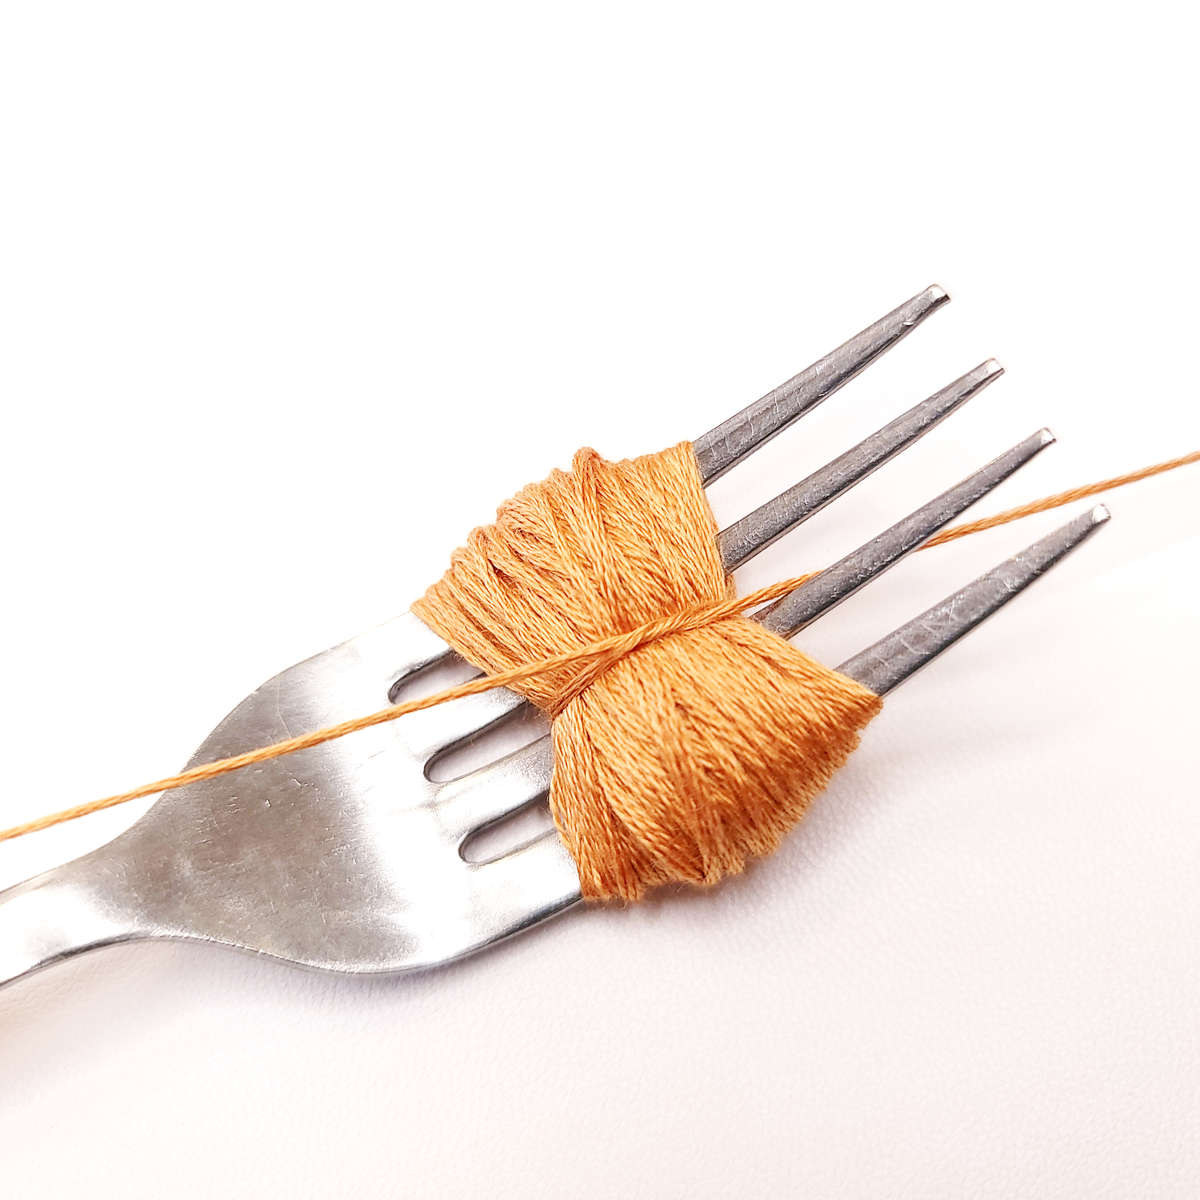
Then wrap the tie around the bundle of floss. Tie it but do not make a knot. Slip the bundle off of the fork. Be sure to keep your tie thread tight so the bundle stays together.
Pull your tie thread very tight. When it is as tight as you can get it, tie it in a knot. It is very helpful if you have a second person that can put their finger on the tie to hold it tight while you tie the knot.
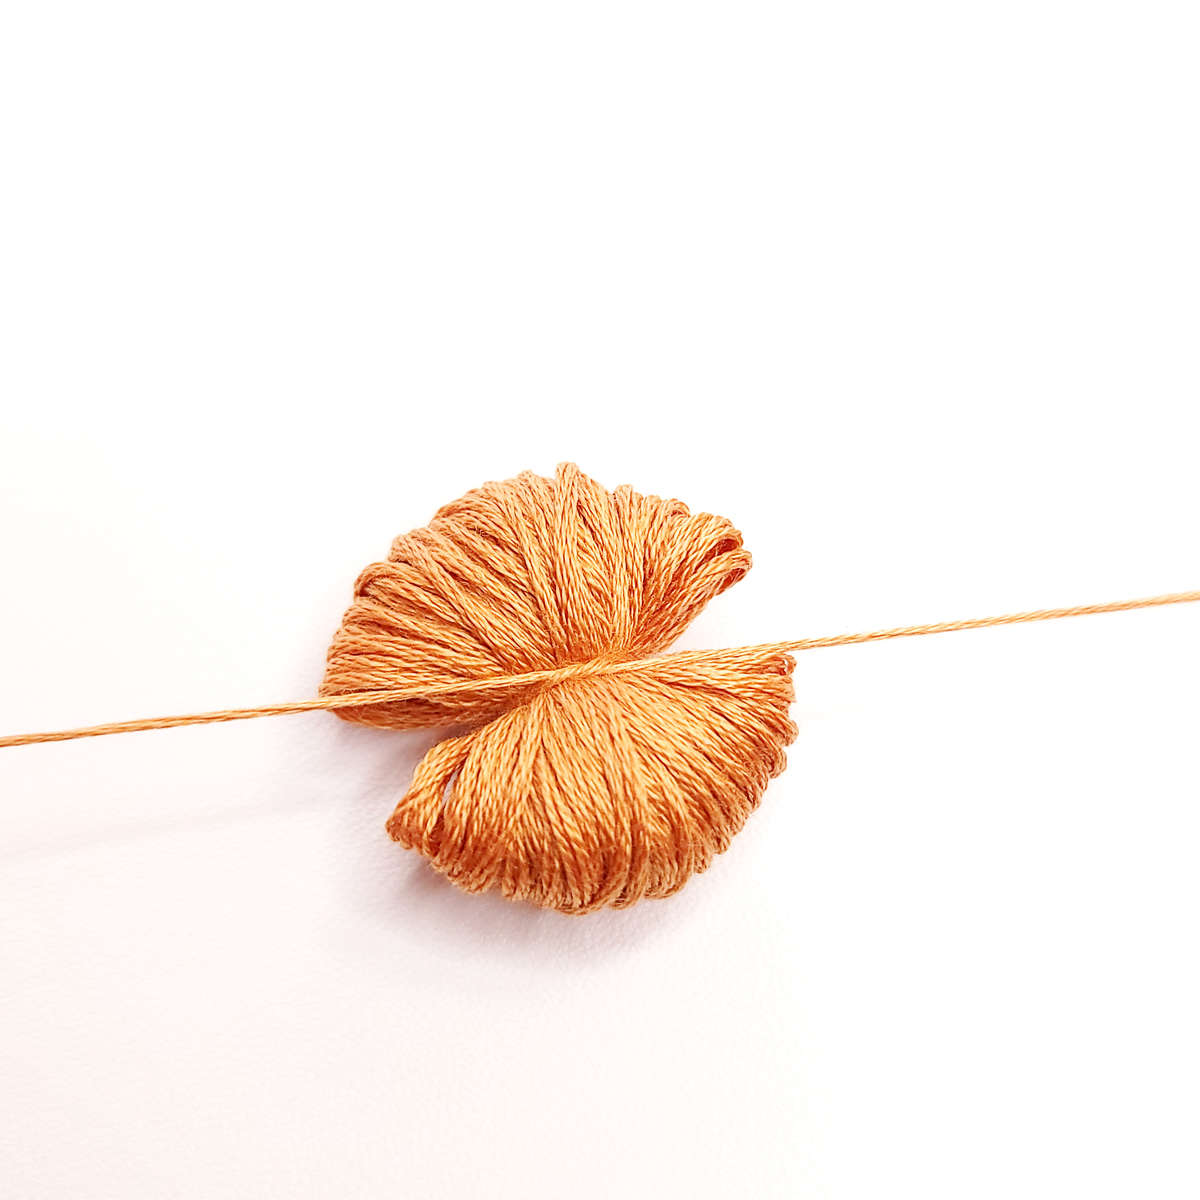
Once your knot is tied you will have a small bundle with loops all the way around.
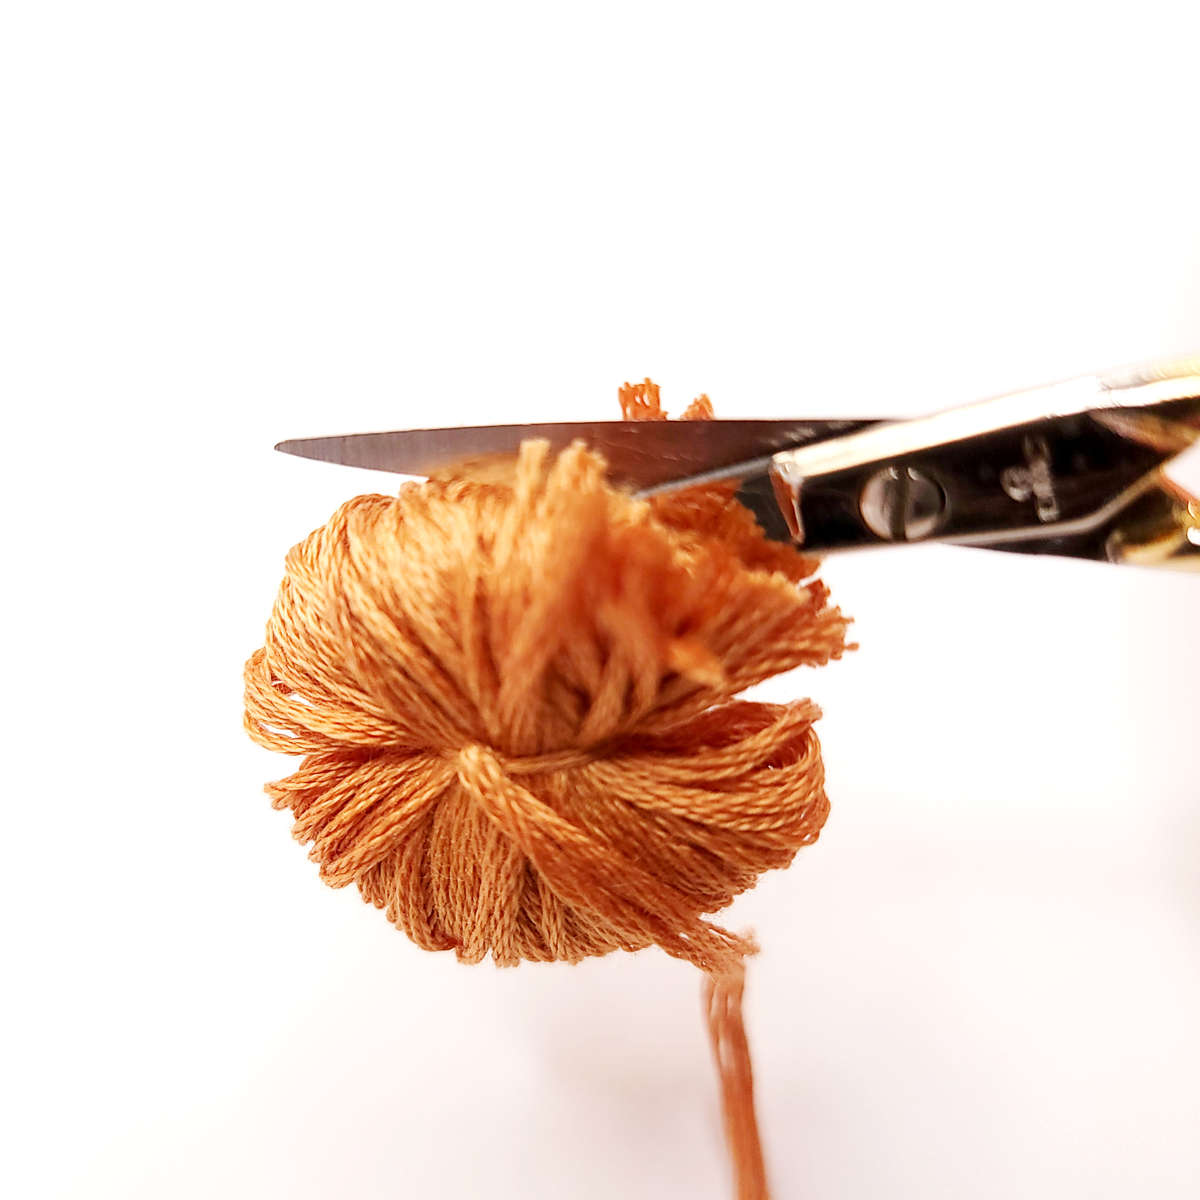
Using a small scissor, cut the loops open. Do this all the way around the bundle.
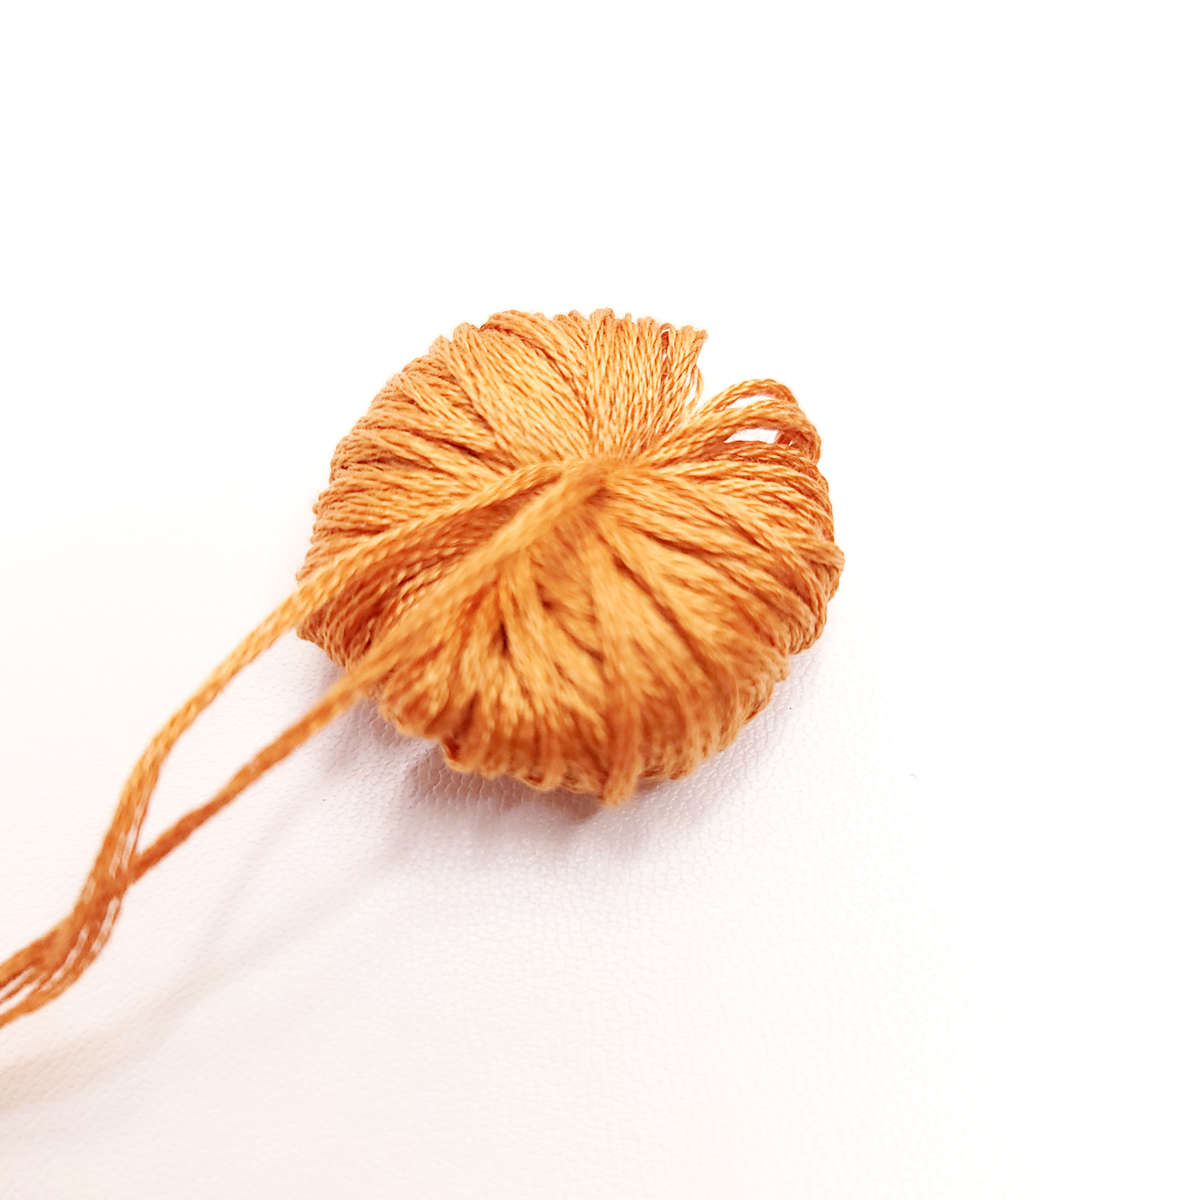
There is a good chance not all of the loops were cut the first time around. So thumb through the fibers and cut any more loops you find.
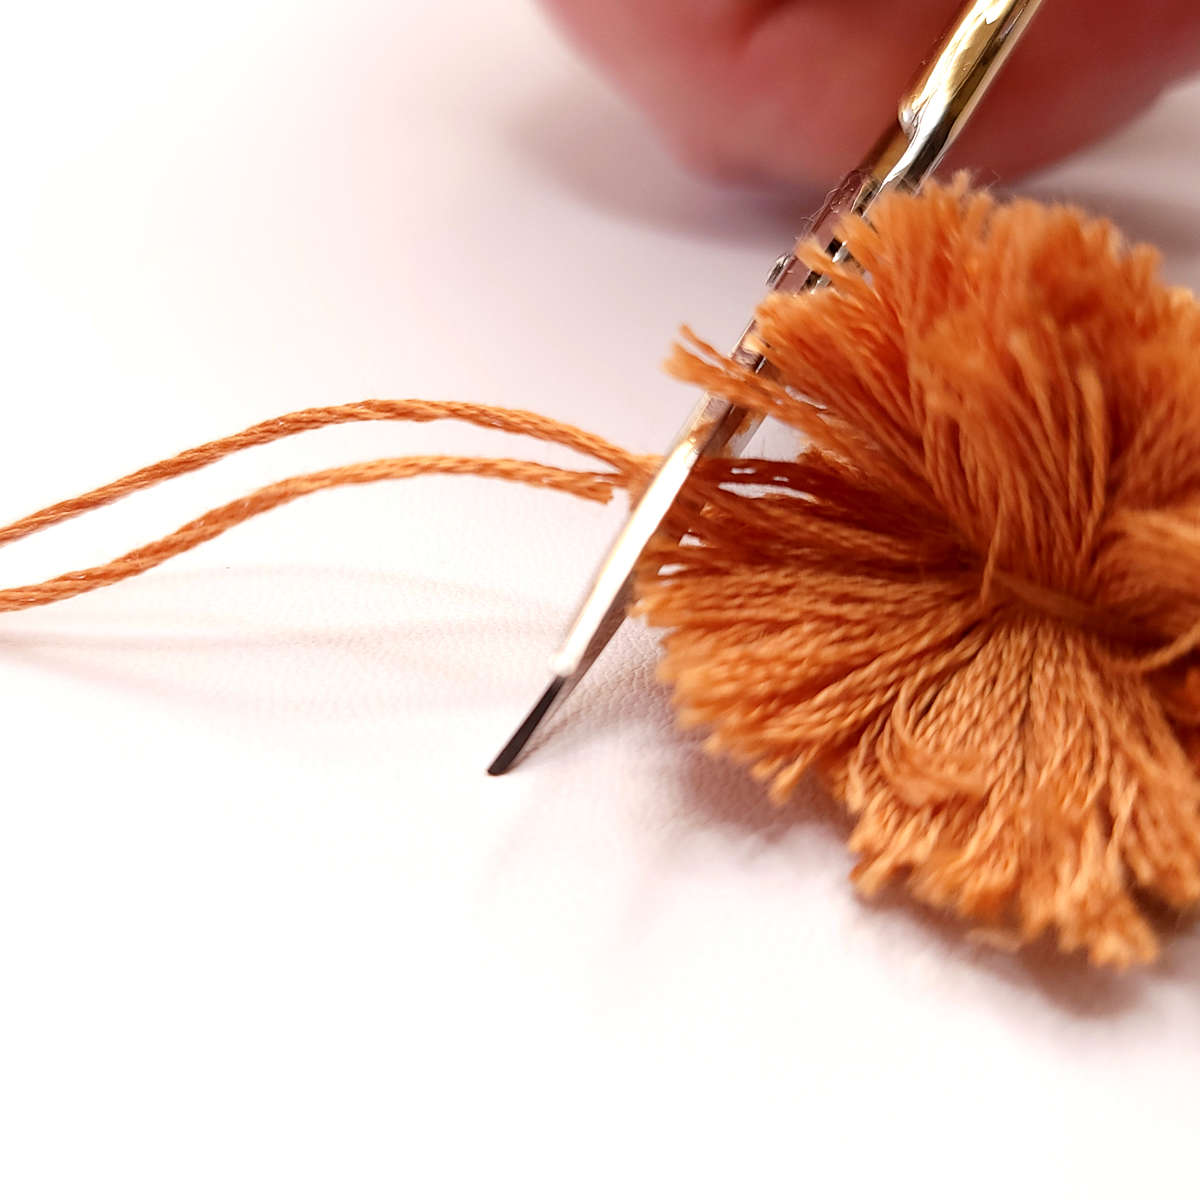
Cut the tails off of the tie thread.

Gently give your pompom a fluff and shape it a bit with your fingers.
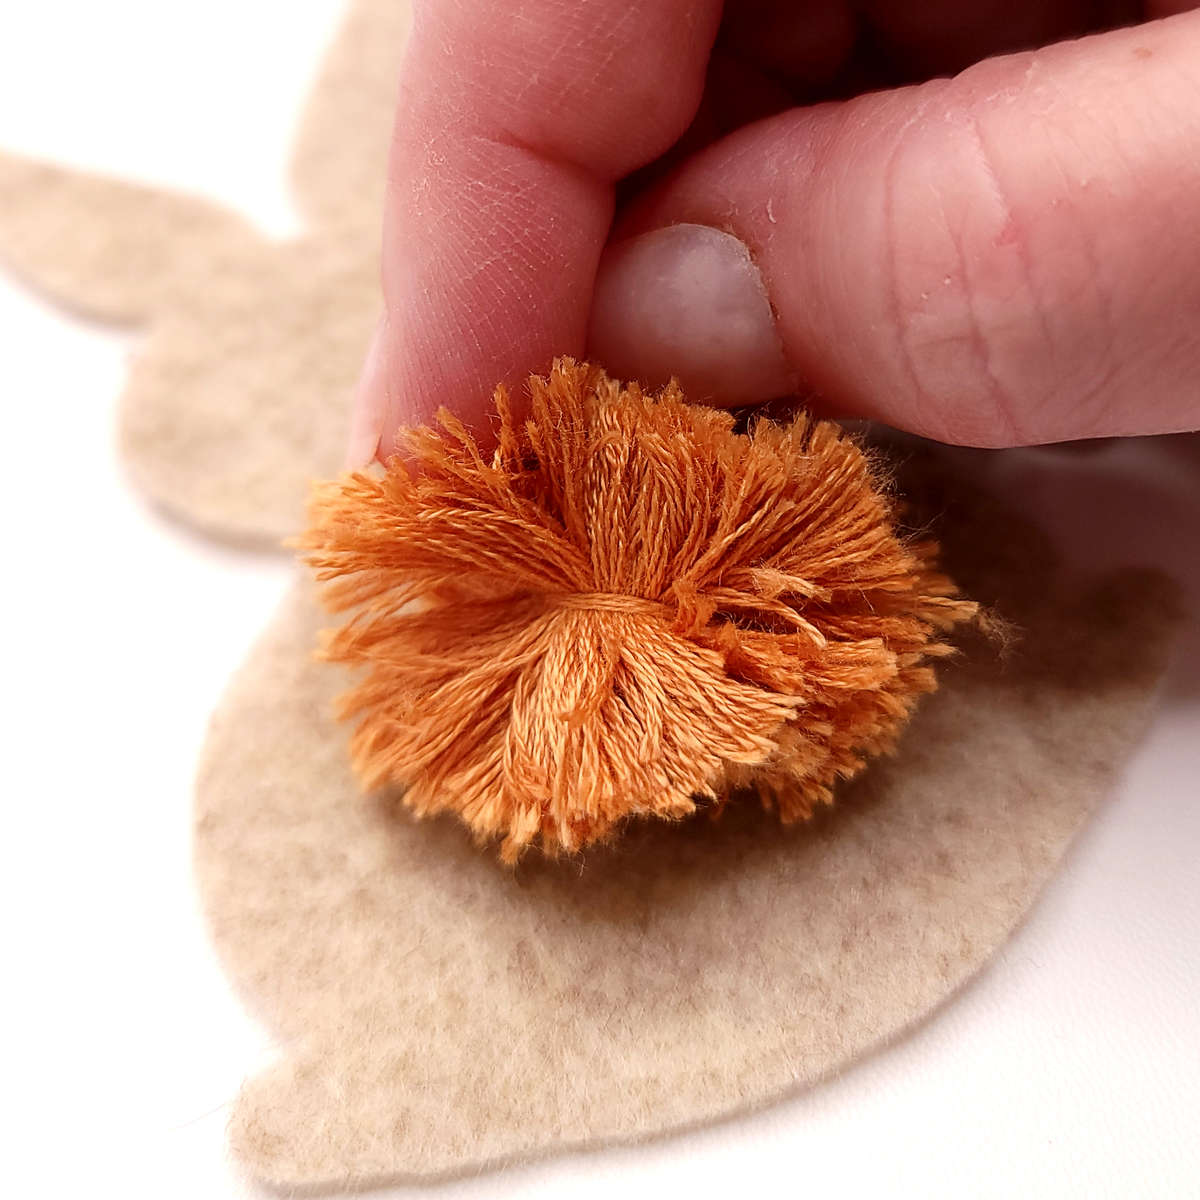
Orientate the pompom in whatever direction it looks best. I positioned this one so the tie thread is horizontal or parallel with the fabric. This position gave me the best ball shape and hid the tie thread well.
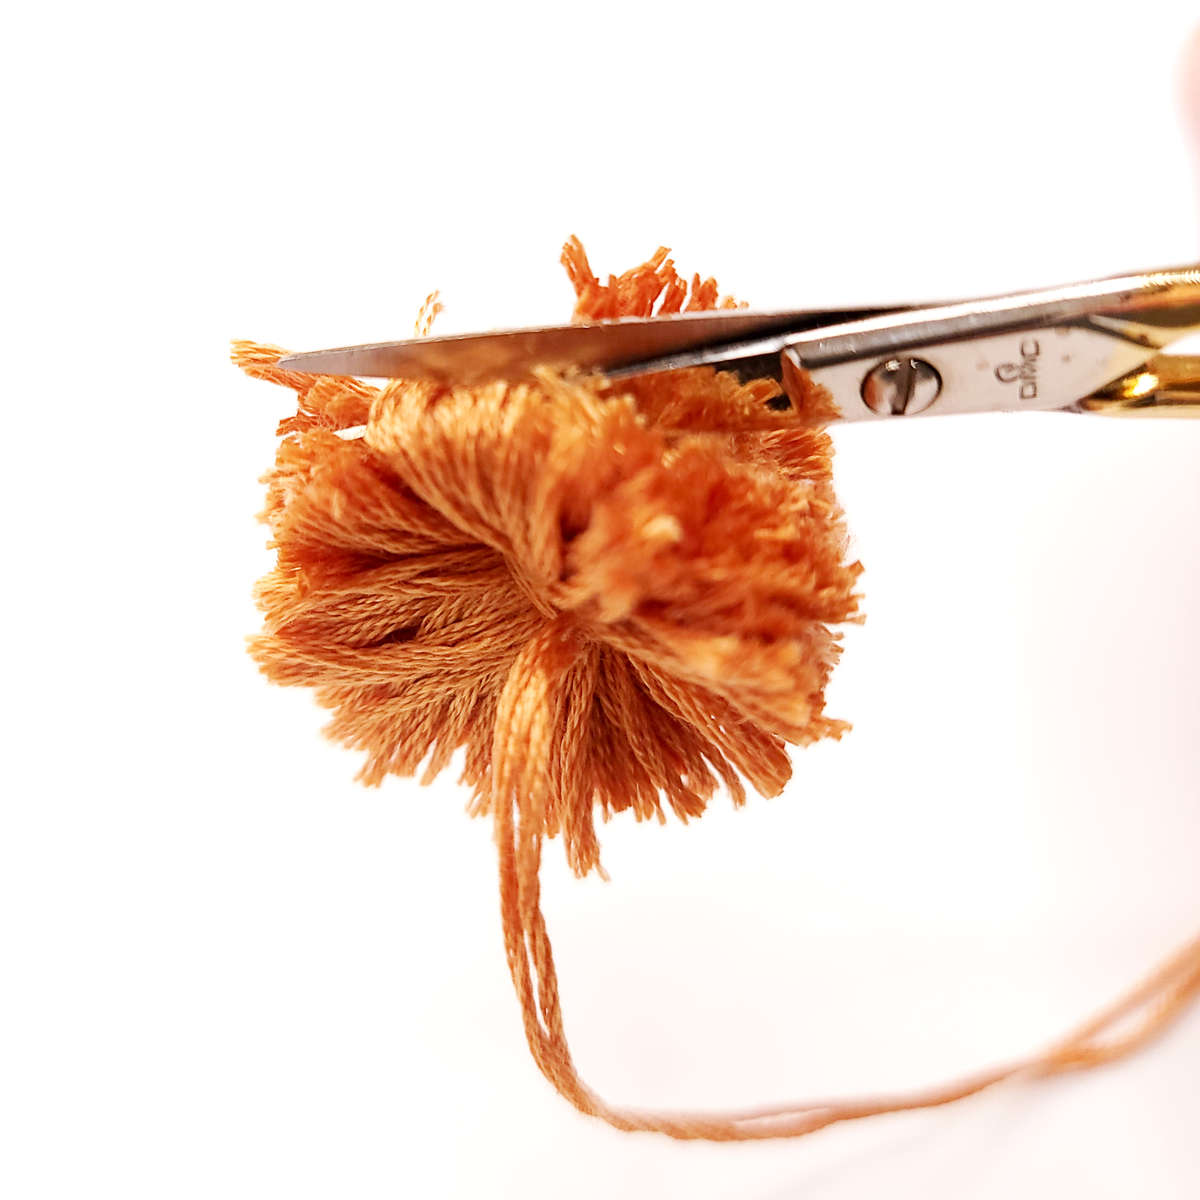
Shape the pompom into a ball by trimming any uneven areas with a small scissors. Be careful not to cut too much.

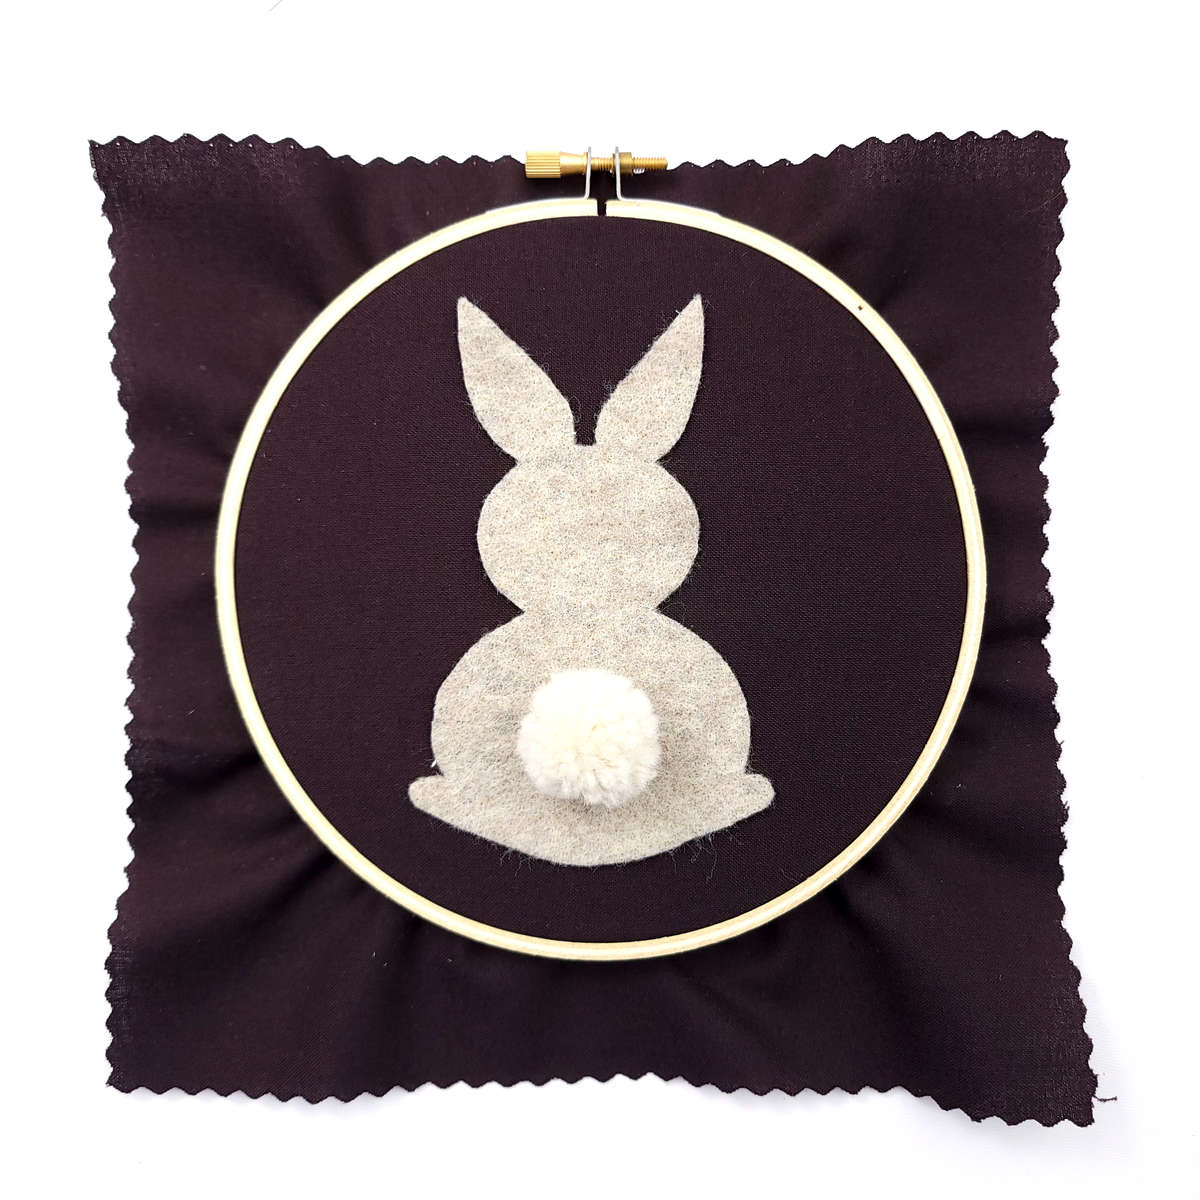
Displaying Your Finished Work
There are a number of ways to display a finished embroidery piece. You can leave it in the hoop, make a small quilted wall hanging, or mount it in a frame, just to name a few.
If you frame it in the hoop you can hang it on the wall or place it in a display stand.
You can also put the adjusting hardware to the top and add a bow and string to hang it on the wall.
Paint, stain, tape or fabric are all fun ways to decorate a hoop. For best results stitch the project with a plain hoop. Then remove the outer hoop ring and apply any decorative product. After the hoop is dry re-hoop the fabric and finish the back.
For this piece I used wood stain on an inexpensive wood hoop.

Finishing the Back
If you choose to frame your embroidery in the hoop you will want to finish the back. To do this you will need a 30 inch long piece of sewing thread or a single strand of embroidery floss.
To finish the back start by trimming the corners, leaving about an inch of fabric. Starting with your needle on the backside of the fabric, bring your needle up through the fabric about a quarter inch from the edge. Leave a three or four inch tail of thread to the inside.
Continue to stitch a loose running stitch all the way around the hoop. Try to stay about a quarter of an inch away from the edge of the fabric.
When you get back to your first stitch, pull the tail thread and the needle thread together. This will gather and bunch the fabric. Tie the two ends of thread together with a secure knot. Cut off any excess thread. You can use a little steam along the edges to help it lay flat.
To completely cover the back you can cut a piece of felt the same size as the hoop and stitch it or glue it to the back.

Share Your Work!
You did it, great job! Thank you so much for joining me on this stitch along project. If you enjoyed this pattern snap a photo of your finished piece and share it on social media.
I love seeing your work and your unique take on patterns so don't forget to tag me. #wildflowerfoxcrafts
I love seeing your work and your unique take on patterns so don't forget to tag me. #wildflowerfoxcrafts
Join me In the Hoop
Get all of the latest news, tips & tutorials delivered right to your inbox!
There is always something fun happening in the hoop.
There is always something fun happening in the hoop.
In The Hoop Newsletter
Sign up to get the latest on sales, new releases and more …