Pumpkin Trio Hand Embroidery Project

Tutorial
This guide will walk you through all of the steps and techniques used to stitch this pattern. The information in this guide is merely a suggestion so please feel free to make changes to colors, stitches or techniques to make it your own. There is no right or wrong way to stitch this pattern, so relax and have fun!
You will need:
- Sharp Scissors
- Embroidery Needles
- 6" Embroidery Hoop
- Embroidery Floss or Thread
- Pumpkin Trio Pattern, Fabric or Kit
Iron and Ironing-board or Equivalent
DMC Floss Colors
- 741
- 946
- 721
- 904
- 988
- 3011
Or colors of your choice
Stitches Used in this Project
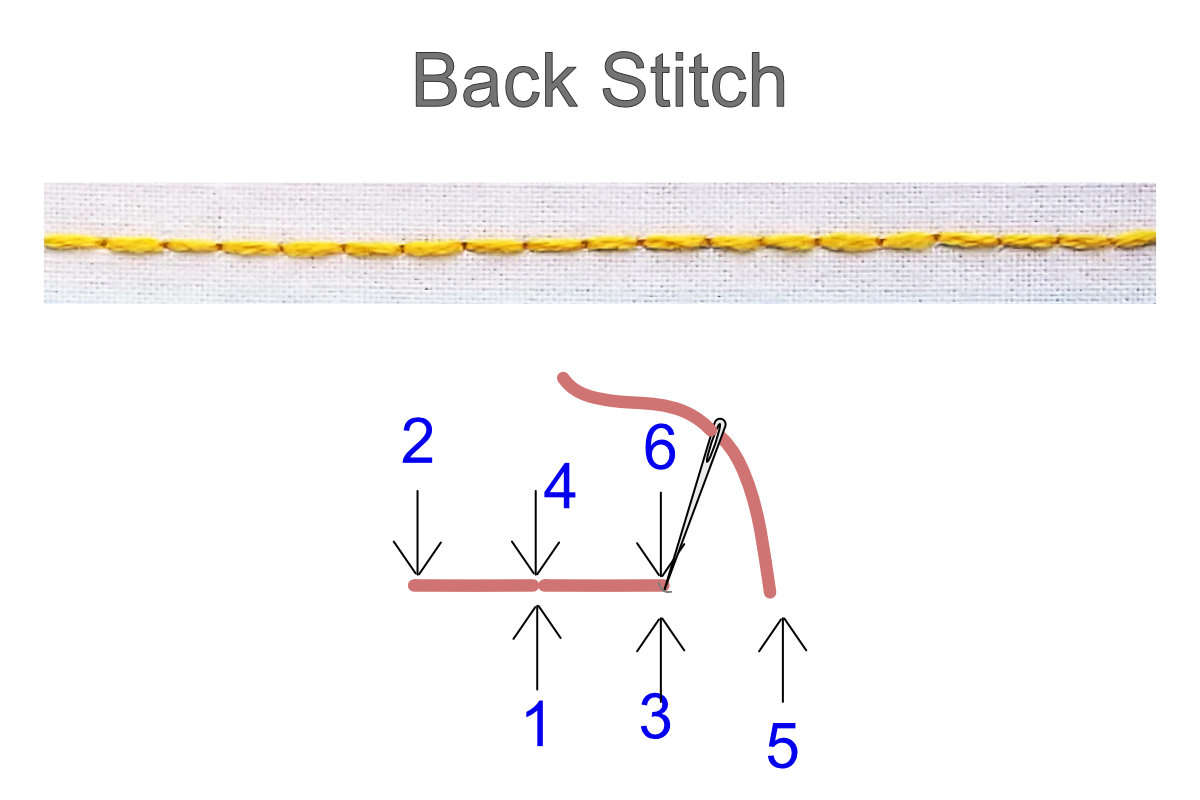
To complete the Back Stitch
Start on the back side of the fabric and bring your needle up through the fabric at 1 then down through at 2. Bring your needle up through at 3 and back down at 4 in the same hole as 1. Each stitch is made by moving forward on the back side then back to the previous stitch on top.
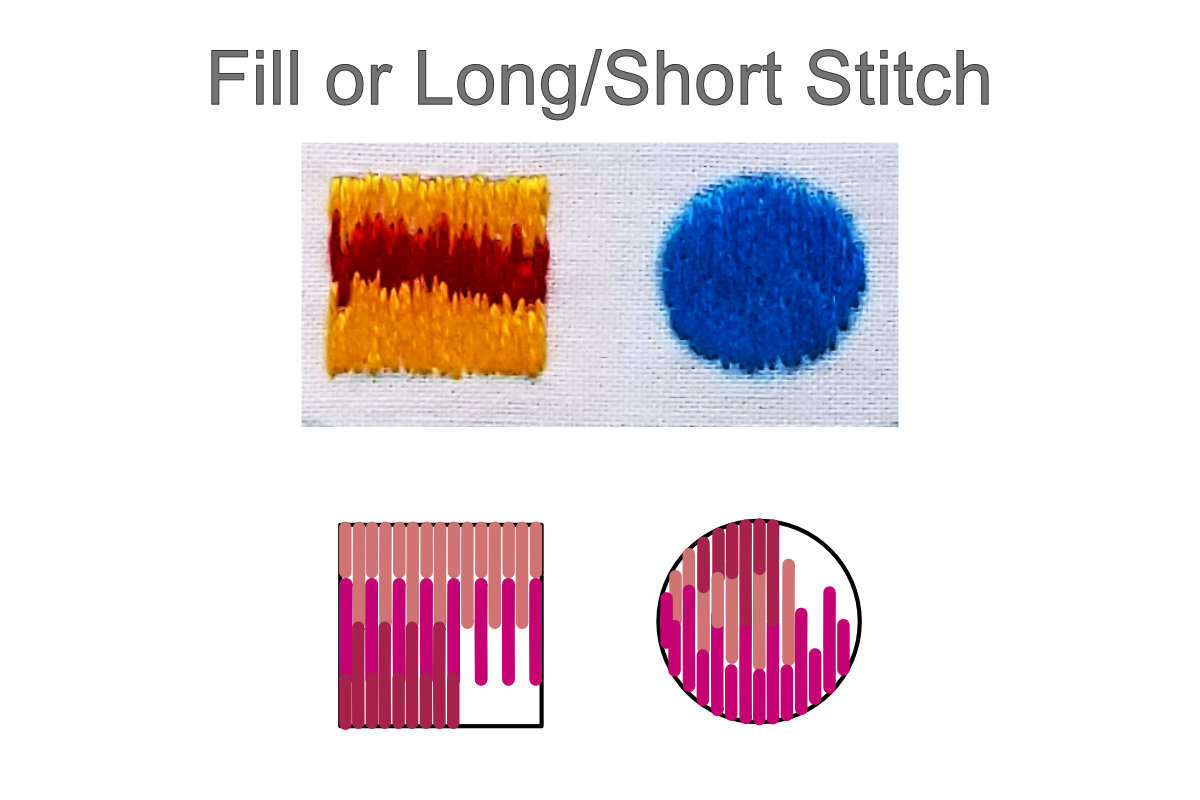
To complete the Fill Stitch
Use the long and short stitch to fill large shapes. You can use one color or multiple for different shading. Starting at the top or bottom of a shape, create a row of parallel stitches varying the length. Next work a second row of long stitches into the short stitches of the first row, passing the needle through the stitch above. Continue working rows until the shape is filled.
When filling circles be careful not to go to far out on the sides or the circle will start to look more oval. If you are having trouble keeping your stitches straight, use a ruler to draw parallel lines in.
When filling circles be careful not to go to far out on the sides or the circle will start to look more oval. If you are having trouble keeping your stitches straight, use a ruler to draw parallel lines in.
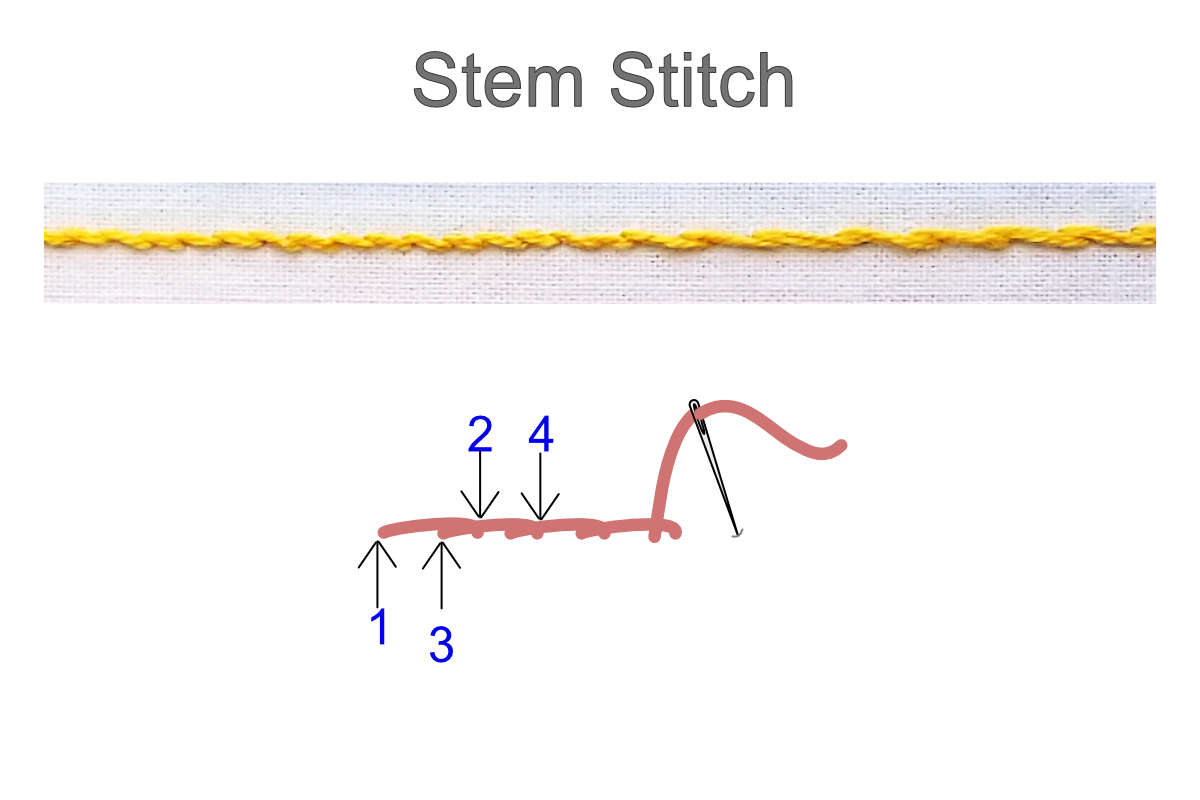
To complete the Stem Stitch
Start on the back side of the fabric, bring your needle up through the fabric at 1 then down through at 2. Then holding your first stitch to the side slightly bring your needle up at 3 being careful not to pierce the first stitch. Then go down at 4 to make your next stitch. Your stitches will overlap slightly. Stay consistent by always bringing your needle up on the same side of the stitch.
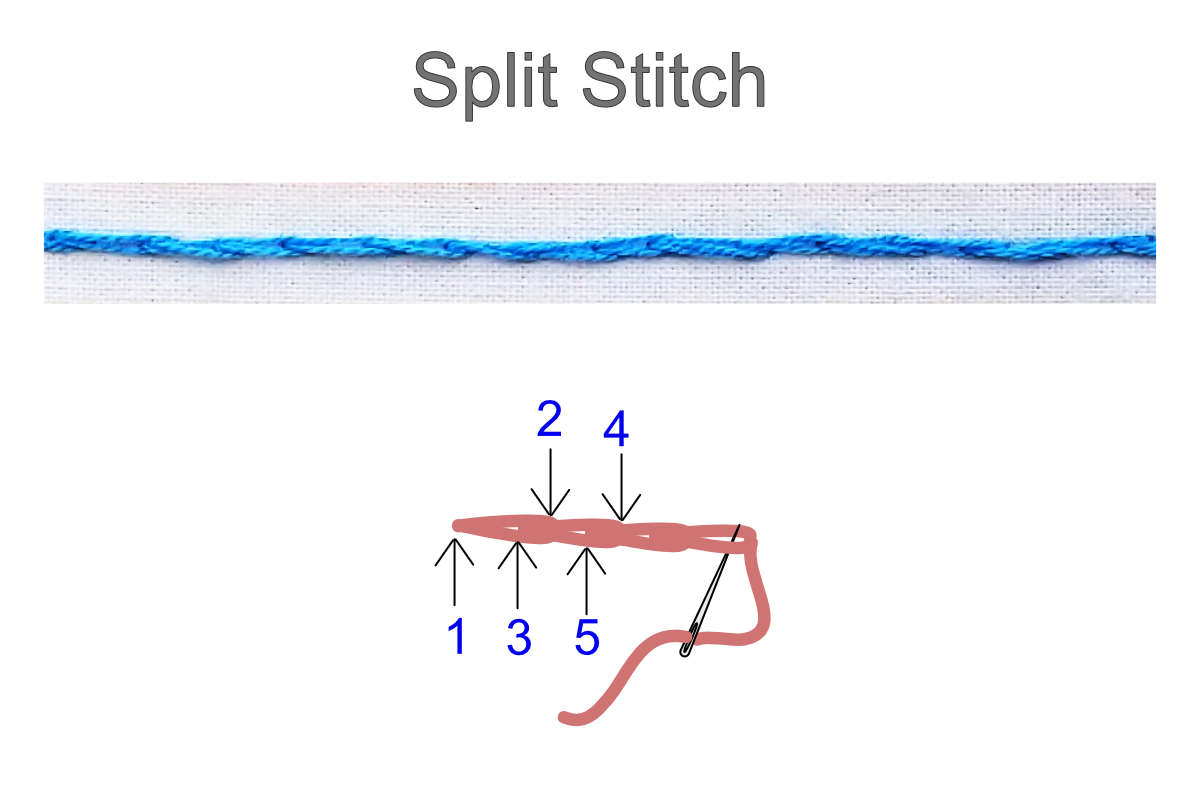
To complete the Split Stitch
Start on the back side of the fabric and bring your needle up through the fabric at 1 then down through at 2. Bring your needle up through at 3 stitching through the previous stitch piercing the strands of floss. Create another stitch by bringing your needle down at 4 and up at 5 repeating the process.
----- Let's get Started! -----
Before you start stitching be sure your fabric is pressed and free of wrinkles or creases. Hoop your fabric and let's get stitching.
This pattern is stitched with three and six strands of floss. I used a size 1 needle throughout the pattern. You can use whatever needles you have on hand as long as you can comfortably fit 6 strands into the eye.
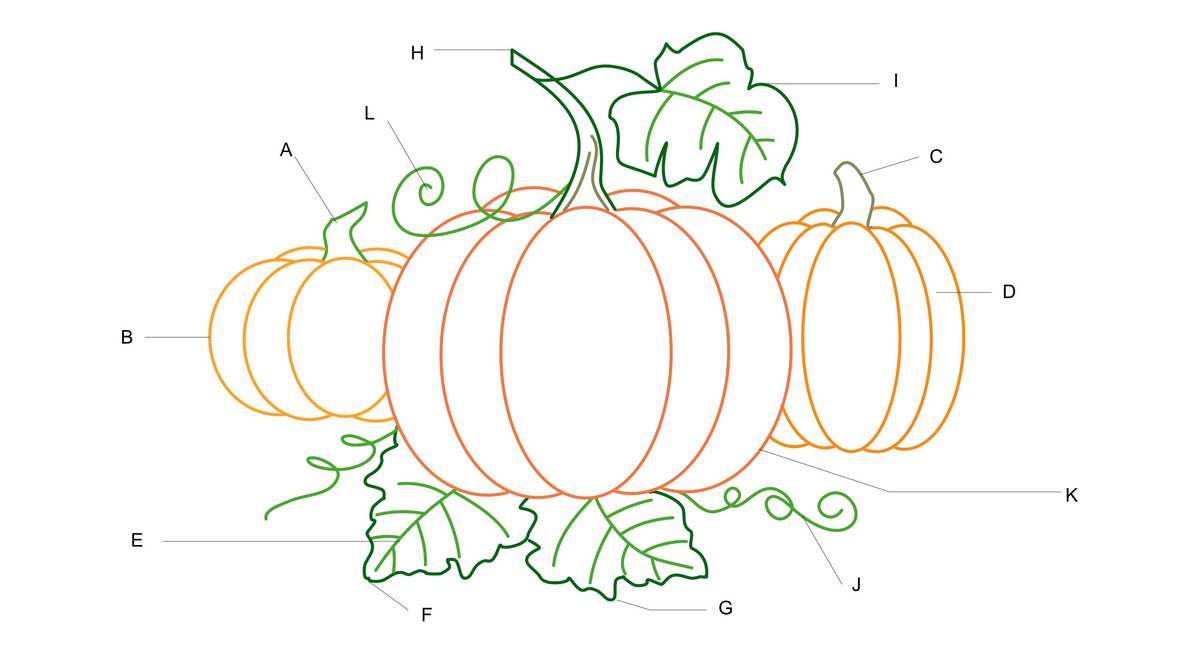
Because of the simplicity of the pattern it doesn't matter what order you stitch it in. You can stitch each lettered section in full or for fewer thread changes you can stitch each color in full. For the fewest thread changes, stitch each color in full in this order 3011, 904, 721, 741, 946, 988. Just make sure you stitch the large pumpkin (K) before you stitch the top vine (L).
Left Stem & Left Pumpkin
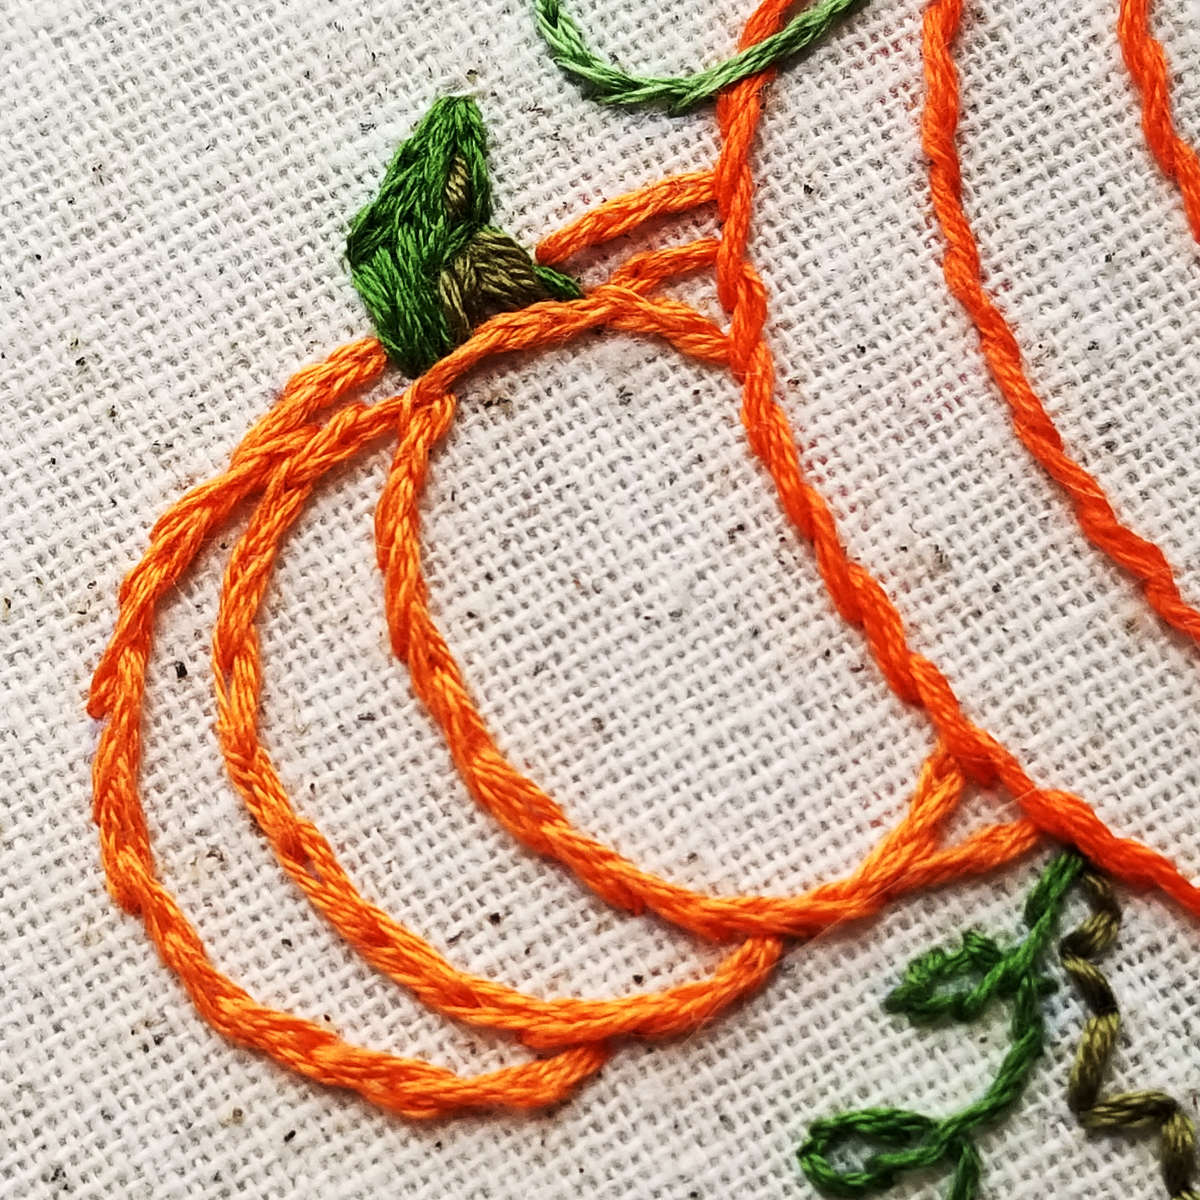
A - Left Stem
- DMC 3011 & 904
- 3 Strands
- Fill Stitch
The pumpkin stems can be outlined only, but to add a little more flair I filled them in. Stitching at a slight angle will give your stem a twisted look. Start with the darkest green 3011, this is the recessed area of the stem. Add just a few stitches where you want your stem to have a valley. Next fill the rest of the stem in with 904 green. Last, add a few highlights with 988 green. Using different shades of green will give the illusion of twists and valleys.
B - Left Pumpkin
B - Left Pumpkin
- DMC 721
- 6 Strands
- Split Stitch
Right Stem & Right Pumpkin
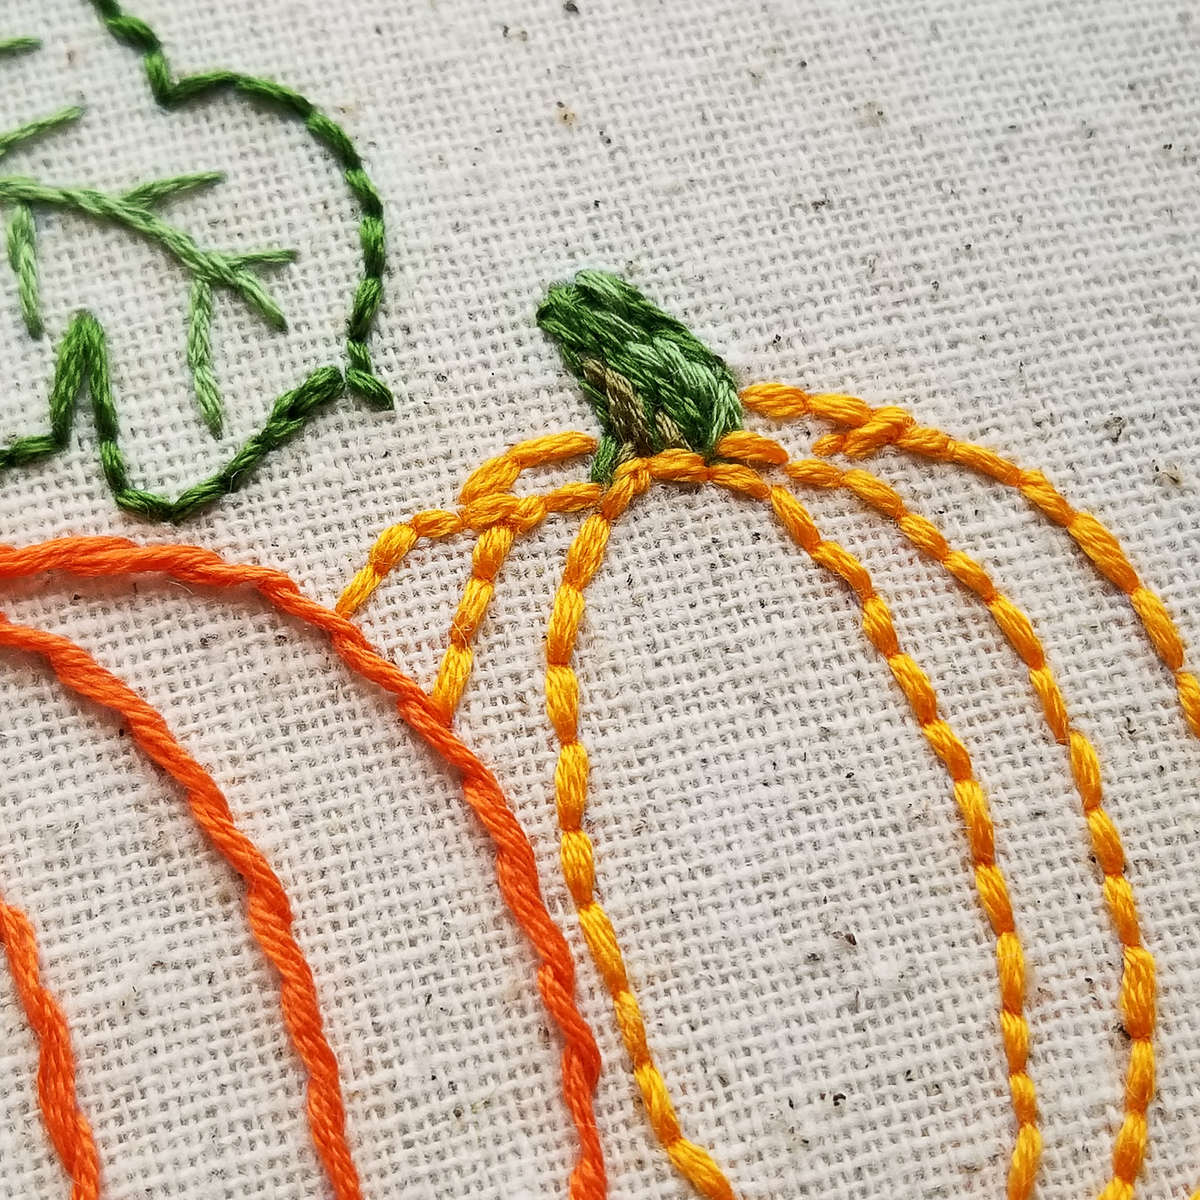
C - Right Stem
- DMC 3011, 904, 988
- 3 Strands
- Fill Stitch
To give the pumpkins a little personality and create different textures I used a different stitch on each one. If you prefer a more uniform look they can all be done in whatever stitch you prefer.
D - Right Pumpkin
- DMC 741
- 6 Strands
- Back Stitch
Leaves
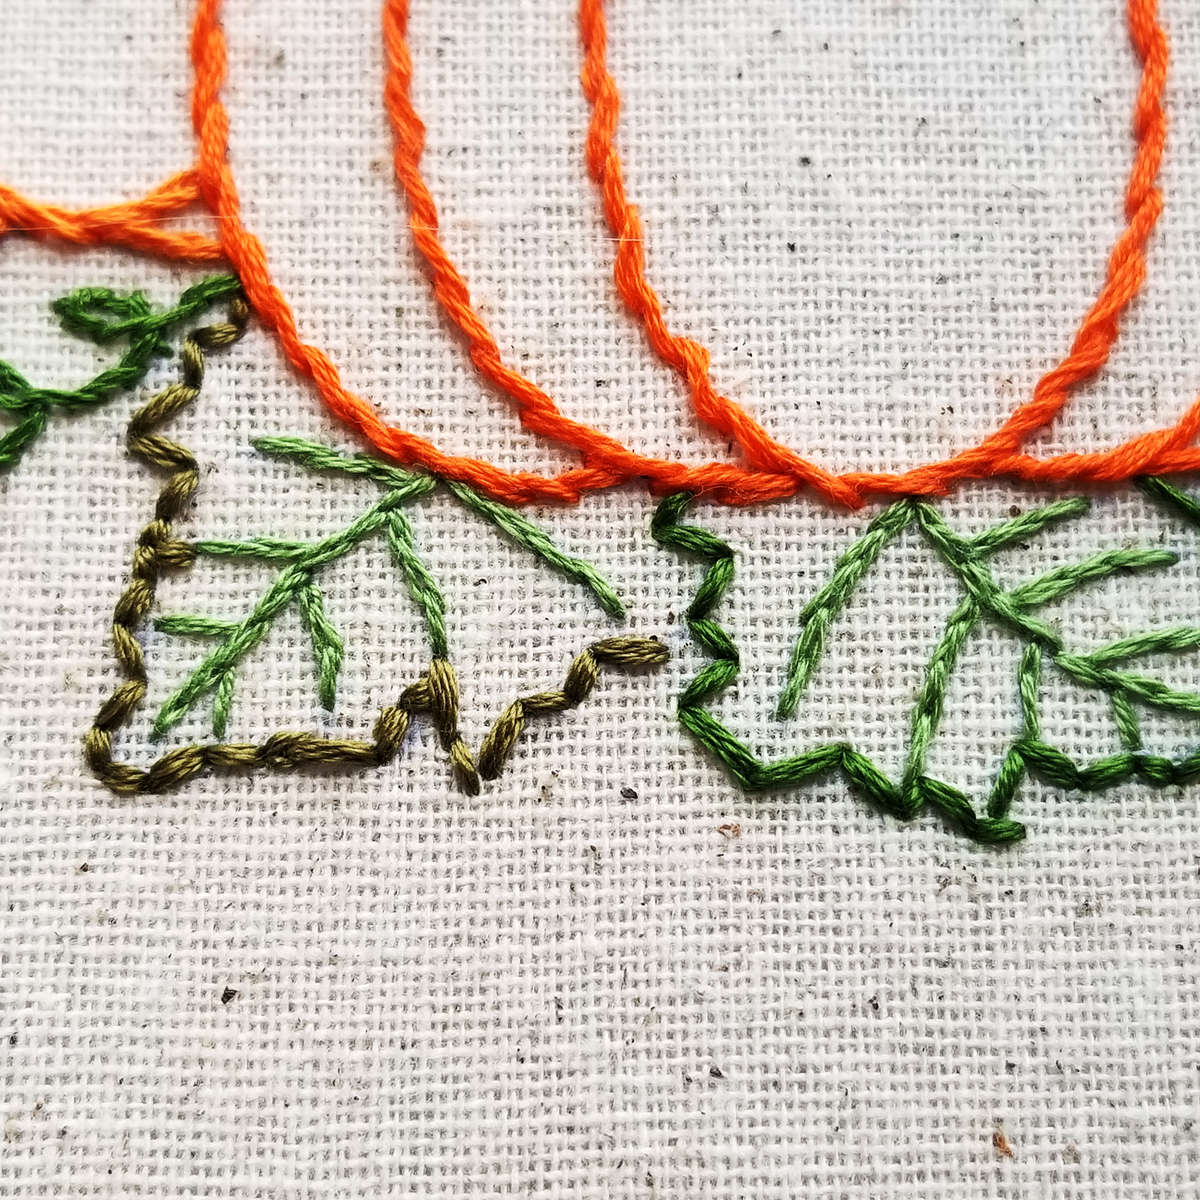
E - All Leave Veins
- DMC 988
- 3 Strands
- Split Stitch
The leaves can all be the same color or you can change it up a bit. The back stitch makes it easy to follow the bends.
F - Left lower Leaf
- DMC 3011
- 6 Strand
- Back Stitch
G - Right Leaf
- DMC 904
- 6 Strands
- Back Stitch
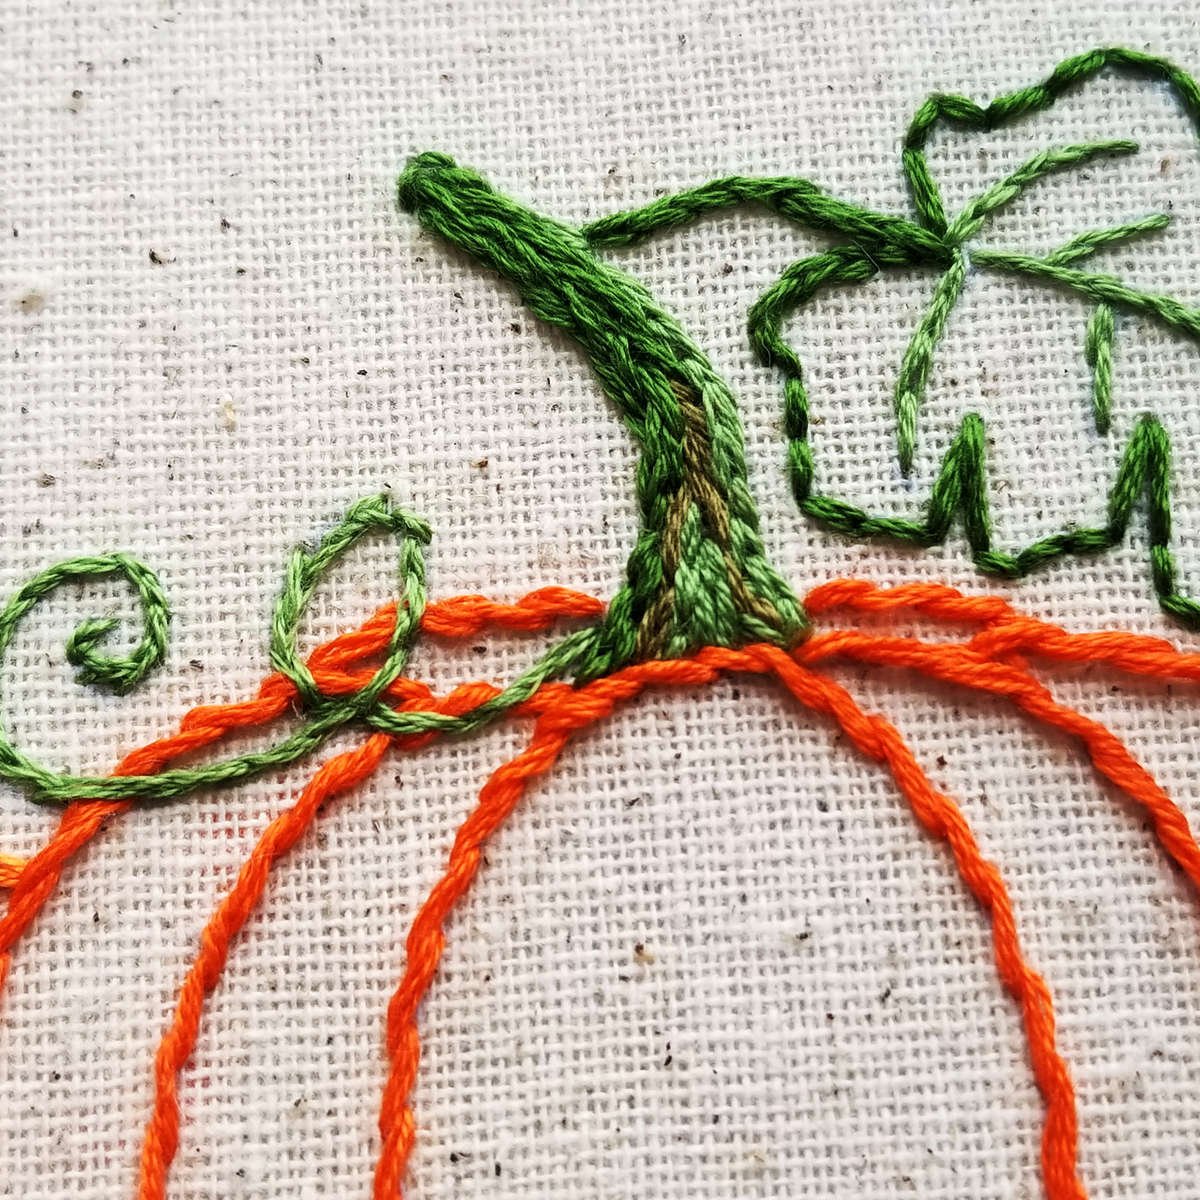
Stem and Top Leaf
H - Stem
- DMC 3011, 904, 988
- 3 Strands
- Fill Stitch
Don't stitch the top vine yet. Stitch that after you stitch the center pumpkin. You want the green over top of the orange.
I - Top Leaf
- DMC 904
- 6 Strands
- Back Stitch
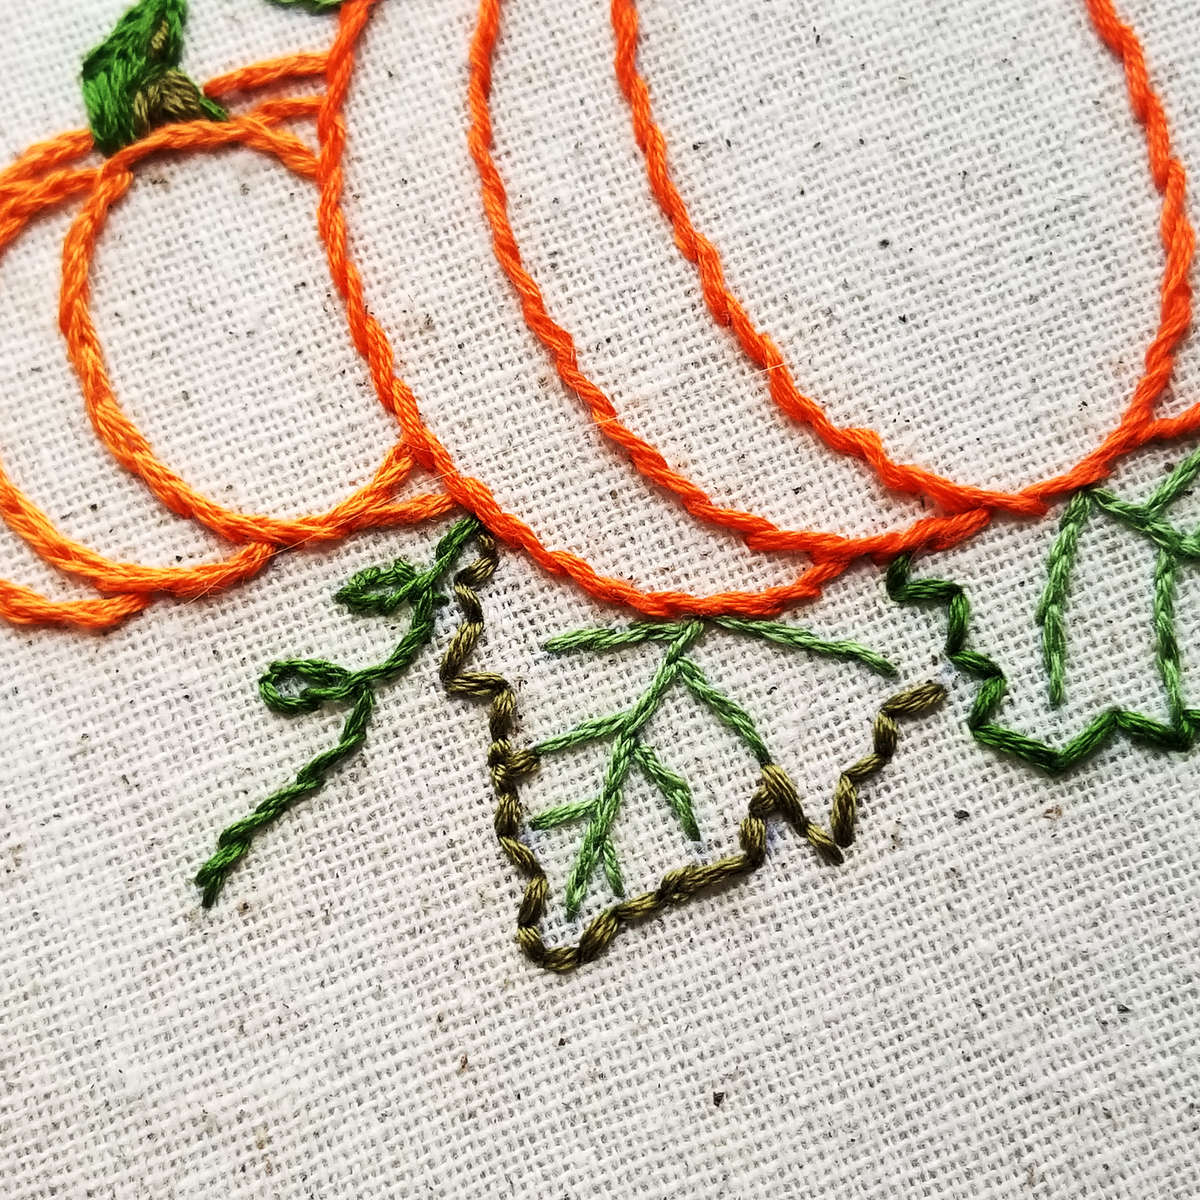
Bottom Vines and Center Pumkin
Stem stitches can be a little tricky on very tight curves. To make it easier you can change your stitch type midway. If the back stitch or split stitch is easier for you on tight curves, you can start with one of them and change to a stem stitch on the straight away.
J - Bottom Vines
- DMC 904
- 3 Strands
- Stem Stitch
K - Center Pumpkin
- DMC 946
- 6 Strands
- Stem Stitch
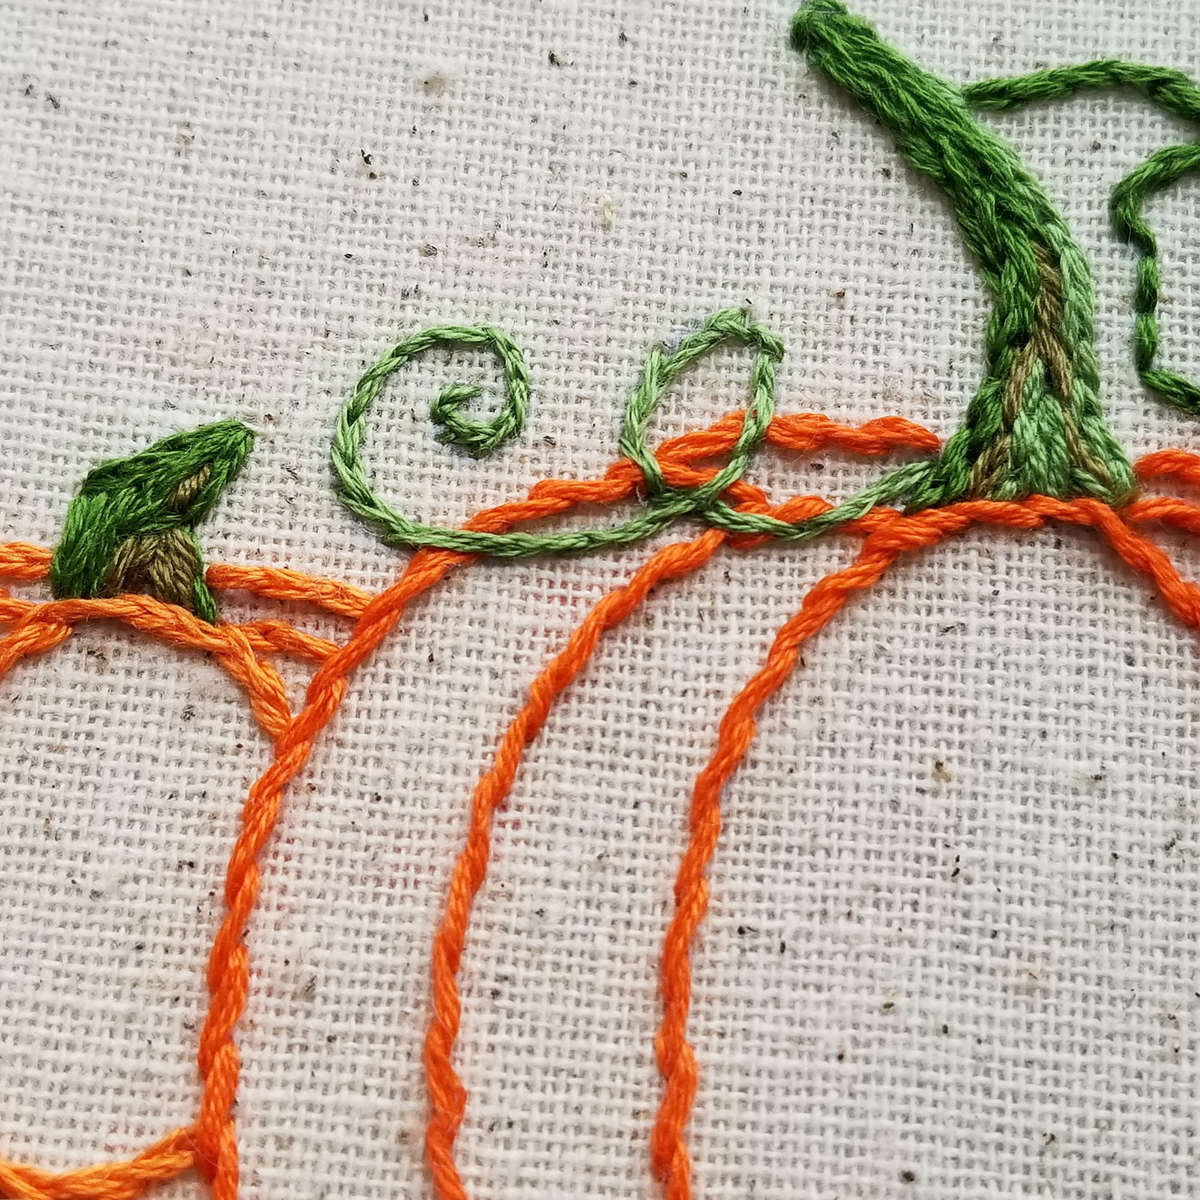
Top Vine
The top vine in the image to the right was stitched with 3 strands of floss. It gets a little lost in the curve of the pumpkin. For a thicker, fuller vine use 6 strands of floss
L - Top Vine
L - Top Vine
- DMC 988
- 3 to 6 Strands
- Split Stitch
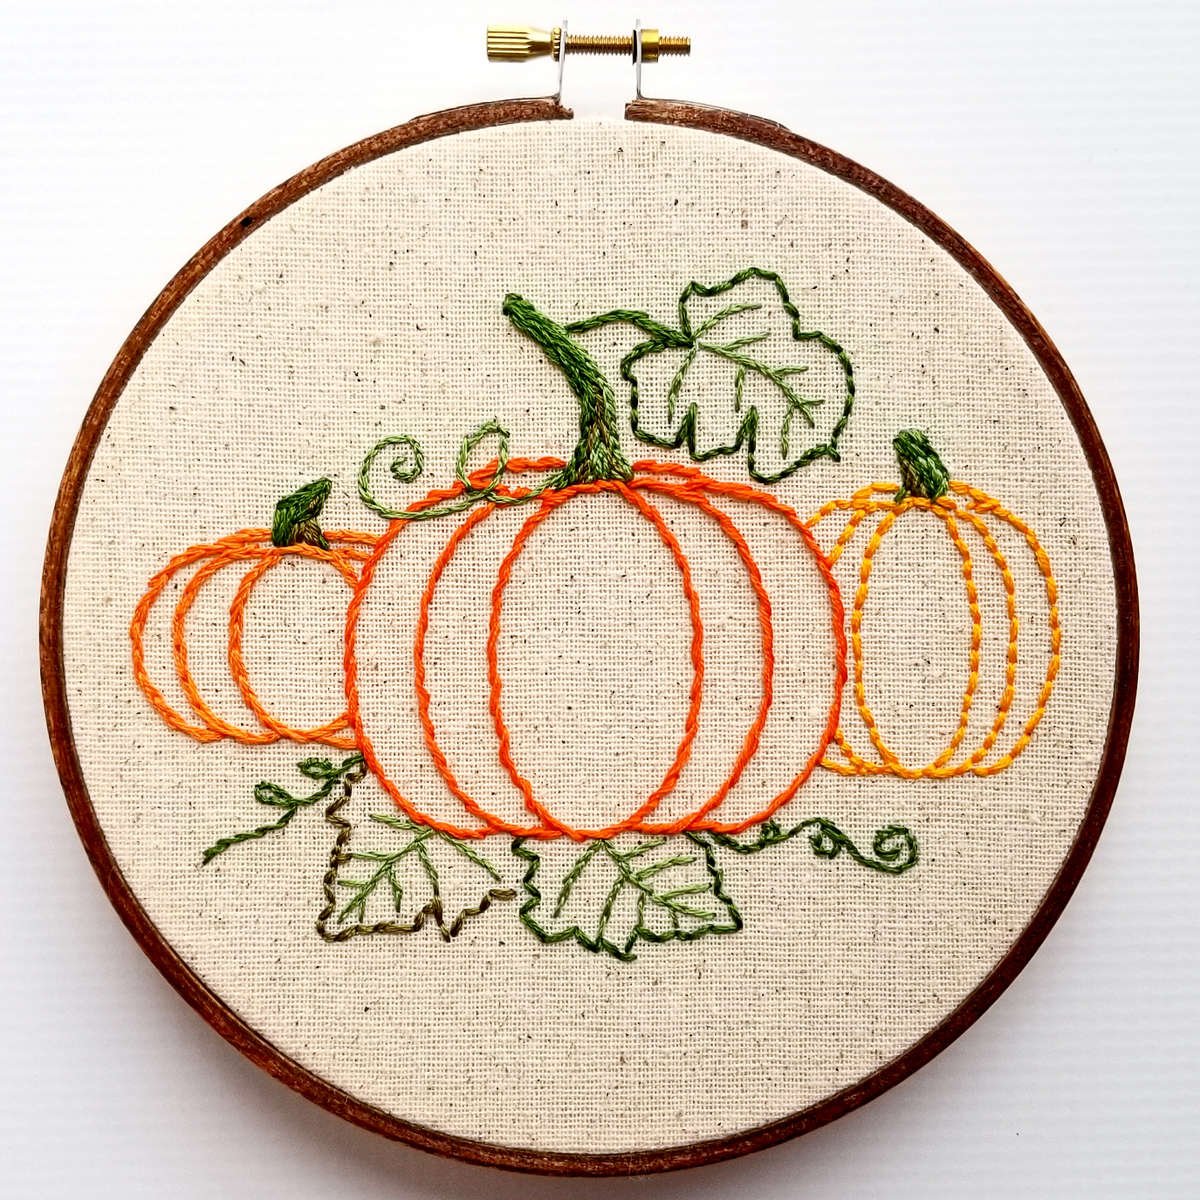
Displaying Your Finished Work
There are a number of ways to display a finished embroidery piece. You can leave it in the hoop, make a small quilted wall hanging, or mount it in a frame, just to name a few.
If you frame it in the hoop you can hang it on the wall or place it in a display stand.
You can also put the adjusting hardware to the top and add a bow and string to hang it on the wall.
Paint, stain, tape or fabric are all fun ways to decorate a hoop. For best results stitch the project with a plain hoop. Then remove the outer hoop ring and apply any decorative product. After the hoop is dry re-hoop the fabric and finish the back.
For this piece I used wood stain on an an inexpensive wood hoop.
Finishing the Back
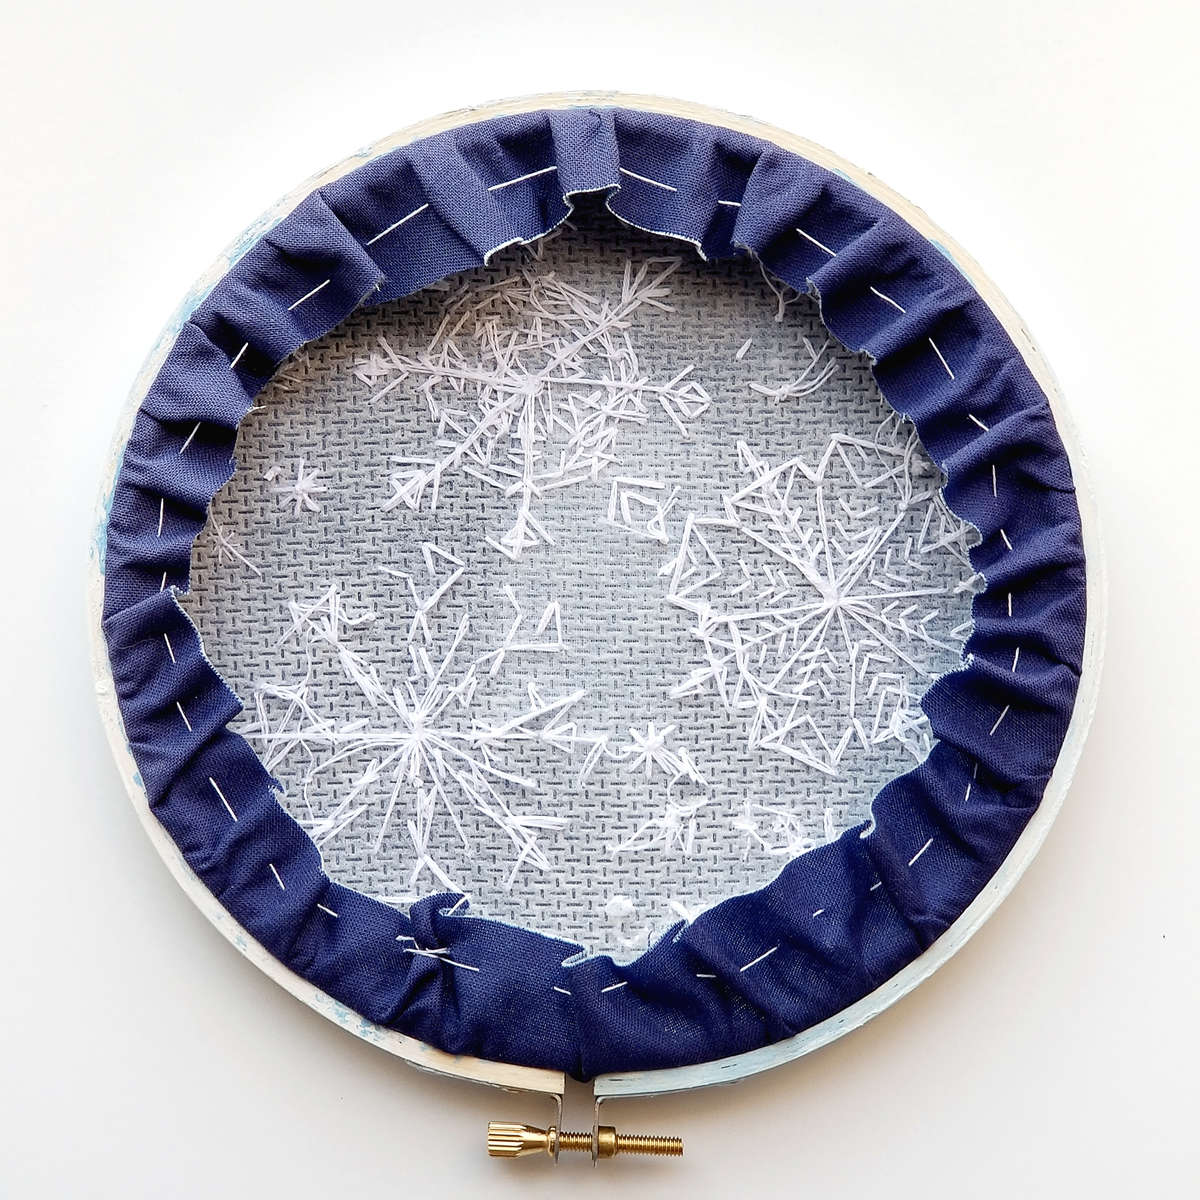
If you choose to frame your embroidery in the hoop you will want to finish the back. To do this you will need a 30 inch long piece of sewing thread or a single strand of embroidery floss.
To finish the back start by trimming the corners, leaving about an inch of fabric. Starting with your needle on the backside of the fabric, bring your needle up through the fabric about a quarter inch from the edge. Leave a three or four inch tail of thread to the inside.
Continue to stitch a loose running stitch all the way around the hoop. Try to stay about a quarter of an inch away from the edge of the fabric.
When you get back to your first stitch, pull the tail thread and the needle thread together. This will gather and bunch the fabric. Tie the two ends of thread together with a secure knot. Cut off any excess thread. You can use a little steam along the edges to help it lay flat.
To completely cover the back you can cut a piece of felt the same size as the hoop and stitch it or glue it to the back.
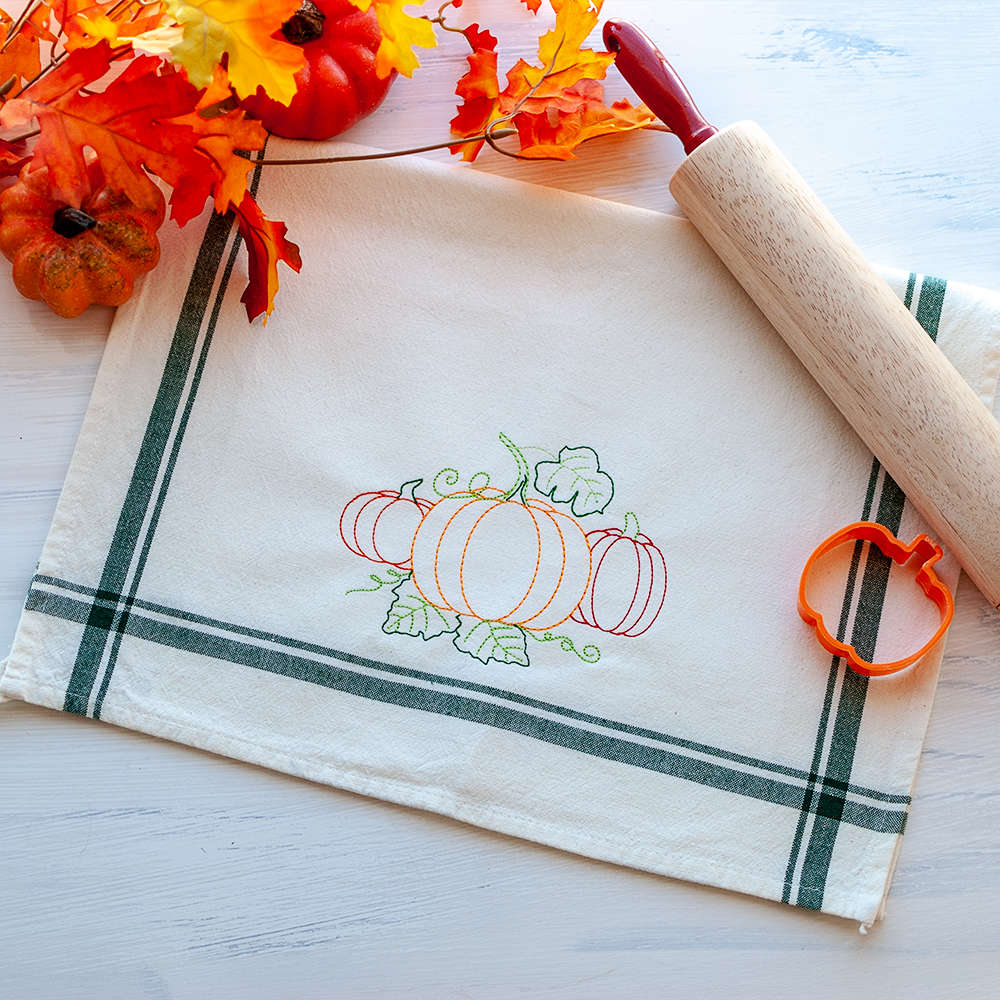
This pattern looks great on dish towels.
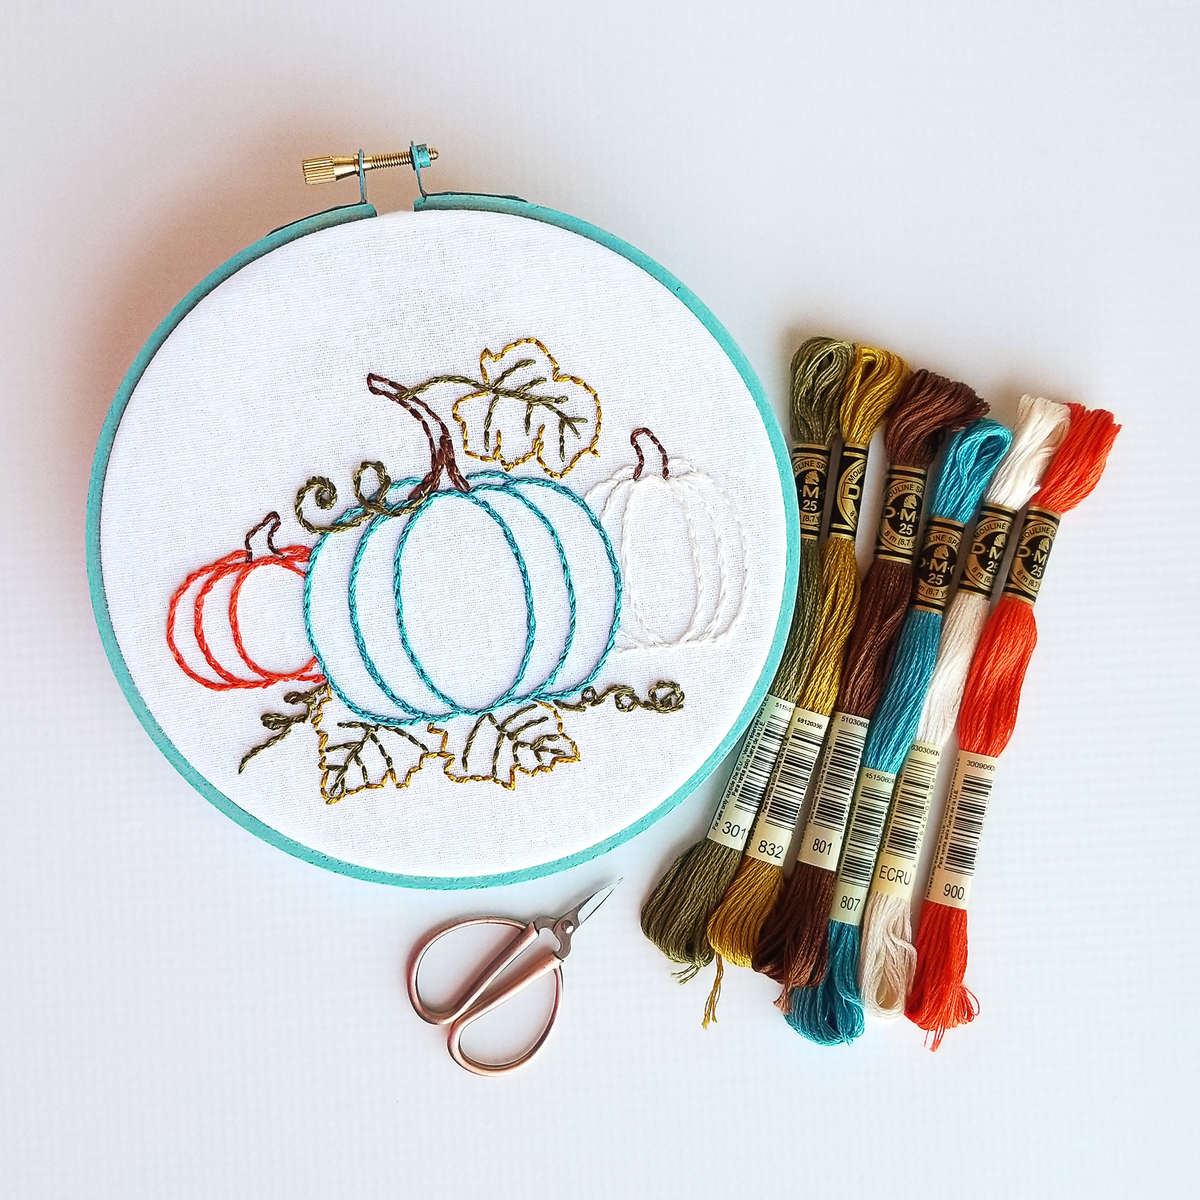
Change up the colors to fit your style or décor.
Share Your Work!
You did it, great job! Thank you so much for joining me on this stitch along project. If you enjoyed this pattern snap a photo of your finished piece and share it on social media.
I love seeing your work and your unique take on patterns so don't forget to tag me. #wildflowerfoxcrafts
I love seeing your work and your unique take on patterns so don't forget to tag me. #wildflowerfoxcrafts
Join me In the Hoop
Get all of the latest news, tips & tutorials delivered right to your inbox!
There is always something fun happening in the hoop.
There is always something fun happening in the hoop.
In The Hoop Newsletter
Sign up to get the latest on sales, new releases and more …
Tutorial

This guide will walk you through all of the steps and techniques used to stitch this pattern. The information in this guide is merely a suggestion so please feel free to make changes to colors, stitches or techniques to make it your own. There is no right or wrong way to stitch this pattern, so relax and have fun!
You will need:
- Sharp Scissors
- Embroidery Needles
- 6" Embroidery Hoop
- Embroidery Floss or Thread
- Pumpkin Trio Pattern, Fabric or Kit
Iron and Ironing-board or Equivalent
DMC Floss Colors
- 741
- 946
- 721
- 904
- 988
- 3011
Or colors of your choice
----- Let's get Started! -----
Stitches Used in this Project

To complete the Back Stitch
Start on the back side of the fabric and bring your needle up through the fabric at 1 then down through at 2. Bring your needle up through at 3 and back down at 4 in the same hole as 1. Each stitch is made by moving forward on the back side then back to the previous stitch on top.

To complete the Fill Stitch
Use the long and short stitch to fill large shapes. You can use one color or multiple for different shading. Starting at the top or bottom of a shape, create a row of parallel stitches varying the length. Next work a second row of long stitches into the short stitches of the first row, passing the needle through the stitch above. Continue working rows until the shape is filled.
When filling circles be careful not to go to far out on the sides or the circle will start to look more oval. If you are having trouble keeping your stitches straight, use a ruler to draw parallel lines in.
When filling circles be careful not to go to far out on the sides or the circle will start to look more oval. If you are having trouble keeping your stitches straight, use a ruler to draw parallel lines in.

To complete the Stem Stitch
Start on the back side of the fabric, bring your needle up through the fabric at 1 then down through at 2. Then holding your first stitch to the side slightly bring your needle up at 3 being careful not to pierce the first stitch. Then go down at 4 to make your next stitch. Your stitches will overlap slightly. Stay consistent by always bringing your needle up on the same side of the stitch.

To complete the Split Stitch
Start on the back side of the fabric and bring your needle up through the fabric at 1 then down through at 2. Bring your needle up through at 3 stitching through the previous stitch piercing the strands of floss. Create another stitch by bringing your needle down at 4 and up at 5 repeating the process.
Terms
Before you start stitching be sure your fabric is pressed and free of wrinkles or creases. Hoop your fabric and let's get stitching.
This pattern is stitched with three and six strands of floss. I used a size 1 needle throughout the pattern. You can use whatever needles you have on hand as long as you can comfortably fit 6 strands into the eye.
Because of the simplicity of the pattern it doesn't matter what order you stitch it in. You can stitch each lettered section in full or for fewer thread changes you can stitch each color in full. For the fewest thread changes, stitch each color in full in this order 3011, 904, 721, 741, 946, 988. Just make sure you stitch the large pumpkin (K) before you stitch the top vine (L).
This pattern is stitched with three and six strands of floss. I used a size 1 needle throughout the pattern. You can use whatever needles you have on hand as long as you can comfortably fit 6 strands into the eye.
Because of the simplicity of the pattern it doesn't matter what order you stitch it in. You can stitch each lettered section in full or for fewer thread changes you can stitch each color in full. For the fewest thread changes, stitch each color in full in this order 3011, 904, 721, 741, 946, 988. Just make sure you stitch the large pumpkin (K) before you stitch the top vine (L).


A & B, Left Stem & Left Pumpkin
A - Left Stem, DMC 3011 & 904, Three Strands, Fill Stitch
The pumpkin stems can be outlined only, but to add a little more flair I filled them in. Stitching at a slight angle will give your stem a twisted look. Start with the darkest green 3011, this is the recessed area of the stem. Add just a few stitches where you want your stem to have a valley. Next fill the rest of the stem in with 904 green. Last, add a few highlights with 988 green. Using different shades of green will give the illusion of twists and valleys.
B - Left Pumpkin, DMC 721, 6 Strands, Split Stitch
To give the pumpkins a little personality and create different textures I used a different stitch on each one. If you prefer a more uniform look they can all be done in whatever stitch you prefer.

C & D
DMC 105 variegated
Fill stitch with two strands of staggered floss
If you are new to the fill stitch, branches are a great place to start. They are bumpy, twisted and full of protrusions, so there is no need to worry about having perfect stitches. All of the branches are stitched in two strands of staggered floss. I made it a point to get some of the lightest part of the thread in there for highlights.
A French knot was also added at the end of the branch in the upper left corner (of the image) to make it look like it had been cut.

Leaves
DMC 4066 variegated
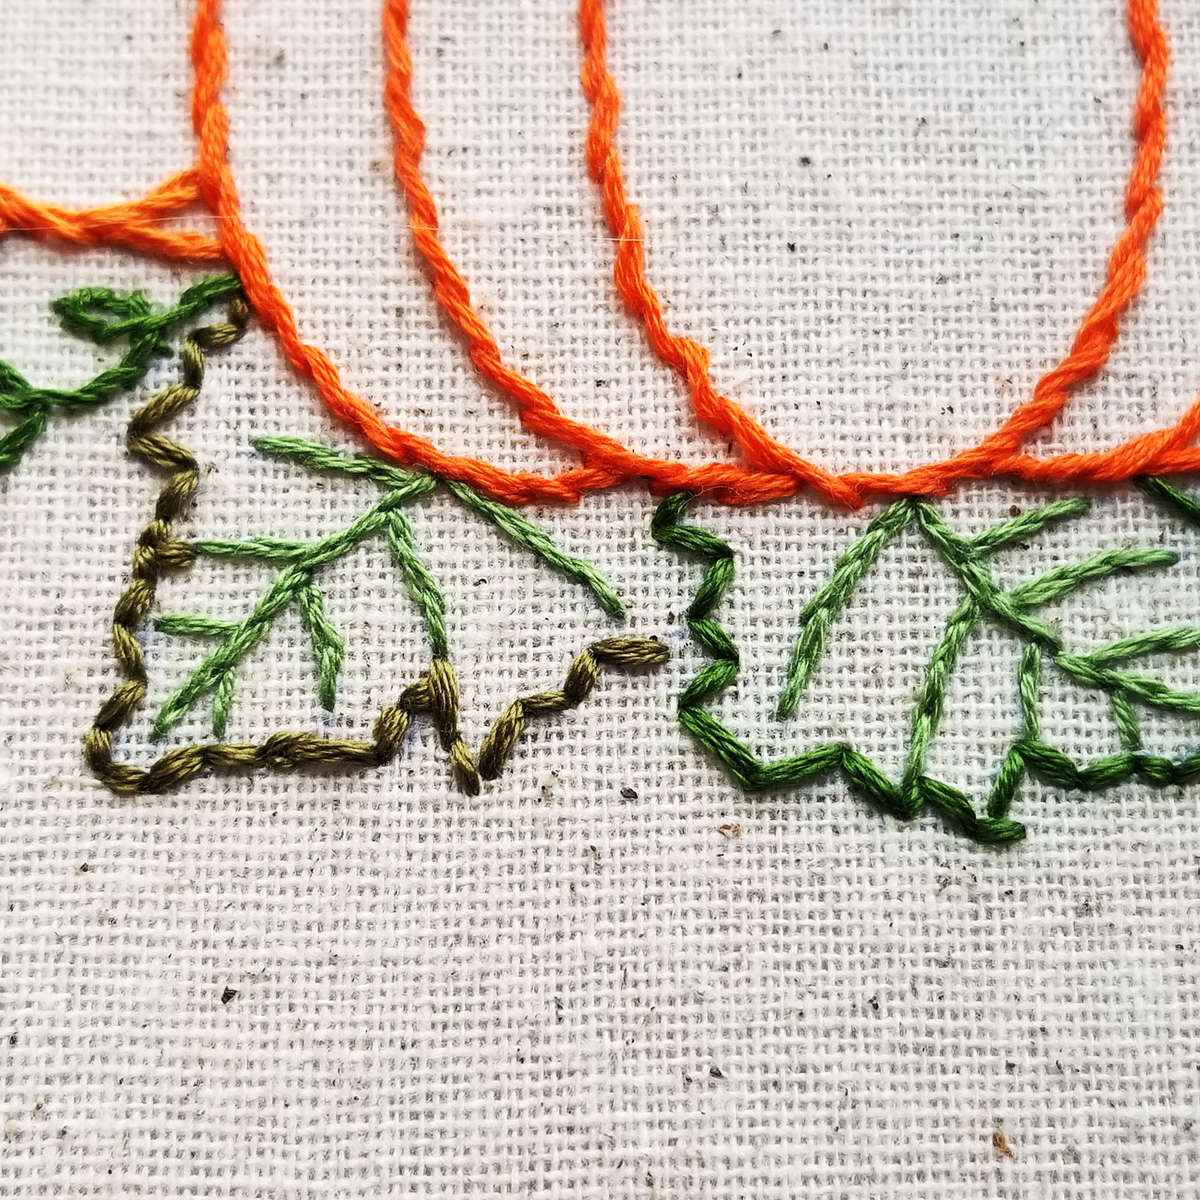
Split stitch or back stitch in one or two strands of staggered floss for the outline. The Fly Stitch for the veins.
There are a variety of ways to stitch leaves. The leaves shown here are stitched with a combination of back stitches and split stitches.
The veins of the larger leaves are stitched with two strands of staggered floss. The veins of the smaller leaves are stitched with one strand of floss. All of the leaves are outlined with two strands of staggered floss.
If you look closely you will see I stitched each leaf a little differently. I think it looks a little more natural that way but if you prefer a more consistent look they can all be stitched the same.
You could also fill the leaves in with a fish bone stitch or fill stitch.

Apple Blossoms
DMC 4180 variegated & DMC 725
Split stitch and back stitch outlines.
French Knots or Cross Stitch Centers
One, two or three strands depending on the size of the flower.
Like the leaves the flowers are stitched a little differently depending on their size. Larger flowers are created with a split stitch and three strands of floss on the outline and one to two strands in the center. Smaller flowers are made with a back stitch in two strands of floss for the outline and one strand in the center.
For the yellow centers use either a cross stitch or French knots in two strands of floss.
For a more consistent look all of the flowers can be stitched the same.
Bees
DMC 310, 307, 67 variegated
Back stitch and fill stitch in one to two strands of floss
The body is outlined with a back stitch in two strands of yellow. Then filled using two strands. Each black and yellow section will take 3 to 5 stitches to fill. The head is outlined in two strands of black and then filled with two strands.
If you do not want the outline of the body visible, your fill stitches can extend over the top of the outline. To do this start your fill stitches on the outside of the outline and extend them over the top.
The legs and antennas are one strand of black.
The wings are outline with a back stitch in one strand of floss of the lightest section of the 67 blue variegated. For bolder wings you could use a darker section of blue or black.

Text
This pattern is available with a blank space in the rings or Mom. You can easily add any name, monogram or phase you like.
DMC 321 (optional text)
Split back stitch in two or three strands of floss
A split-back stitch is a combination of the split stitch and the back stitch. It is made just like a back stitch but instead of the needle entering the fabric at the last stitch hole you move back slightly and split the previous stitch entering the fabric from the top instead of from the bottom.
The advantage to a split-back stitch is it very easy to make small smooth split stitches for curvy areas such as letting. The disadvantage is it uses a lot more thread.
Letters can also be stitched in a normal back stitch or split stitch.
The image shows a split-back stitch in three strands of floss.
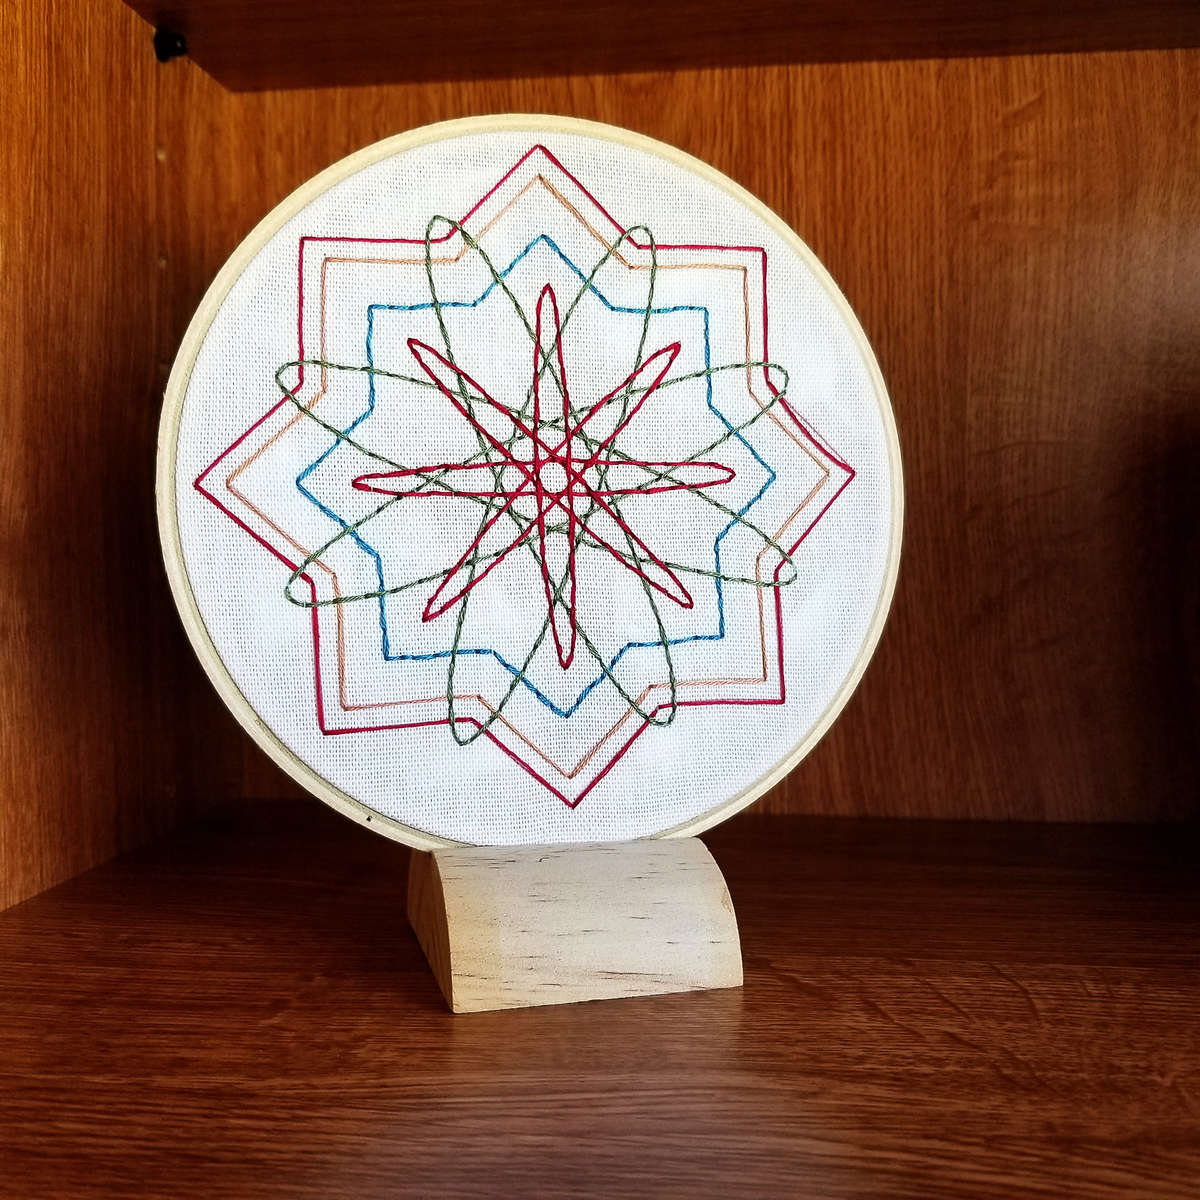
Displaying Your Finished Work
There are a number of ways to display a finished embroidery piece. You can leave it in the hoop, make a small quilted wall hanging, or mount it in a frame, just to name a few.
If you frame it in the hoop you can hang it on the wall or place it in a display stand.
(Display stand available here)
You can also put the adjusting hardware to the top and add a bow and string to hang it on the wall.
Paint, stain, tape or fabric are all fun ways to decorate a hoop. For best results stitch the project with a plain hoop. Then remove the outer hoop ring and apply any decorative product. After the hoop is dry re-hoop the fabric and finish the back.

Finishing the Back
If you choose to frame your embroidery in the hoop you will want to finish the back. To do this you will need a 30 inch long piece of sewing thread or a single strand of embroidery floss.
To finish the back start by trimming the corners, leaving about an inch of fabric. Starting with your needle on the backside of the fabric, bring your needle up through the fabric about a quarter inch from the edge. Leave a three or four inch tail of thread to the inside.
Continue to stitch a loose running stitch all the way around the hoop. Try to stay about a quarter of an inch away from the edge of the fabric.
When you get back to your first stitch, pull the tail thread and the needle thread together. This will gather and bunch the fabric. Tie the two ends of thread together with a secure knot. Cut off any excess thread. You can use a little steam along the edges to help it lay flat.
To completely cover the back you can cut a piece of felt the same size as the hoop and stitch it or glue it to the back.
To finish the back start by trimming the corners, leaving about an inch of fabric. Starting with your needle on the backside of the fabric, bring your needle up through the fabric about a quarter inch from the edge. Leave a three or four inch tail of thread to the inside.
Continue to stitch a loose running stitch all the way around the hoop. Try to stay about a quarter of an inch away from the edge of the fabric.
When you get back to your first stitch, pull the tail thread and the needle thread together. This will gather and bunch the fabric. Tie the two ends of thread together with a secure knot. Cut off any excess thread. You can use a little steam along the edges to help it lay flat.
To completely cover the back you can cut a piece of felt the same size as the hoop and stitch it or glue it to the back.

This pattern looks great on dish towels.

Change up the colors to fit your theme or decor.

Share Your Work!
You did it, great job! Thank you so much for joining me on this stitch along project. If you enjoyed this pattern snap a photo of your finished piece and share it on social media.
I love seeing your work and your unique take on patterns so don't forget to tag me. #wildflowerfoxink or #wildflowerfoxemb
I love seeing your work and your unique take on patterns so don't forget to tag me. #wildflowerfoxink or #wildflowerfoxemb
Join me In the Hoop
Get all of the latest news, tips & tutorials delivered right to your inbox!
There is always something fun happening in the hoop.
There is always something fun happening in the hoop.
Tutorial This guide will walk you through all of the steps and techniques used to stitch this pattern. The information in this guide is merely a suggestion so please feel free to make changes to colors, stitches or techniques to make it your own. There is no right or wrong way to stitch this pattern, so relax and have fun! You will need: Sharp ScissorsEmbroidery Needles6" Embroidery HoopEmbroidery Floss or ThreadPumpkin Trio Pattern, Fabric or KitIron and Ironing-board or Equivalent DMC Floss Colors 7419467219049883011Or colors of your choice Stitches Used in this Project To complete the Back Stitch Start on the back side of the fabric and bring your needle up through the fabric at 1 then down through at 2. Bring your needle up through at 3 and back down at 4 in the same hole as 1. Each stitch is made by moving forward on the back side then back to the previous stitch on top. To complete the Fill Stitch Use the long and short stitch to fill large shapes. You can use one color or multiple for different shading. Starting at the top or bottom of a shape, create a row of parallel stitches varying the length. Next work a second row of long stitches into the short stitches of the first row, passing the needle through the stitch above. Continue working rows until the shape is filled. When filling circles be careful not to go to far out on the sides or the circle will start to look more oval. If you are having trouble keeping your stitches straight, use a ruler to draw parallel lines in. To complete the Stem Stitch Start on the back side of the fabric, bring your needle up through the fabric at 1 then down through at 2. Then holding your first stitch to the side slightly bring your needle up at 3 being careful not to pierce the first stitch. Then go down at 4 to make your next stitch. Your stitches will overlap slightly. Stay consistent by always bringing your needle up on the same side of the stitch. To complete the Split Stitch Start on the back side of the fabric and bring your needle up through the fabric at 1 then down through at 2. Bring your needle up through at 3 stitching through the previous stitch piercing the strands of floss. Create another stitch by bringing your needle down at 4 and up at 5 repeating the process. ----- Let's get Started! ----- Before you start stitching be sure your fabric is pressed and free of wrinkles or creases. Hoop your fabric and let's get stitching. This pattern is stitched with three and six strands of floss. I used a size 1 needle throughout the pattern. You can use whatever needles you have on hand as long as you can comfortably fit 6 strands into the eye. Because of the simplicity of the pattern it doesn't matter what order you stitch it in. You can stitch each lettered section in full or for fewer thread changes you can stitch each color in full. For the fewest thread changes, stitch each color in full in this order 3011, 904, 721, 741, 946, 988. Just make sure you stitch the large pumpkin (K) before you stitch the top vine (L). Left Stem & Left Pumpkin A - Left StemDMC 3011 & 904 3 StrandsFill StitchThe pumpkin stems can be outlined only, but to add a little more flair I filled them in. Stitching at a slight angle will give your stem a twisted look. Start with the darkest green 3011, this is the recessed area of the stem. Add just a few stitches where you want your stem to have a valley. Next fill the rest of the stem in with 904 green. Last, add a few highlights with 988 green. Using different shades of green will give the illusion of twists and valleys.B - Left Pumpkin DMC 7216 StrandsSplit Stitch Right Stem & Right Pumpkin C - Right StemDMC 3011, 904, 9883 StrandsFill StitchTo give the pumpkins a little personality and create different textures I used a different stitch on each one. If you prefer a more uniform look they can all be done in whatever stitch you prefer. D - Right PumpkinDMC 7416 StrandsBack Stitch Leaves E - All Leave VeinsDMC 9883 StrandsSplit StitchThe leaves can all be the same color or you can change it up a bit. The back stitch makes it easy to follow the bends.F - Left lower LeafDMC 30116 StrandBack StitchG - Right LeafDMC 9046 StrandsBack Stitch Stem and Top Leaf H - StemDMC 3011, 904, 9883 StrandsFill StitchDon't stitch the top vine yet. Stitch that after you stitch the center pumpkin. You want the green over top of the orange. I - Top LeafDMC 9046 StrandsBack Stitch Bottom Vines and Center Pumkin Stem stitches can be a little tricky on very tight curves. To make it easier you can change your stitch type midway. If the back stitch or split stitch is easier for you on tight curves, you can start with one of them and change to a stem stitch on the straight away. J - Bottom VinesDMC 9043 StrandsStem StitchK - Center PumpkinDMC 9466 StrandsStem Stitch Top Vine The top vine in the image to the right was stitched with 3 strands of floss. It gets a little lost in the curve of the pumpkin. For a thicker, fuller vine use 6 strands of flossL - Top VineDMC 9883 to 6 StrandsSplit Stitch Displaying Your Finished Work There are a number of ways to display a finished embroidery piece. You can leave it in the hoop, make a small quilted wall hanging, or mount it in a frame, just to name a few. If you frame it in the hoop you can hang it on the wall or place it in a display stand.You can also put the adjusting hardware to the top and add a bow and string to hang it on the wall. Paint, stain, tape or fabric are all fun ways to decorate a hoop. For best results stitch the project with a plain hoop. Then remove the outer hoop ring and apply any decorative product. After the hoop is dry re-hoop the fabric and finish the back.For this piece I used wood stain on an an inexpensive wood hoop. Finishing the Back If you choose to frame your embroidery in the hoop you will want to finish the back. To do this you will need a 30 inch long piece of sewing thread or a single strand of embroidery floss.To finish the back start by trimming the corners, leaving about an inch of fabric. Starting with your needle on the backside of the fabric, bring your needle up through the fabric about a quarter inch from the edge. Leave a three or four inch tail of thread to the inside. Continue to stitch a loose running stitch all the way around the hoop. Try to stay about a quarter of an inch away from the edge of the fabric.When you get back to your first stitch, pull the tail thread and the needle thread together. This will gather and bunch the fabric. Tie the two ends of thread together with a secure knot. Cut off any excess thread. You can use a little steam along the edges to help it lay flat. To completely cover the back you can cut a piece of felt the same size as the hoop and stitch it or glue it to the back. This pattern looks great on dish towels. Change up the colors to fit your style or décor. Share Your Work! You did it, great job! Thank you so much for joining me on this stitch along project. If you enjoyed this pattern snap a photo of your finished piece and share it on social media.I love seeing your work and your unique take on patterns so don't forget to tag me. #wildflowerfoxcrafts Follow me on Instagram Join me In the Hoop Get all of the latest news, tips & tutorials delivered right to your inbox!There is always something fun happening in the hoop. In The Hoop Newsletter Sign up to get the latest on sales, new releases and more … Subscribe Tutorial This guide will walk you through all of the steps and techniques used to stitch this pattern. The information in this guide is merely a suggestion so please feel free to make changes to colors, stitches or techniques to make it your own. There is no right or wrong way to stitch this pattern, so relax and have fun! You will need: Sharp ScissorsEmbroidery Needles6" Embroidery HoopEmbroidery Floss or ThreadPumpkin Trio Pattern, Fabric or KitIron and Ironing-board or Equivalent DMC Floss Colors 7419467219049883011Or colors of your choice ----- Let's get Started! ----- Stitches Used in this Project To complete the Back Stitch Start on the back side of the fabric and bring your needle up through the fabric at 1 then down through at 2. Bring your needle up through at 3 and back down at 4 in the same hole as 1. Each stitch is made by moving forward on the back side then back to the previous stitch on top. To complete the Fill Stitch Use the long and short stitch to fill large shapes. You can use one color or multiple for different shading. Starting at the top or bottom of a shape, create a row of parallel stitches varying the length. Next work a second row of long stitches into the short stitches of the first row, passing the needle through the stitch above. Continue working rows until the shape is filled. When filling circles be careful not to go to far out on the sides or the circle will start to look more oval. If you are having trouble keeping your stitches straight, use a ruler to draw parallel lines in. To complete the Stem Stitch Start on the back side of the fabric, bring your needle up through the fabric at 1 then down through at 2. Then holding your first stitch to the side slightly bring your needle up at 3 being careful not to pierce the first stitch. Then go down at 4 to make your next stitch. Your stitches will overlap slightly. Stay consistent by always bringing your needle up on the same side of the stitch. To complete the Split Stitch Start on the back side of the fabric and bring your needle up through the fabric at 1 then down through at 2. Bring your needle up through at 3 stitching through the previous stitch piercing the strands of floss. Create another stitch by bringing your needle down at 4 and up at 5 repeating the process. Terms Before you start stitching be sure your fabric is pressed and free of wrinkles or creases. Hoop your fabric and let's get stitching. This pattern is stitched with three and six strands of floss. I used a size 1 needle throughout the pattern. You can use whatever needles you have on hand as long as you can comfortably fit 6 strands into the eye. Because of the simplicity of the pattern it doesn't matter what order you stitch it in. You can stitch each lettered section in full or for fewer thread changes you can stitch each color in full. For the fewest thread changes, stitch each color in full in this order 3011, 904, 721, 741, 946, 988. Just make sure you stitch the large pumpkin (K) before you stitch the top vine (L). A & B, Left Stem & Left Pumpkin A - Left Stem, DMC 3011 & 904, Three Strands, Fill StitchThe pumpkin stems can be outlined only, but to add a little more flair I filled them in. Stitching at a slight angle will give your stem a twisted look. Start with the darkest green 3011, this is the recessed area of the stem. Add just a few stitches where you want your stem to have a valley. Next fill the rest of the stem in with 904 green. Last, add a few highlights with 988 green. Using different shades of green will give the illusion of twists and valleys.B - Left Pumpkin, DMC 721, 6 Strands, Split StitchTo give the pumpkins a little personality and create different textures I used a different stitch on each one. If you prefer a more uniform look they can all be done in whatever stitch you prefer. C & D DMC 105 variegatedFill stitch with two strands of staggered flossIf you are new to the fill stitch, branches are a great place to start. They are bumpy, twisted and full of protrusions, so there is no need to worry about having perfect stitches. All of the branches are stitched in two strands of staggered floss. I made it a point to get some of the lightest part of the thread in there for highlights. A French knot was also added at the end of the branch in the upper left corner (of the image) to make it look like it had been cut. Leaves DMC 4066 variegatedSplit stitch or back stitch in one or two strands of staggered floss for the outline. The Fly Stitch for the veins.There are a variety of ways to stitch leaves. The leaves shown here are stitched with a combination of back stitches and split stitches. The veins of the larger leaves are stitched with two strands of staggered floss. The veins of the smaller leaves are stitched with one strand of floss. All of the leaves are outlined with two strands of staggered floss. If you look closely you will see I stitched each leaf a little differently. I think it looks a little more natural that way but if you prefer a more consistent look they can all be stitched the same. You could also fill the leaves in with a fish bone stitch or fill stitch. Apple Blossoms DMC 4180 variegated & DMC 725Split stitch and back stitch outlines.French Knots or Cross Stitch Centers One, two or three strands depending on the size of the flower.Like the leaves the flowers are stitched a little differently depending on their size. Larger flowers are created with a split stitch and three strands of floss on the outline and one to two strands in the center. Smaller flowers are made with a back stitch in two strands of floss for the outline and one strand in the center. For the yellow centers use either a cross stitch or French knots in two strands of floss. For a more consistent look all of the flowers can be stitched the same. Bees DMC 310, 307, 67 variegatedBack stitch and fill stitch in one to two strands of flossThe body is outlined with a back stitch in two strands of yellow. Then filled using two strands. Each black and yellow section will take 3 to 5 stitches to fill. The head is outlined in two strands of black and then filled with two strands. If you do not want the outline of the body visible, your fill stitches can extend over the top of the outline. To do this start your fill stitches on the outside of the outline and extend them over the top. The legs and antennas are one strand of black.The wings are outline with a back stitch in one strand of floss of the lightest section of the 67 blue variegated. For bolder wings you could use a darker section of blue or black. Text This pattern is available with a blank space in the rings or Mom. You can easily add any name, monogram or phase you like. DMC 321 (optional text)Split back stitch in two or three strands of flossA split-back stitch is a combination of the split stitch and the back stitch. It is made just like a back stitch but instead of the needle entering the fabric at the last stitch hole you move back slightly and split the previous stitch entering the fabric from the top instead of from the bottom.The advantage to a split-back stitch is it very easy to make small smooth split stitches for curvy areas such as letting. The disadvantage is it uses a lot more thread.Letters can also be stitched in a normal back stitch or split stitch. The image shows a split-back stitch in three strands of floss. Displaying Your Finished Work There are a number of ways to display a finished embroidery piece. You can leave it in the hoop, make a small quilted wall hanging, or mount it in a frame, just to name a few. If you frame it in the hoop you can hang it on the wall or place it in a display stand.(Display stand available here)You can also put the adjusting hardware to the top and add a bow and string to hang it on the wall. Paint, stain, tape or fabric are all fun ways to decorate a hoop. For best results stitch the project with a plain hoop. Then remove the outer hoop ring and apply any decorative product. After the hoop is dry re-hoop the fabric and finish the back. Finishing the Back If you choose to frame your embroidery in the hoop you will want to finish the back. To do this you will need a 30 inch long piece of sewing thread or a single strand of embroidery floss.To finish the back start by trimming the corners, leaving about an inch of fabric. Starting with your needle on the backside of the fabric, bring your needle up through the fabric about a quarter inch from the edge. Leave a three or four inch tail of thread to the inside. Continue to stitch a loose running stitch all the way around the hoop. Try to stay about a quarter of an inch away from the edge of the fabric.When you get back to your first stitch, pull the tail thread and the needle thread together. This will gather and bunch the fabric. Tie the two ends of thread together with a secure knot. Cut off any excess thread. You can use a little steam along the edges to help it lay flat. To completely cover the back you can cut a piece of felt the same size as the hoop and stitch it or glue it to the back. This pattern looks great on dish towels. Change up the colors to fit your theme or decor. Share Your Work! You did it, great job! Thank you so much for joining me on this stitch along project. If you enjoyed this pattern snap a photo of your finished piece and share it on social media. I love seeing your work and your unique take on patterns so don't forget to tag me. #wildflowerfoxink or #wildflowerfoxemb Follow me on Instagram Join me In the Hoop Get all of the latest news, tips & tutorials delivered right to your inbox!There is always something fun happening in the hoop. (function(d, s, id) { var js, fjs = d.getElementsByTagName(s)[0]; if (d.getElementById(id)) return; js = d.createElement(s); js.id = id; js.src = "//forms.aweber.com/form/34/2070590534.js"; fjs.parentNode.insertBefore(js, fjs); }(document, "script", "aweber-wjs-zm8f3nlw9"));
Also in Hand Embroidery Tutorials
Subscribe
Sign up to get the latest on sales, new releases and more …


